Ana içeriğe geç

Samsung Series 5 Ultrabook LCD Screen Replacement

Neye ihtiyacın var

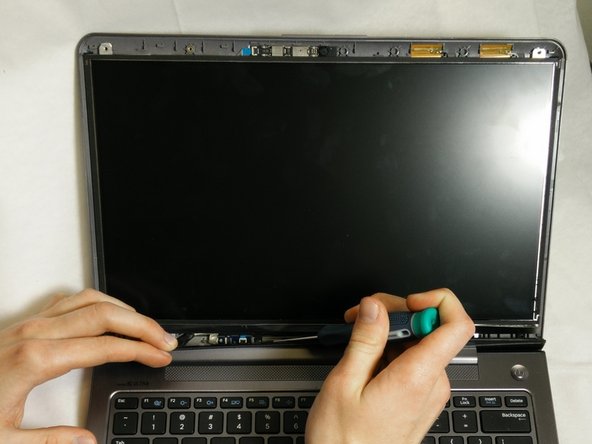
  1. Samsung Series 5 Ultrabook LCD Screen Replacement, Remove the Touchscreen: adım 1, 2 resimden 1. Samsung Series 5 Ultrabook LCD Screen Replacement, Remove the Touchscreen: adım 1, 2 resimden 2.
    • Before starting, make sure the device is powered off and unplugged to prevent electrocution.

    • Using a sharp object, pry the screen away from the back cover. Make sure to pry over the rubber rather than underneath as this can cause screws to break out.

    • This step is difficult! See if a friend will help you take the cover off as it is easier with two sets of hands pulling.

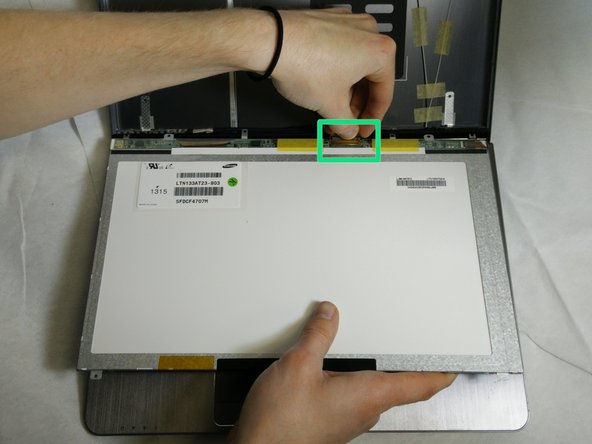
  2. Samsung Series 5 Ultrabook LCD Screen Replacement, Disconnect the Touchscreen: adım 2, 3 resimden 1. Samsung Series 5 Ultrabook LCD Screen Replacement, Disconnect the Touchscreen: adım 2, 3 resimden 2. Samsung Series 5 Ultrabook LCD Screen Replacement, Disconnect the Touchscreen: adım 2, 3 resimden 3.
    • There is a small, skinny wire leading from the bottom of the touchscreen to the joint of the laptop. Remove carefully with tweezers.

  3. Samsung Series 5 Ultrabook LCD Screen Replacement, Remove the Screen's Frame: adım 3, 1 resimden 1.
    • Remove the frame by unscrewing the two 3.7 mm screws at the top.

  4. Samsung Series 5 Ultrabook LCD Screen Replacement, Unscrew the Screen: adım 4, 2 resimden 1. Samsung Series 5 Ultrabook LCD Screen Replacement, Unscrew the Screen: adım 4, 2 resimden 2.
    • Unscrew the six 3.7 mm screws holding the screen in place.

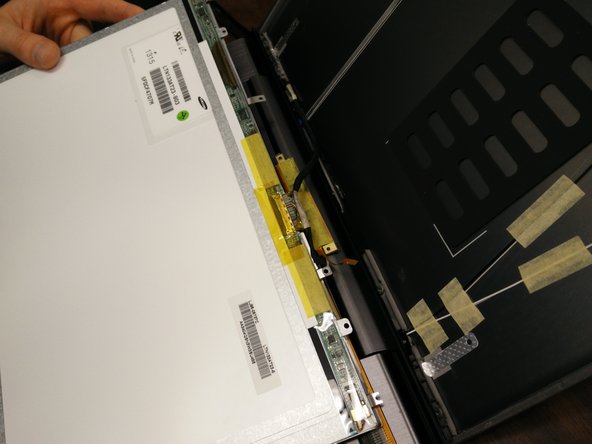
  5. Samsung Series 5 Ultrabook LCD Screen Replacement, Unplug the Video Connection: adım 5, 3 resimden 1. Samsung Series 5 Ultrabook LCD Screen Replacement, Unplug the Video Connection: adım 5, 3 resimden 2. Samsung Series 5 Ultrabook LCD Screen Replacement, Unplug the Video Connection: adım 5, 3 resimden 3.
    • Pull the screen down and remove the tape over the video connection.

    • Remove the video cables from the screen. This is easiest with tweezers.

  6. Samsung Series 5 Ultrabook LCD Screen Replacement, Remove the Old Screen: adım 6, 1 resimden 1.
    • Remove the old screen from its location.

Sonuç

To reassemble your device, follow these instructions in reverse order.

8 farklı kişi bu kılavuzu tamamladı.

Timothy

Üyelik tarihi: 01/30/15

1.579 İtibar

5 adet Kılavuz yazıldı

Ekip

USF Tampa, Team 16-3, Watkins Winter 2015 USF Tampa, Team 16-3, Watkins Winter 2015 üyesi

USFT-WATKINS-W15S16G3

4 Üyeler

5 adet Kılavuz yazıldı

3 Yorum

In order to access the screens 2 lower screws, using a plastic tool unclip the plastic hinge at its join.There are a few further clips at the far edges. The plastic cover can now be removed and will reveal the lcd and touchscreen connectors. This is best done BEFORE attempting to loosen the touchscreen. The top screen frame does not have to be removed in order to remove the lcd.

Guide proved useful when I needed to change the lcd cable due to hinge abrasion damage.

Maud Attrill - Yanıt

Is it possible to remove the plastic hinge to access the lcd connectors without taking the lcd screen off? I have an issue with intermittant screen graphics and think its a connector problem but can;t get to it

vibe builds roblox -

Hi,

Where to buy screen for this laptop.

Samsung 13.3” Series 5 Ultrabook

NP540U3C-A02AU

Sr No: HYTQ91DCA00002B

Roman - Yanıt

Yorum Ekle

İstatistikleri Görüntüle:

Son 24 Saat: 1

Son 7 gün: 6

Son 30 gün: 19

Her zaman: 15,085