Ana içeriğe geç

Sharp Aquos LC13B2UA Fuses Replacement

Neye ihtiyacın var

  1. Sharp Aquos LC13B2UA Fuses Replacement, Stand: adım 1, 2 resimden 1. Sharp Aquos LC13B2UA Fuses Replacement, Stand: adım 1, 2 resimden 2.
    • Place the TV face down on a flat smooth surface as to not scratch the screen.

    • Using a Phillips #2 screwdriver remove the four 8mm screws attaching the stand to the TV.

  2. Sharp Aquos LC13B2UA Fuses Replacement: adım 2, 2 resimden 1. Sharp Aquos LC13B2UA Fuses Replacement: adım 2, 2 resimden 2.
    • Lift the stand off the television.

  3. Sharp Aquos LC13B2UA Fuses Replacement, Back Case: adım 3, 3 resimden 1. Sharp Aquos LC13B2UA Fuses Replacement, Back Case: adım 3, 3 resimden 2. Sharp Aquos LC13B2UA Fuses Replacement, Back Case: adım 3, 3 resimden 3.
    • Remove the two back panels by prying them out with your hands.

  4. Sharp Aquos LC13B2UA Fuses Replacement: adım 4, 2 resimden 1. Sharp Aquos LC13B2UA Fuses Replacement: adım 4, 2 resimden 2.
    • Using a Phillips #2 screwdriver, remove the eight 6mm Phillips screws located around the edge.

    • Using a Phillips #2 screwdriver, remove the two 6mm Phillips screws located near the inputs.

  5. Sharp Aquos LC13B2UA Fuses Replacement: adım 5, 1 resimden 1.
    • Using your hands, gently lift and remove the back case of the television.

  6. Sharp Aquos LC13B2UA Fuses Replacement, Fuses: adım 6, 2 resimden 1. Sharp Aquos LC13B2UA Fuses Replacement, Fuses: adım 6, 2 resimden 2.
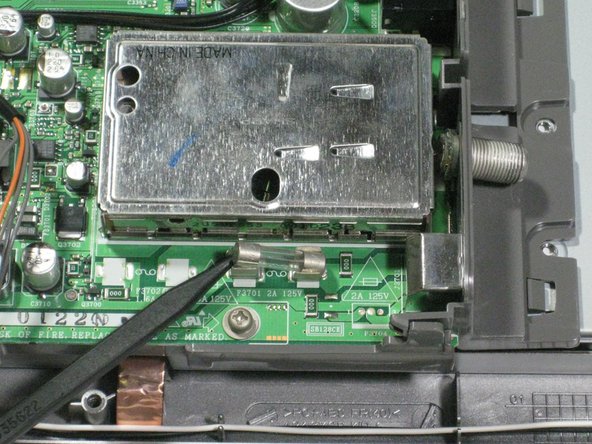
    • To identify a broken fuse, look at the thin wire running through the center of the fuse. If the wire is misshapen or broken, the fuse needs to be replaced.

    • To remove the fuse, either push from one side or pry gently with a spudger.

    • Make sure to replace the fuse with the correct amperage and voltage fuse. The correct voltage and amperage is displayed on the side of the fuse.

Sonuç

To reassemble your device, follow these instructions in reverse order.

Robert Hobson

Üyelik tarihi: 01/20/11

1.290 İtibar

9 adet Kılavuz yazıldı

Ekip

Cal Poly, Team 1-11, Amido Winter 2011 Cal Poly, Team 1-11, Amido Winter 2011 üyesi

CPSU-AMIDO-W11S1G11

4 Üyeler

9 adet Kılavuz yazıldı

Bir Yorum

I recently replaced a blown fuse on this model TV. When testing it with the back still off, the power light turned red, then green, then went off. Puzzling. It turned out that the back has to be on the TV and the screws have to be in (at least, the screws that make contact with metal parts). After that, all good.

atbatcat - Yanıt

Yorum Ekle

İstatistikleri Görüntüle:

Son 24 Saat: 0

Son 7 gün: 2

Son 30 gün: 17

Her zaman: 11,748