Ana içeriğe geç

Siemens Surpresso Outlet Valve repair

Neye ihtiyacın var

  1. Siemens Surpresso Outlet Valve repair, Opening the Siemens Surpresso Compact: adım 1, 1 resimden 1.
    • Unplug your coffee maker!

    • Remove the water container, the brew group and the drip tray with pomace container.

    • Using a spoon, remove as much of the coffee beans as possible from the coffee bean container.

    • Depending on the model, additional sensors with cables may be installed on the top and side panels. You have to remove these before you can completely remove the housing parts.

  2. Siemens Surpresso Outlet Valve repair: adım 2, 1 resimden 1.
    • Remove the two Torx T10 screws on the top.

  3. Siemens Surpresso Outlet Valve repair: adım 3, 2 resimden 1. Siemens Surpresso Outlet Valve repair: adım 3, 2 resimden 2.
    • Remove seven T10 Torx screws on the back.

    • The two screws at the bottom of the front can remain.

  4. Siemens Surpresso Outlet Valve repair: adım 4, 2 resimden 1. Siemens Surpresso Outlet Valve repair: adım 4, 2 resimden 2.
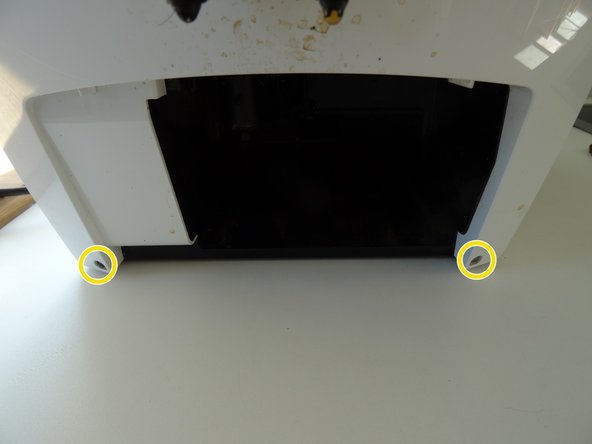
    • Press with a flat-head screwdriver into the openings on the side with the water tank. This releases the latches on the top.

    • Press the flat-head screwdriver into the opening on the side with the brew group. This will release the last notch on the top.

    • Lift the top off.

    • On some models, a cable leads to the sensor on the powder tray. Unplug the connector on this cable first.

  5. Siemens Surpresso Outlet Valve repair: adım 5, 2 resimden 1. Siemens Surpresso Outlet Valve repair: adım 5, 2 resimden 2.
    • Slide the side section of the brewing unit about 2 cm to the rear. This sometimes gets stuck and may require some force to remove.

    • Remove the two tabs from the power switch.

    • Take off the side panel with the brew group.

  6. Siemens Surpresso Outlet Valve repair: adım 6, 1 resimden 1.
    • Do the same with the panel on the other side.

    • To remove the water tank hose simply pull it of the pump.

    • Remove the side panel.

  7. Siemens Surpresso Outlet Valve repair, Outlet valve: adım 7, 1 resimden 1.
    • Look for the outlet valve on the top right of the device.

  8. Siemens Surpresso Outlet Valve repair: adım 8, 3 resimden 1. Siemens Surpresso Outlet Valve repair: adım 8, 3 resimden 2. Siemens Surpresso Outlet Valve repair: adım 8, 3 resimden 3.
    • There are three latches securing the valve lid. Carefully lift the lid up using a metal spudger.

    • Lifting the lid exposes a spring, a plunger and its holder, an O-ring and the seal of the plunger. The photo shows clearly the imprint of the valve seat, so the valve doesn't close properly. The plunger tends to break but the spare plunger in the repair kit is made of metal.

    • Note the order and orientation of the parts (photo).

    • Alternatively you can replace the complete valve, it's not too expensive.

Sonuç

To reassemble your device, follow these instructions in reverse order.

3 farklı kişi bu kılavuzu tamamladı.

Bu çevirmenlere özel teşekkürler:

de en

100%

Bu çevirmenler dünyayı onarmamıza yardım ediyor! Katkıda bulunmak ister misiniz?
Çeviriye Başlayın ›

VauWeh

Üyelik tarihi: 10/19/15

199.709 İtibar

246 adet Kılavuz yazıldı

Ekip

Repair is War on Entropy Repair is War on Entropy üyesi

Community

24 Üyeler

1.084 adet Kılavuz yazıldı

0 Yorum

Yorum Ekle

İstatistikleri Görüntüle:

Son 24 Saat: 3

Son 7 gün: 11

Son 30 gün: 73

Her zaman: 5,143