Ana içeriğe geç

Sony Alpha SLT-A55V LCD Display Replacement

Neye ihtiyacın var

  1. Sony Alpha SLT-A55V LCD Display Replacement, LCD Display: adım 1, 2 resimden 1. Sony Alpha SLT-A55V LCD Display Replacement, LCD Display: adım 1, 2 resimden 2.
    • The LCD screen is located on the back of the SLT-A55V.

    • The screen folds out and can be rotated to view in several orientations.

  2. Sony Alpha SLT-A55V LCD Display Replacement: adım 2, 1 resimden 1.
    • Start the replacement by removing the rear cover of the camera.

    • The rear cover is attached with several screws on four sides of the camera. On the left side there are two screws near the clip for the wrist strap.

  3. Sony Alpha SLT-A55V LCD Display Replacement: adım 3, 1 resimden 1.
    • On the same side as the previous step lift the rubber flap that covers USB and the HDMI ports.

    • Remove two screws.

  4. Sony Alpha SLT-A55V LCD Display Replacement: adım 4, 1 resimden 1.
    • Remove three screws from the right hand side of the case.

  5. Sony Alpha SLT-A55V LCD Display Replacement: adım 5, 1 resimden 1.
    • Remove the screw that attaches the focusing adjustment for the eyepiece. The focusing wheel will also be removed.

  6. Sony Alpha SLT-A55V LCD Display Replacement: adım 6, 1 resimden 1.
    • On the bottom of the camera remove seven screws indicated by the circles in the picture to the left.

  7. Sony Alpha SLT-A55V LCD Display Replacement: adım 7, 1 resimden 1.
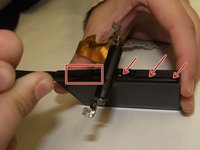
    • On the top of the camera there is a black plastic sticker that hides two screws which must be removed.

    • This sticker can be re-used. Peel the sticker off and place it on a clean piece of parchment paper or wax paper. This will prevent dirt and dust from getting on the adhesive.

    • Remove the two screws that lie beneath the sticker. The arrows indicate the location of these screws.

  8. Sony Alpha SLT-A55V LCD Display Replacement: adım 8, 1 resimden 1.
    • Using a nylon spudger, gently pry the cover open.

    • To do this step properly without damaging the back cover it is necessary to pry open the cover incrementally around the perimeter of the case.

  9. Sony Alpha SLT-A55V LCD Display Replacement: adım 9, 1 resimden 1.
    • After the cover has been opened, there are two ribbon cables connected to the back cover. These cables will be removed in the next step.

  10. Sony Alpha SLT-A55V LCD Display Replacement: adım 10, 1 resimden 1.
    • Using tweezers, gently remove the ribbon cables.

  11. Sony Alpha SLT-A55V LCD Display Replacement: adım 11, 1 resimden 1.
    • Unplug the ribbon cable indicated by the arrow on the left of the picture.

    • The arrow pointing to the black area indicates another sticker. This sticker will need to be removed in order to thread the ribbon cable through the back cover. This cable is attached to the LCD panel.

  12. Sony Alpha SLT-A55V LCD Display Replacement: adım 12, 2 resimden 1. Sony Alpha SLT-A55V LCD Display Replacement: adım 12, 2 resimden 2.
    • Using a nylon spudger, separate the LCD case the same way the main housing was separated.

  13. Sony Alpha SLT-A55V LCD Display Replacement: adım 13, 1 resimden 1.
    • Unplug the ribbon cable from the LCD screen.

    • Replace the LCD screen and re-assemble in reverse order of these steps.

Sonuç

To reassemble your device, follow these instructions in reverse order.

2 farklı kişi bu kılavuzu tamamladı.

Sultan Almunif

Üyelik tarihi: 09/26/15

357 İtibar

3 adet Kılavuz yazıldı

Ekip

IUPUI, Team 1-1, Wilson Fall 2015 IUPUI, Team 1-1, Wilson Fall 2015 üyesi

IUPUI-WILSON-F15S1G1

4 Üyeler

6 adet Kılavuz yazıldı

0 Yorum

Yorum Ekle

İstatistikleri Görüntüle:

Son 24 Saat: 1

Son 7 gün: 5

Son 30 gün: 33

Her zaman: 2,548