Giriş
Complete replacement of the outer case requires complete dissassembly of the camera. This is a good time to replace other components if needed.
Neye ihtiyacın var
-
-
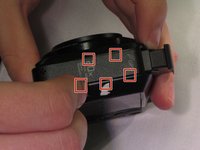
Orient the device so the bottom is facing up, and the lens is facing you ("bottom view").
-
-
-
-
Remove the black M1.4 X 3.5 Phillips head screw in upper right corner of the device.
-
Service manual for reference: Click to go to the service manual.
-
-
-
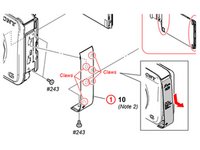
Discharge the capacitor by connecting the resistor jig between the highlighted squares.
-
-
-
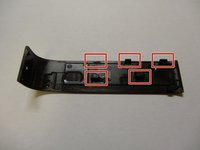
Remove the black M1.4 X 3.5 Phillips head screw in upper right corner of device.
-


To reassemble your device, follow these instructions in reverse order.
To reassemble your device, follow these instructions in reverse order.
İptal et: Bu kılavuzu tamamlamadım.
Bir başkası bu kılavuzu tamamladı.
Ekip

Eastern Washington University, Team 2-4, Matresse Spring 2015 Eastern Washington University, Team 2-4, Matresse Spring 2015 üyesi
EWU-MATRESSE-S15S2G4
4 Üyeler
10 adet Kılavuz yazıldı
2Kılavuz Yorumları
can i follow the same instruction for SONY DSC HX 10V .as both looks identical . when i shake my camera sound comes as if some parts are loosen but when i switched on my camera and the lens comes out that sound goes off . should i care for it or not ?
Thank you! Useful instructions.
Step 5 - perhaps a little more accurate step would be to lift up the bottom of the panel and then slide the panel downward. (reinstall in reverse direction).
I am having trouble orienting the control wheel - I tried to seat the middle button so it clicks and then set down the wheel on top but that does not seem to work after putting the back cover on. I’ve reopened and tried many times. Any suggestions on how to orient or reinstall the control wheel.