Ana içeriğe geç

Sony Cyber-shot DSC-HX9V Lens Replacement

Neye ihtiyacın var

  1. Sony Cyber-shot DSC-HX9V Lens Replacement, Battery: adım 1, 1 resimden 1.
    • Ensure the camera is powered off prior to removal of the battery. The LCD screen will have no information displayed if the camera is properly turned off.

    • Place the camera upside down with the top sitting on a flat surface.

    • Using your fingers, slide the door lock to the unlock position.

  2. Sony Cyber-shot DSC-HX9V Lens Replacement: adım 2, 1 resimden 1.
    • Open the battery compartment door.

    • Remove the battery from the compartment by turning the camera upside down and allow it to slide out. Be sure to catch the battery as it slides out.

    • If you are replacing internal camera parts, stop here. If you are replacing the old battery, continue with step 2.

    • Sony recommends the use of an approved battery for maximum performance. The recommended battery model number is NP-FG1.

    • Insert the new battery into the compartment matching the positive battery lead to the positive terminal and the negative battery lead to the negative terminal on the camera.

    • Close and lock the battery door and power the camera up. Ensure to check the battery charge levels and that all functions of the camera work properly.

  3. Sony Cyber-shot DSC-HX9V Lens Replacement, Rear Case: adım 3, 1 resimden 1.
    • The screws are very small and may become lost during removal. It is recommended to store the screws in a Ziplock bag or container until it is time to reassemble.

    • Place the camera on a towel while working on top of a desk or table.

    • Remove the five marked screws with a Phillips #000 screwdriver.

  4. Sony Cyber-shot DSC-HX9V Lens Replacement: adım 4, 1 resimden 1.
    • In addition, remove the two marked screws with a Phillips #000 screwdriver.

  5. Sony Cyber-shot DSC-HX9V Lens Replacement: adım 5, 1 resimden 1.
    • Slide the side cover downward once all screws are removed and place it to the side.

  6. Sony Cyber-shot DSC-HX9V Lens Replacement: adım 6, 1 resimden 1.
    • The marked screws will loosen the rear case and the LCD screen may shift. The use of a soft work surface will prevent the LCD screen from breaking if it accidently shifts during the removal process.

    • Remove the two marked screws with a Phillips #000 screwdriver.

  7. Sony Cyber-shot DSC-HX9V Lens Replacement: adım 7, 1 resimden 1.
    • Once all the screws are removed, partially lift the rear case upward and install a rubber band.

    • The LCD screen will be loose. The use of a tight fitting rubber band will prevent the LCD screen from sliding. The rubber band will only be temporary.

    • After installation of the rubber band, open the HDMI dust plug located on the right hand side of the camera and continue to tilt the rear case backwards until it is removed.

  8. Sony Cyber-shot DSC-HX9V Lens Replacement: adım 8, 1 resimden 1.
    • The control board will be loose. Take note to the orientation of the board to aid with installation.

    • Partially lift the control board up from the accessory cage.

  9. Sony Cyber-shot DSC-HX9V Lens Replacement: adım 9, 1 resimden 1.
    • Disconnect the control board data cable with care. Permanent damage may occur to the control board if tools are used to disconnect the data cable. Use your fingers only.

    • Disconnect the control board data cable by wiggling carefully with your fingertips. Set the control board to the side once it is disconnected.

  10. Sony Cyber-shot DSC-HX9V Lens Replacement, LCD Screen: adım 10, 1 resimden 1.
    • LCD screen is very fragile. Handle with care. Do not use tools to remove the screen.

    • The LCD screens rests against a metal plate. Lift the metal plate and LCD screen simultaneously until it is perpendicular to the camera.

  11. Sony Cyber-shot DSC-HX9V Lens Replacement: adım 11, 1 resimden 1.
    • Use caution when handling the data cable. Excessive force will permanently damage the cable.

    • Using one hand, carefully rock the data cable in a side to side motion to disconnect it from the mainboard. Ensure your other hand is holding the screen to prevent damage.

    • Store the LCD screen on a padded surface with the screen facing downward. This will prevent any damage to the screen if tools or items were accidently dropped on it.

  12. Sony Cyber-shot DSC-HX9V Lens Replacement, Lens: adım 12, 1 resimden 1.
    • Do not use excessive force to remove the lens data cable or permanent damage will occur to the cable.

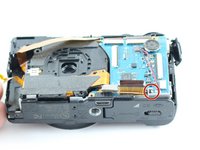
    • Disconnect the lens data cable from the mainboard by wiggling the dark brown locking tang in an alternate pattern between the marked locations. Push the lens data cable away from the mainboard. Use small movements until it is disconnected.

    • If you are unable to remove data cable with your fingers, a blue plastic spudger may be needed. Using small movements, alternate back and forth between the marked spots pushing the locking tang away from the mainboard until it disconnects.

  13. Sony Cyber-shot DSC-HX9V Lens Replacement: adım 13, 1 resimden 1.
    • Remove the lens motor by pulling it out of the marked compartment using your fingers. The motor does not have to be disconnected.

  14. Sony Cyber-shot DSC-HX9V Lens Replacement: adım 14, 2 resimden 1. Sony Cyber-shot DSC-HX9V Lens Replacement: adım 14, 2 resimden 2.
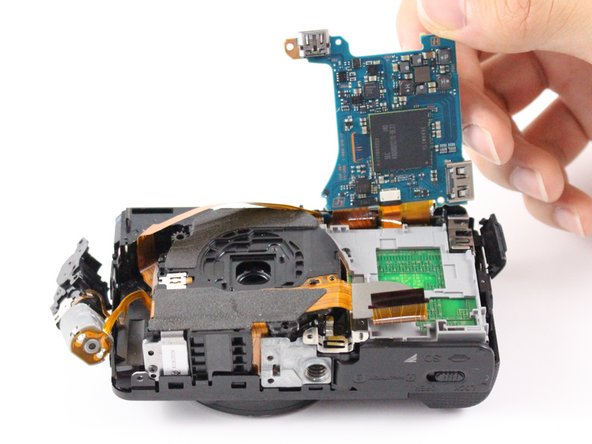
    • The mainboard is held in place by the marked locking tang. Using your fingers, push the locking tang away from the mainboard. If you cannot push with your fingers, a plastic spudger can be used instead.

    • Do not lift the mainboard past the perpendicular position. Permanent damage to the connected data cable may occur if the mainboard is pushed or pulled too far.

    • While holding the locking tang back, lift the mainboard to the perpendicular position.

  15. Sony Cyber-shot DSC-HX9V Lens Replacement: adım 15, 1 resimden 1.
    • While holding the mainboard in the perpendicular position, use your other hand to carefully lift the camera lens straight up and out of the case.

    • The lens data cable runs under the mainboard. Upon installation of the lens, route the lens data cable under the mainboard before you latch the mainboard down to the case.

Sonuç

To reassemble your device, follow these instructions in reverse order.

Bir başkası bu kılavuzu tamamladı.

Kris

Üyelik tarihi: 10/26/16

587 İtibar

4 adet Kılavuz yazıldı

Ekip

UW Tacoma, Team 1-2, Rose Fall 2016 UW Tacoma, Team 1-2, Rose Fall 2016 üyesi

UWT-ROSE-F16S1G2

4 Üyeler

12 adet Kılavuz yazıldı

3 Yorum

One step was skipped, prior to removing the mainboard you need to remove the CCD photodiode thing that plugs into the lens housing.

rezilient - Yanıt

Hello @jetblast Thanks for this repair guide. Flash of my HX9V is not working properly. It actaully popus up but doesn’t throw the white light. I got it checked in the Sony Service center and this is what they suggested me to change: http://prntscr.com/qidtm4 Can anyone identity these two parts and from where I can get them? Also, any repaid guide available on how to change the flash?

Raj - Yanıt

Lens flex cable need..is it available?

Subrata Kumar Ghatak - Yanıt

Yorum Ekle

İstatistikleri Görüntüle:

Son 24 Saat: 0

Son 7 gün: 5

Son 30 gün: 29

Her zaman: 3,919