Ana içeriğe geç
Sony Cyber-shot DSC-T1 LCD screen Replacement

Sony Cyber-shot DSC-T1 LCD screen Replacement

Paul Elrich

Paul Elrich ve 6 diğer katkıda bulunanlar

En son January 28, 2014 tarihinde güncellendi

15 - 20 dakika
Zor

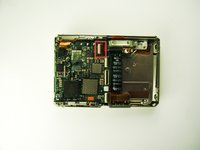
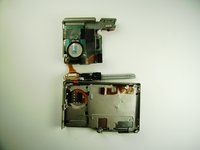
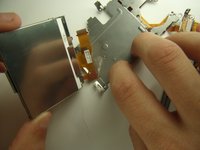
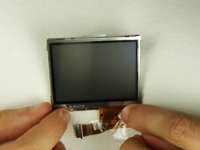
The LCD screen is an essential components to the camera that will allow view-back of images. It is required to first remove the battery, the CCD black plastic housing, and the motherboard to access the LCD screen.

Neye ihtiyacın var

Aletler

  1. Sony Cyber-shot DSC-T1 LCD screen Replacement, Battery: adım 1, 1 resimden 1.
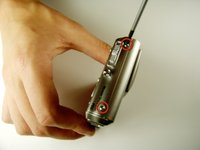
    • Locate the cover on the bottom of the camera.

    • Slide the cover towards the back of the camera.

    • Be careful—the battery can slide out on its own.

  2. Sony Cyber-shot DSC-T1 LCD screen Replacement: adım 2, 1 resimden 1.
    • Carefully remove the exposed battery.

    • If it is difficult to remove, flip over the camera and the battery will slide out.

  3. Sony Cyber-shot DSC-T1 LCD screen Replacement, Flash: adım 3, 3 resimden 1. Sony Cyber-shot DSC-T1 LCD screen Replacement, Flash: adım 3, 3 resimden 2. Sony Cyber-shot DSC-T1 LCD screen Replacement, Flash: adım 3, 3 resimden 3.
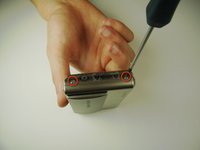
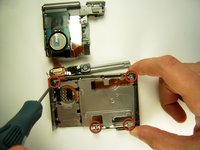
    • Locate and remove the 3mm screws on the top and sides of the camera with the size 00 screwdriver.

  4. Sony Cyber-shot DSC-T1 LCD screen Replacement: adım 4, 1 resimden 1.
    • Pull the two halves of the camera apart.

    • Place the two halves down with the insides facing you.

  5. Sony Cyber-shot DSC-T1 LCD screen Replacement: adım 5, 1 resimden 1.
    • Find the two clips holding the motherboard to the black lens box.

    • Slide the plastic opening tool in between the ribbon and the black part of the clip, then flip it. (If difficult, your fingernail can also be used)

  6. Sony Cyber-shot DSC-T1 LCD screen Replacement: adım 6, 1 resimden 1.
    • After releasing the clips, pull out black lens box.

  7. Sony Cyber-shot DSC-T1 LCD screen Replacement: adım 7, 2 resimden 1. Sony Cyber-shot DSC-T1 LCD screen Replacement: adım 7, 2 resimden 2.
    • Use the plastic opening tool to flip the clip.

  8. Sony Cyber-shot DSC-T1 LCD screen Replacement: adım 8, 2 resimden 1. Sony Cyber-shot DSC-T1 LCD screen Replacement: adım 8, 2 resimden 2.
    • Grab the white part and slide it to the right until it clicks.

    • This may require some force.

    • Pull out the flash.

  9. Sony Cyber-shot DSC-T1 LCD screen Replacement, LCD screen: adım 9, 1 resimden 1.
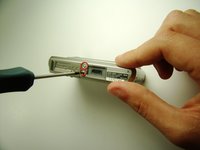
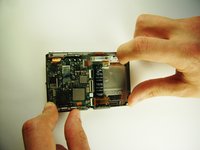
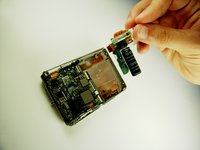
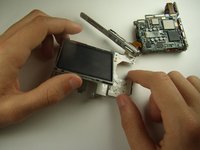
    • Use the plastic opening tool to flip the top clip that holds the ribbon to the motherboard unit.

  10. Sony Cyber-shot DSC-T1 LCD screen Replacement: adım 10, 2 resimden 1. Sony Cyber-shot DSC-T1 LCD screen Replacement: adım 10, 2 resimden 2.
    • Flip the motherboard unit up to expose the metal plate beneath it.

    • Remove the four 3mm screws shown using the 00 screwdriver.

  11. Sony Cyber-shot DSC-T1 LCD screen Replacement: adım 11, 1 resimden 1.
    • Lift and remove the metal plate covering the LCD screen from the camera.

  12. Sony Cyber-shot DSC-T1 LCD screen Replacement: adım 12, 3 resimden 1. Sony Cyber-shot DSC-T1 LCD screen Replacement: adım 12, 3 resimden 2. Sony Cyber-shot DSC-T1 LCD screen Replacement: adım 12, 3 resimden 3.
    • Flip the LCD over to the other side of the camera.

    • Peel the tape connecting the LCD to the camera.

    • Remove LCD screen

Sonuç

To reassemble your device, follow these instructions in reverse order.

2 farklı kişi bu kılavuzu tamamladı.

Paul Elrich

Üyelik tarihi: 04/12/12

45 İtibar

2 adet Kılavuz yazıldı

Ekip

Cal Poly, Team 7-35, Maness Spring 2012 Cal Poly, Team 7-35, Maness Spring 2012 üyesi

CPSU-MANESS-S12S7G35

4 Üyeler

3 adet Kılavuz yazıldı

0 Yorum

Yorum Ekle

İstatistikleri Görüntüle:

Son 24 Saat: 1

Son 7 gün: 6

Son 30 gün: 27

Her zaman: 3,814