Ana içeriğe geç

Sony Cyber-shot DSC-W150 LCD Screen Replacement

Neye ihtiyacın var

  1. Sony Cyber-shot DSC-W150 LCD Screen Replacement, Back Casing: adım 1, 1 resimden 1.
    • The screws from the camera are extremely small, so it is a good idea to have a small container to hold all the screws as you remove them.

  2. Sony Cyber-shot DSC-W150 LCD Screen Replacement: adım 2, 1 resimden 1.
    • Take your screwdriver and remove the four silver bottom screws of the camera.

    • The picture shows the lens facing away from you and the LCD facing you.

  3. Sony Cyber-shot DSC-W150 LCD Screen Replacement: adım 3, 1 resimden 1.
    • On the right side of the camera, remove the two silver screws using the screwdriver.

    • The picture shows the lens facing away from you and the LCD screen facing you.

  4. Sony Cyber-shot DSC-W150 LCD Screen Replacement: adım 4, 1 resimden 1.
    • On the left side of the camera, remove the two silver screws using the screwdriver.

    • The picture shows the lens facing away from you and the LCD screen facing you.

  5. Sony Cyber-shot DSC-W150 LCD Screen Replacement: adım 5, 1 resimden 1.
    • Gently detach the back cover by holding onto both sides of the camera and pulling them apart.

  6. Sony Cyber-shot DSC-W150 LCD Screen Replacement: adım 6, 1 resimden 1.
    • After detaching the back cover, carefully pull it off.

  7. Sony Cyber-shot DSC-W150 LCD Screen Replacement: adım 7, 1 resimden 1.
    • The back cover should now be separated from the camera.

  8. Sony Cyber-shot DSC-W150 LCD Screen Replacement, Front Casing: adım 8, 1 resimden 1.
    • Keep track of the small screws that you remove.

    • Opening, removing, and/or replacing the front casing may void your manufacturer's warranty.

  9. Sony Cyber-shot DSC-W150 LCD Screen Replacement: adım 9, 1 resimden 1.
    • Remove the two screws at the top of the camera casing.

  10. Sony Cyber-shot DSC-W150 LCD Screen Replacement: adım 10, 1 resimden 1.
    • After removing the screws, gently pop open the plastic piece, as shown by firmly pulling it with your fingers.

  11. Sony Cyber-shot DSC-W150 LCD Screen Replacement: adım 11, 1 resimden 1.
    • After popping open the plastic piece, there is a screw that needs to be removed.

    • Remove the screw connecting the front casing to the electrical components.

  12. Sony Cyber-shot DSC-W150 LCD Screen Replacement: adım 12, 1 resimden 1.
    • On the casing on the opposite side of the camera, gently loosen and remove the casing by firmly pulling with your fingers.

    • Be cautious not to break the fragile pieces or scratch the LCD screen.

  13. Sony Cyber-shot DSC-W150 LCD Screen Replacement: adım 13, 1 resimden 1.
    • Remove the two screws connecting the front casing to the electrical components using a screwdriver.

  14. Sony Cyber-shot DSC-W150 LCD Screen Replacement: adım 14, 1 resimden 1.
    • Gently loosen the front casing by gently using your fingers to pull it apart.

    • Be cautious not to scratch any of the exposed electrical components.

  15. Sony Cyber-shot DSC-W150 LCD Screen Replacement: adım 15, 1 resimden 1.
    • Fully remove the front casing from the camera and set it aside.

  16. Sony Cyber-shot DSC-W150 LCD Screen Replacement, LCD Screen: adım 16, 1 resimden 1.
    • The last screw is in the bottom left corner of the camera's right side.

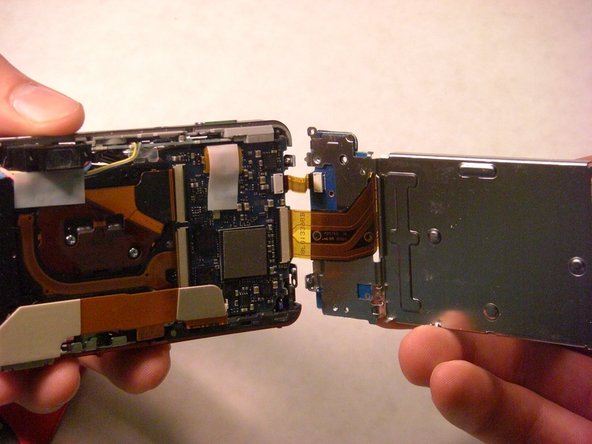
    • Using a screwdriver, remove the last screw holding the LCD/control panel to the rest of the camera on the right-hand side.

    • It is crucial for reassembly to track which screws were removed from which holes.

  17. Sony Cyber-shot DSC-W150 LCD Screen Replacement: adım 17, 2 resimden 1. Sony Cyber-shot DSC-W150 LCD Screen Replacement: adım 17, 2 resimden 2.
    • At this point, all screws on the left and right sides of the camera should be removed.

    • Paying careful attention to the right side's electrical wiring, gently pull the left side of the LCD plate away from the rest of the camera.

    • DO NOT detach the electrical wiring connecting the right side of the LCD and the camera.

  18. Sony Cyber-shot DSC-W150 LCD Screen Replacement: adım 18, 1 resimden 1.
    • This picture is used to identify the action required to release the electrical ribbons, but not the proper location for this step.

    • This step applies to the larger electrical ribbon connecting the LCD screen and circuit board.

    • Using a spudger, wedge the flat-tipped end between the black bar and the circuit board.

    • Carefully lift the black bar into the vertical position.

  19. Sony Cyber-shot DSC-W150 LCD Screen Replacement: adım 19, 1 resimden 1.
    • After raising the black bar, the electrical ribbon should be free from its port.

    • Use tweezers to carefully pull the larger electrical ribbon from its circuit board port.

  20. Sony Cyber-shot DSC-W150 LCD Screen Replacement: adım 20, 1 resimden 1.
    • The smaller electrical ribbon, to the left of the larger ribbon, does not have a black bar securing it in place.

    • Use tweezers to pull the smaller electrical ribbon carefully from its circuit board port.

  21. Sony Cyber-shot DSC-W150 LCD Screen Replacement: adım 21, 1 resimden 1.
    • Desolder the small electrical ribbon that connects the control panel to the LCD screen.

    • Now the LCD/control panel is completely removed from the part and ready to be replaced.

Sonuç

To reassemble your device, follow these instructions in reverse order.

4 farklı kişi bu kılavuzu tamamladı.

Brent Clavin

Üyelik tarihi: 04/15/10

90 İtibar

1 Kılavuz yazıldı

Ekip

Cal Poly, Team 33-73, Johann Spring 2010 Cal Poly, Team 33-73, Johann Spring 2010 üyesi

CPSU-JOHANN-S10S33G73

3 Üyeler

2 adet Kılavuz yazıldı

0 Yorum

Yorum Ekle

İstatistikleri Görüntüle:

Son 24 Saat: 0

Son 7 gün: 2

Son 30 gün: 21

Her zaman: 9,947