Ana içeriğe geç

Sony Handycam CX260V Battery Port Replacement

Neye ihtiyacın var

  1. Sony Handycam CX260V Battery Port Replacement, Sony Handycam CX260V Housing Disassembly: adım 1, 1 resimden 1.
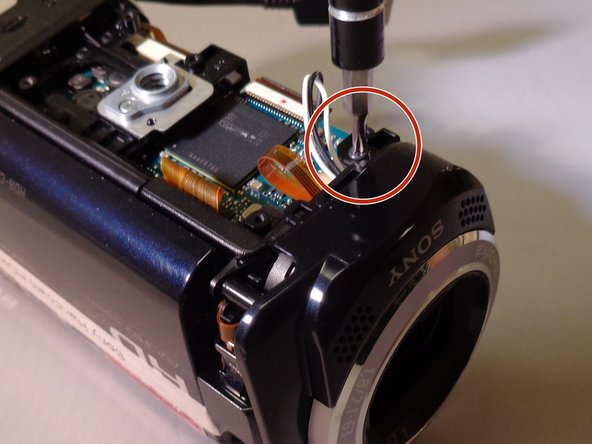
    • Use a Phillips #00 screwdriver to remove the one 3mm and two 5mm screws located in the battery assembly area.

  2. Sony Handycam CX260V Battery Port Replacement: adım 2, 1 resimden 1.
    • Remove the two 5mm screws located on the top left and bottom of the camera.

    • Remove the 3mm screw located in the middle of the joint attaching the LCD screen to the device.

  3. Sony Handycam CX260V Battery Port Replacement: adım 3, 1 resimden 1.
    • Remove the two 5mm screws from the panel to the right of the LCD screen.

  4. Sony Handycam CX260V Battery Port Replacement: adım 4, 1 resimden 1.
    • Use the plastic opening tool to remove the cover for the recording buttons.

  5. Sony Handycam CX260V Battery Port Replacement: adım 5, 1 resimden 1.
    • Remove the five 5mm screws located on the bottom panel.

    • Remove the bottom panel covering the internal motherboard.

  6. Sony Handycam CX260V Battery Port Replacement: adım 6, 1 resimden 1.
    • Remove the 5mm screw located by the lens and two 5mm screws located under the handle.

    • Remove the leather strap from the device.

  7. Sony Handycam CX260V Battery Port Replacement: adım 7, 1 resimden 1.
    • Remove the 5mm screw to the left of the Record button.

    • Remove the entire right-side panel where the leather strap was located.

  8. Sony Handycam CX260V Battery Port Replacement: adım 8, 1 resimden 1.
    • Use a spudger to remove the LCD joint cover.

  9. Sony Handycam CX260V Battery Port Replacement: adım 9, 2 resimden 1. Sony Handycam CX260V Battery Port Replacement: adım 9, 2 resimden 2.
    • Remove the three black 5mm screws and one silver 4mm screw located on the front right-side of the camera, near the orange motherboard.

    • The silver screw is located on the front right-side of the camera and is attached to the main panel.

  10. Sony Handycam CX260V Battery Port Replacement: adım 10, 1 resimden 1.
    • Remove the 5mm screw located on the top left near the camera lens.

  11. Sony Handycam CX260V Battery Port Replacement: adım 11, 1 resimden 1.
    • Using tweezers, carefully detach the two wires connected to the bottom motherboard portion of the camera.

    • One white wire, one black wire, and one flat yellow wire are connected to the lens panel.

    • Remove the lens panel.

  12. Sony Handycam CX260V Battery Port Replacement: adım 12, 1 resimden 1.
    • Remove the three 5mm screws.

    • One is located at the bottom of the lens area, and the other two are on the top left and right of the lens area.

    • Carefully remove the camera lens with your hands or a spudger.

    • There are three springs located underneath the lens. Make sure to not lose them.

  13. Sony Handycam CX260V Battery Port Replacement: adım 13, 1 resimden 1.
    • Remove one 5mm screw located on the back left section near the zoom and picture control capturing button.

    • There are two flat blue wires keeping the buttons connected to the main assembly. Carefully set them aside or unplug them.

    • This partially removes the zoom and picture capturing control.

  14. Sony Handycam CX260V Battery Port Replacement: adım 14, 1 resimden 1.
    • Remove one silver 5mm screw located near the tripod mount.

    • Remove the tripod mount screw that has the mount assembly underneath.

  15. Sony Handycam CX260V Battery Port Replacement: adım 15, 1 resimden 1.
    • Remove the silver 5mm screw located on the front right side of the camera by the orange motherboard.

    • Unplug the wire.

    • Remove the silver 5mm screw underneath the wire.

  16. Sony Handycam CX260V Battery Port Replacement: adım 16, 1 resimden 1.
    • Using tweezers, release the clip attaching the main internal system to the mainframe. This allows the rest of the camera to be freely taken apart.

    • The side panel will have cords running through the frame. If you unplug these, the frame will be removable.

  17. Sony Handycam CX260V Battery Port Replacement, Battery Port: adım 17, 2 resimden 1. Sony Handycam CX260V Battery Port Replacement, Battery Port: adım 17, 2 resimden 2.
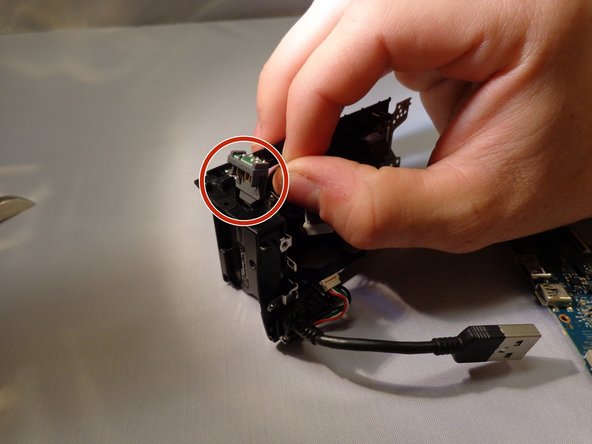
    • Unplug the battery port connected to the frame/motherboard. Remove the battery port.

Sonuç

To reassemble your device, follow these instructions in reverse order.

4 farklı kişi bu kılavuzu tamamladı.

0 Yorum

Yorum Ekle

İstatistikleri Görüntüle:

Son 24 Saat: 0

Son 7 gün: 0

Son 30 gün: 5

Her zaman: 293