Bu sürüm, hatalı düzenlemeler içerebilir. En son doğrulanmış bellek kopyası dönün.
Neye ihtiyacın var
-
Bu adım çevrilmemiş. Çevrilmesine yardım edin
-
Use a Phillips #00 screwdriver to remove the one 3mm and two 5mm screws located in the battery assembly area.
-
-
Bu adım çevrilmemiş. Çevrilmesine yardım edin
-
Remove the two 5mm screws located on the top left and bottom of the camera.
-
Remove the 3mm screw located in the middle of the joint attaching the LCD screen to the device.
-
-
Bu adım çevrilmemiş. Çevrilmesine yardım edin
-
Remove the two 5mm screws from the panel to the right of the LCD screen.
-
-
Bu adım çevrilmemiş. Çevrilmesine yardım edin
-
Use the plastic opening tool to remove the cover for the recording buttons.
-
-
Bu adım çevrilmemiş. Çevrilmesine yardım edin
-
Remove the five 5mm screws located on the bottom panel.
-
Remove the bottom panel covering the internal motherboard.
-
-
Bu adım çevrilmemiş. Çevrilmesine yardım edin
-
Remove the 5mm screw located by the lens and two 5mm screws located under the handle.
-
Remove the leather strap from the device.
-
-
Bu adım çevrilmemiş. Çevrilmesine yardım edin
-
Remove the 5mm screw to the left of the Record button.
-
Remove the entire right-side panel where the leather strap was located.
-
-
-
Bu adım çevrilmemiş. Çevrilmesine yardım edin
-
Remove the three black 5mm screws and one silver 4mm screw located on the front right-side of the camera, near the orange motherboard.
-
-
Bu adım çevrilmemiş. Çevrilmesine yardım edin
-
Remove the 5mm screw located on the top left near the camera lens.
-
-
Bu adım çevrilmemiş. Çevrilmesine yardım edin
-
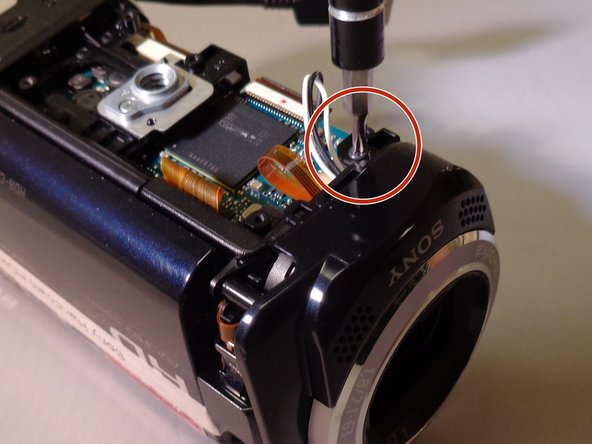
Using tweezers, carefully detach the two wires connected to the bottom motherboard portion of the camera.
-
Remove the lens panel.
-
-
Bu adım çevrilmemiş. Çevrilmesine yardım edin
-
Remove the three 5mm screws.
-
Carefully remove the camera lens with your hands or a spudger.
-
-
Bu adım çevrilmemiş. Çevrilmesine yardım edin
-
Remove one 5mm screw located on the back left section near the zoom and picture control capturing button.
-
There are two flat blue wires keeping the buttons connected to the main assembly. Carefully set them aside or unplug them.
-
-
Bu adım çevrilmemiş. Çevrilmesine yardım edin
-
Remove one silver 5mm screw located near the tripod mount.
-
Remove the tripod mount screw that has the mount assembly underneath.
-
-
Bu adım çevrilmemiş. Çevrilmesine yardım edin
-
Remove the silver 5mm screw located on the front right side of the camera by the orange motherboard.
-
Unplug the wire.
-
Remove the silver 5mm screw underneath the wire.
-
-
Bu adım çevrilmemiş. Çevrilmesine yardım edin
-
Using tweezers, release the clip attaching the main internal system to the mainframe. This allows the rest of the camera to be freely taken apart.
-
-
Bu adım çevrilmemiş. Çevrilmesine yardım edin
-
Unscrew near the front LCD joint of the camera 2 black 5mm screws and 1 black 3mm screw.
-
-
Bu adım çevrilmemiş. Çevrilmesine yardım edin
-
Using a screwdriver unscrew 1 black 5mm screw from the mother board.
-
-
Bu adım çevrilmemiş. Çevrilmesine yardım edin
-
Slightly angle the mother board and remove the LCD screen by unplugging the remaining orange wire from the mother board. Removes the LCD screen and wire assembly connected to the mother board.
-


İptal et: Bu kılavuzu tamamlamadım.
3 farklı kişi bu kılavuzu tamamladı.
Ekip

Eastern Washington University, Team 1-5, Plummer Spring 2015 Eastern Washington University, Team 1-5, Plummer Spring 2015 üyesi
EWU-PLUMMER-S15S1G5
4 Üyeler
12 adet Kılavuz yazıldı