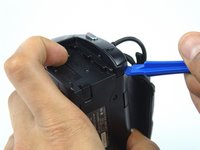
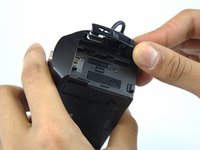
Ana içeriğe geç

Sony Handycam HDR-CX675 Camera Shell Replacement

Neye ihtiyacın var

  1. Sony Handycam HDR-CX675 Camera Shell Replacement, Camera Shell: adım 1, 1 resimden 1.
    • The battery should be removed and oriented upwards.

  2. Sony Handycam HDR-CX675 Camera Shell Replacement: adım 2, 1 resimden 1.
    • Remove the side 4.5 mm JIS #00 screw using JIS Screwdriver

    • Remove the 5.5 mm JIS #00 screw.

  3. Sony Handycam HDR-CX675 Camera Shell Replacement: adım 3, 2 resimden 1. Sony Handycam HDR-CX675 Camera Shell Replacement: adım 3, 2 resimden 2.
    • Gently pry the plastic case surrounding the start/stop button free by using the blue plastic opening tools.

    • Remove the casing using your thumb and index finger.

  4. Sony Handycam HDR-CX675 Camera Shell Replacement: adım 4, 1 resimden 1.
    • Turn the camera around and flip open the LCD screen to expose the side panel.

    • Remove the 5.5mm #00 screw using the J00 head screwdriver.

  5. Sony Handycam HDR-CX675 Camera Shell Replacement: adım 5, 1 resimden 1.
    • Turn the camera to the handgrip side and unscrew two of the 5.5mm JIS #00 head screws using the JIS #00 head screwdriver.

  6. Sony Handycam HDR-CX675 Camera Shell Replacement: adım 6, 1 resimden 1.
    • Remove the two 5.5mm JIS #00 screws with the bottom of the camera facing up.

  7. Sony Handycam HDR-CX675 Camera Shell Replacement: adım 7, 1 resimden 1.
    • Turn the camera around in a way that the bottom of the camera is facing you.

    • Use the blue opening tool to gently remove the camera shell off of the camera.

Sonuç

To reassemble your device, follow these instructions in reverse order.

5 farklı kişi bu kılavuzu tamamladı.

Mohamed Nazer

Üyelik tarihi: 02/15/17

403 İtibar

3 adet Kılavuz yazıldı

Ekip

USF Tampa, Team 8-2, Eyestone Spring 2017 USF Tampa, Team 8-2, Eyestone Spring 2017 üyesi

USFT-EYESTONE-S17S8G2

3 Üyeler

8 adet Kılavuz yazıldı

0 Yorum

Yorum Ekle

İstatistikleri Görüntüle:

Son 24 Saat: 0

Son 7 gün: 5

Son 30 gün: 9

Her zaman: 727