Ana içeriğe geç

Sony Handycam HDR-CX675 Lens Cover Panel Replacement

Neye ihtiyacın var

  1. Sony Handycam HDR-CX675 Lens Cover Panel Replacement, Camera Shell: adım 1, 1 resimden 1.
    • The battery should be removed and oriented upwards.

  2. Sony Handycam HDR-CX675 Lens Cover Panel Replacement: adım 2, 1 resimden 1.
    • Remove the side 4.5 mm JIS #00 screw using JIS Screwdriver

    • Remove the 5.5 mm JIS #00 screw.

  3. Sony Handycam HDR-CX675 Lens Cover Panel Replacement: adım 3, 2 resimden 1. Sony Handycam HDR-CX675 Lens Cover Panel Replacement: adım 3, 2 resimden 2.
    • Gently pry the plastic case surrounding the start/stop button free by using the blue plastic opening tools.

    • Remove the casing using your thumb and index finger.

  4. Sony Handycam HDR-CX675 Lens Cover Panel Replacement: adım 4, 1 resimden 1.
    • Turn the camera around and flip open the LCD screen to expose the side panel.

    • Remove the 5.5mm #00 screw using the J00 head screwdriver.

  5. Sony Handycam HDR-CX675 Lens Cover Panel Replacement: adım 5, 1 resimden 1.
    • Turn the camera to the handgrip side and unscrew two of the 5.5mm JIS #00 head screws using the JIS #00 head screwdriver.

  6. Sony Handycam HDR-CX675 Lens Cover Panel Replacement: adım 6, 1 resimden 1.
    • Remove the two 5.5mm JIS #00 screws with the bottom of the camera facing up.

  7. Sony Handycam HDR-CX675 Lens Cover Panel Replacement: adım 7, 1 resimden 1.
    • Turn the camera around in a way that the bottom of the camera is facing you.

    • Use the blue opening tool to gently remove the camera shell off of the camera.

  8. Sony Handycam HDR-CX675 Lens Cover Panel Replacement, Lens Cover Panel: adım 8, 1 resimden 1.
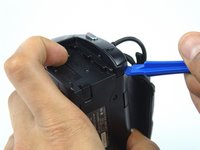
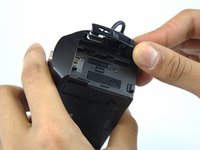
    • Using the blue plastic opener smoothly to take the camera shell off.

  9. Sony Handycam HDR-CX675 Lens Cover Panel Replacement: adım 9, 2 resimden 1. Sony Handycam HDR-CX675 Lens Cover Panel Replacement: adım 9, 2 resimden 2.
    • Let the lens of the camera be pointed to your left.

    • Keep holding the camera with your right hand then gently remove the lens cover panel with your left hand.

Sonuç

To reassemble your device, follow these instructions in reverse order.

Laith Al Hinai

Üyelik tarihi: 02/15/17

161 İtibar

1 Kılavuz yazıldı

Ekip

USF Tampa, Team 8-2, Eyestone Spring 2017 USF Tampa, Team 8-2, Eyestone Spring 2017 üyesi

USFT-EYESTONE-S17S8G2

3 Üyeler

8 adet Kılavuz yazıldı

0 Yorum

Yorum Ekle

İstatistikleri Görüntüle:

Son 24 Saat: 0

Son 7 gün: 0

Son 30 gün: 4

Her zaman: 800