Giriş
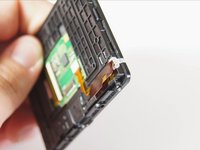
This guide will show you how to unscrew the LCD screen housing from the back of the camera and disconnect the screen's circuitry from the circuitry of the rest of the camera. This requires using a Phillips #00 screwdriver and a plastic opening tool to remove the screen. It is very helpful to use a magnetic pad to organize and keep track of all the screws removed from the camera.
Neye ihtiyacın var
-
-
Remove the two 4.0 mm Phillips #00 screws on the base of the camera.
-
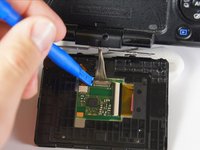
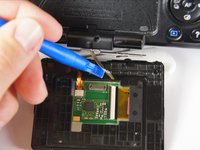
Remove the 3.0 mm Phillips #00 screw on the hinge of the screen.
-
-


To reassemble your device, follow these instructions in reverse order.
İptal et: Bu kılavuzu tamamlamadım.
8 farklı kişi bu kılavuzu tamamladı.
Ekip

Cal Poly, Team 14-11, Amido Spring 2015 Cal Poly, Team 14-11, Amido Spring 2015 üyesi
CPSU-AMIDO-S15S14G11
4 Üyeler
13 adet Kılavuz yazıldı
4Kılavuz Yorumları
my father used to repair black and white tv in the 80's here in the country of PERU, so I thought, my father repairs tv I must have inherited the skill so I will repair my a77v camera, result = I messed up more xD.
At the moment the screen did not emit an image, it went all black, when I uncovered the screen I found a pcb which was missing a component, I started cleaning with a toothbrush and 2 more components came off, I could not identify if they are resistors, capacitors or diodes, I looked for the schematic on the web but I didn't find anything related, could you help me identify which components are missing? Is there a way to upload an image here to show where they came off? I will be very grateful, ATTE: a friend from Peru.
Thanks for the Tutorial, I miss however the Part Number for a new disolay and maybe a source where to buy.
Regards
Willie
Das hat wunderbar funktioniert. Man darf nicht grob beim Aufschrauben sein, vor allen Dingen, wenn man das Gehäuse öffnet. Die Kabel darin sind sehr empfindlich. Vielen Dank! Die Displays gibt es für kleines Geld im Onlinehandel.