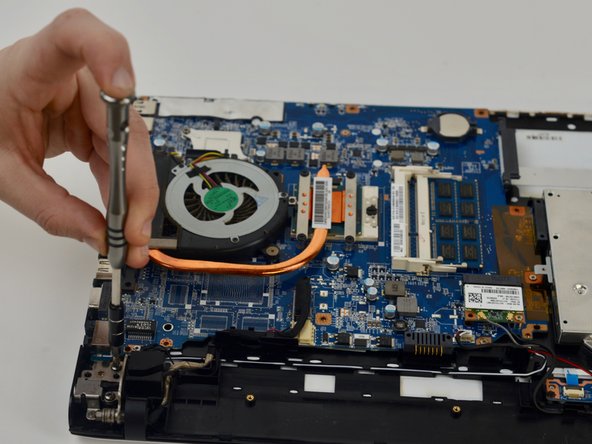
Ana içeriğe geç

Sony Vaio SVE151G11L Webcam Replacement

Neye ihtiyacın var

  1. Sony Vaio SVE151G11L Webcam Replacement, Battery: adım 1, 1 resimden 1.
    • Turn the laptop over so its underside is facing upwards and visible.

  2. Sony Vaio SVE151G11L Webcam Replacement: adım 2, 1 resimden 1.
    • Standing so that the barcode and warning labels are upright and legible, push the left tab up and away from yourself.

  3. Sony Vaio SVE151G11L Webcam Replacement: adım 3, 1 resimden 1.
    • Standing so that the barcode and warning labels are upright and legible, push the right tab up and away from yourself.

  4. Sony Vaio SVE151G11L Webcam Replacement: adım 4, 1 resimden 1.
    • Locate the small gap where the battery and the laptop shell meet. Lift from the gap and rotate the battery up and away from yourself.

  5. Sony Vaio SVE151G11L Webcam Replacement: adım 5, 1 resimden 1.
    • Pull battery away from laptop.

  6. Sony Vaio SVE151G11L Webcam Replacement, Display: adım 6, 1 resimden 1.
    • Flip laptop over so the bottom is facing upwards.

    • Remove bottom of laptop.

  7. Sony Vaio SVE151G11L Webcam Replacement: adım 7, 1 resimden 1.
    • Remove antenna wires attached to the WiFi card using a plastic opening tool.

  8. Sony Vaio SVE151G11L Webcam Replacement: adım 8, 1 resimden 1.
    • Remove the other antenna wire.

  9. Sony Vaio SVE151G11L Webcam Replacement: adım 9, 1 resimden 1.
    • Remove the display cable by pulling upwards.

  10. Sony Vaio SVE151G11L Webcam Replacement: adım 10, 1 resimden 1.
    • Remove the power display cable with a plastic opening tool by pushing outwards.

  11. Sony Vaio SVE151G11L Webcam Replacement: adım 11, 2 resimden 1. Sony Vaio SVE151G11L Webcam Replacement: adım 11, 2 resimden 2.
    • Remove 4 hinge screws with a Phillips #0 screwdriver.

  12. Sony Vaio SVE151G11L Webcam Replacement: adım 12, 2 resimden 1. Sony Vaio SVE151G11L Webcam Replacement: adım 12, 2 resimden 2.
    • Lift upward on the hinges with a plastic opening tool to release them.

  13. Sony Vaio SVE151G11L Webcam Replacement: adım 13, 1 resimden 1.
    • Separate the bottom of the laptop from the monitor.

  14. Sony Vaio SVE151G11L Webcam Replacement: adım 14, 1 resimden 1.
    • Completely detach screen from the laptop.

  15. Sony Vaio SVE151G11L Webcam Replacement, Webcam: adım 15, 1 resimden 1.
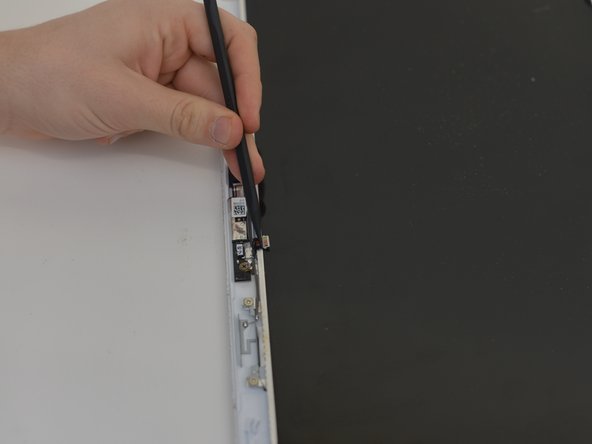
    • Remove the rubber nipples to expose the screws using the pointed side of the spudger.

  16. Sony Vaio SVE151G11L Webcam Replacement: adım 16, 1 resimden 1.
    • Remove each of the screws revealed from the step below with a P00 screwdriver.

  17. Sony Vaio SVE151G11L Webcam Replacement: adım 17, 2 resimden 1. Sony Vaio SVE151G11L Webcam Replacement: adım 17, 2 resimden 2.
    • Pop open display housing and follow the plastic to remove the screen.

  18. Sony Vaio SVE151G11L Webcam Replacement: adım 18, 2 resimden 1. Sony Vaio SVE151G11L Webcam Replacement: adım 18, 2 resimden 2.
    • Remove the camera cable with the spudger.

  19. Sony Vaio SVE151G11L Webcam Replacement: adım 19, 1 resimden 1.
    • Remove screws on both sides using a P000 screwdriver.

  20. Sony Vaio SVE151G11L Webcam Replacement: adım 20, 1 resimden 1.
    • Pop out the board using a spudger.

  21. Sony Vaio SVE151G11L Webcam Replacement: adım 21, 1 resimden 1.
    • The board is now removed.

Sonuç

To reassemble your device, follow these instructions in reverse order.

Azka Khanani

Üyelik tarihi: 10/17/18

313 İtibar

2 adet Kılavuz yazıldı

Ekip

UMass Dartmouth, Team S9-G9, Valliere Fall 2018 UMass Dartmouth, Team S9-G9, Valliere Fall 2018 üyesi

UMASSD-VALLIERE-F18S9G9

4 Üyeler

12 adet Kılavuz yazıldı

0 Yorum

Yorum Ekle

İstatistikleri Görüntüle:

Son 24 Saat: 1

Son 7 gün: 2

Son 30 gün: 5

Her zaman: 1,040