Ana içeriğe geç

Sony Xperia Z3 LCD & Digitizer Replacement

Neye ihtiyacın var

  1. Sony Xperia Z3 LCD & Digitizer Replacement, Back Cover: adım 1, 3 resimden 1. Sony Xperia Z3 LCD & Digitizer Replacement, Back Cover: adım 1, 3 resimden 2. Sony Xperia Z3 LCD & Digitizer Replacement, Back Cover: adım 1, 3 resimden 3.
    • Heat the back cover of your Xperia Z3 to loosen the adhesive underneath.

    • If you use an iOpener, follow these instructions for use.

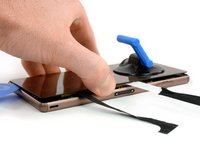
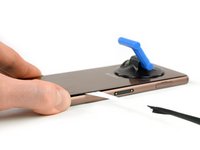
    • Lift up the back cover with a suction handle and put an opening pick in the gap.

    • Move the pick carefully around the edges to loosen the adhesive on every side of the phone.

    • Don't put the pick in too deep under the back cover to not damage any parts inside the phone.

  2. Sony Xperia Z3 LCD & Digitizer Replacement: adım 2, 2 resimden 1. Sony Xperia Z3 LCD & Digitizer Replacement: adım 2, 2 resimden 2.
    • There are two adhesive strips in the center of the phone connecting the rear case to the battery, you'll need to remove them to open the phone.

    • When the edges of the cover are free from adhesive, tilt it to allow access to the battery tabs.

    • Use tweezers to pull the two black adhesive strips out of the phone but don't pull just yet.

  3. Sony Xperia Z3 LCD & Digitizer Replacement: adım 3, 2 resimden 1. Sony Xperia Z3 LCD & Digitizer Replacement: adım 3, 2 resimden 2.
    Bu adımda kullanılan alet:
    Plastic Cards
    $2.99
    Satın Al
    • Gently pull out both of the adhesive tabs out of the phone, parallel to the rear cover.

    • If the adhesive tabs break, try to use a thin flat plastic tool such as a plastic card to remove the last of the adhesive. If the adhesive is stubborn, heat it with an iOpener or hair dryer and pry again.

  4. Sony Xperia Z3 LCD & Digitizer Replacement: adım 4, 2 resimden 1. Sony Xperia Z3 LCD & Digitizer Replacement: adım 4, 2 resimden 2.
    • After pulling out the adhesive tabs, you can lift the back cover and remove it.

  5. Sony Xperia Z3 LCD & Digitizer Replacement, Battery: adım 5, 2 resimden 1. Sony Xperia Z3 LCD & Digitizer Replacement, Battery: adım 5, 2 resimden 2.
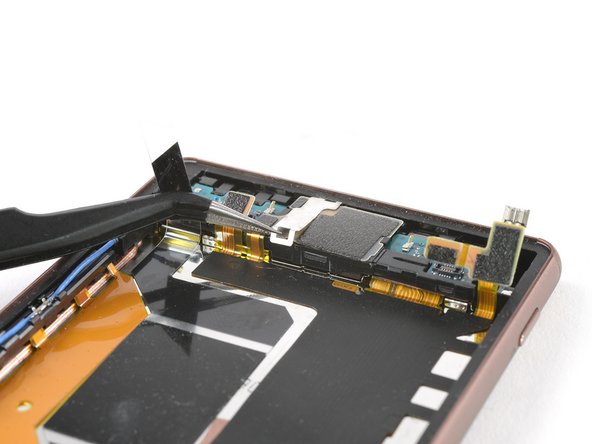
    • Unplug the battery flex connector.

    • Use a tweezer to gently pull off the adhesive strip on the bottom part of the battery.

  6. Sony Xperia Z3 LCD & Digitizer Replacement: adım 6, 2 resimden 1. Sony Xperia Z3 LCD & Digitizer Replacement: adım 6, 2 resimden 2.
    • Use a spudger on the left side of the frame to lever out the battery.

    • Be careful with the spudger - there are cables beneath the battery!

    • Remove the battery.

  7. Sony Xperia Z3 LCD & Digitizer Replacement, Display Prereq: adım 7, 1 resimden 1.
    • Unscrew the two Phillips #00 screws.

  8. Sony Xperia Z3 LCD & Digitizer Replacement: adım 8, 3 resimden 1. Sony Xperia Z3 LCD & Digitizer Replacement: adım 8, 3 resimden 2. Sony Xperia Z3 LCD & Digitizer Replacement: adım 8, 3 resimden 3.
    • Unplug the antenna cable with a tweezer.

    • Use a Spudger to unplug the main flex connector and the flex connector of the vibration motor.

  9. Sony Xperia Z3 LCD & Digitizer Replacement: adım 9, 3 resimden 1. Sony Xperia Z3 LCD & Digitizer Replacement: adım 9, 3 resimden 2. Sony Xperia Z3 LCD & Digitizer Replacement: adım 9, 3 resimden 3.
    • Remove the cover on top of the loudspeaker assembly.

    • Use a spudger to pull out the vibration motor and remove its rubber gasket with a tweezer.

  10. Sony Xperia Z3 LCD & Digitizer Replacement: adım 10, 3 resimden 1. Sony Xperia Z3 LCD & Digitizer Replacement: adım 10, 3 resimden 2. Sony Xperia Z3 LCD & Digitizer Replacement: adım 10, 3 resimden 3.
    • Use a tweezer to remove the adhesive strip of the loudspeaker assembly.

    • Pull up the metal clamp at the upper end of the loudspeaker assembly by using a tweezer and remove it.

  11. Sony Xperia Z3 LCD & Digitizer Replacement: adım 11, 3 resimden 1. Sony Xperia Z3 LCD & Digitizer Replacement: adım 11, 3 resimden 2. Sony Xperia Z3 LCD & Digitizer Replacement: adım 11, 3 resimden 3.
    • Lift up the main flex cable covering the loudspeaker assembly with a Spudger

    • Take care to not damage the loudspeaker. The flex cable is attached to the assembly with adhesive and is a little bit sticky.

    • Lift up the whole loudspeaker assembly with a spudger and remove it.

  12. Sony Xperia Z3 LCD & Digitizer Replacement: adım 12, 2 resimden 1. Sony Xperia Z3 LCD & Digitizer Replacement: adım 12, 2 resimden 2.
    • Use a spudger to lift up the end of the main flex.

    • Remove the bronze foil covering the connector of the main flex with a tweezer.

  13. Sony Xperia Z3 LCD & Digitizer Replacement: adım 13, 3 resimden 1. Sony Xperia Z3 LCD & Digitizer Replacement: adım 13, 3 resimden 2. Sony Xperia Z3 LCD & Digitizer Replacement: adım 13, 3 resimden 3.
    • Lift up the metal plate which is placed beneath the loudspeaker assembly and remove it.

    • Unplug the main flex cable.

    • Use a tweezer to remove the yellow adhesive foil covering the display flex cable.

  14. Sony Xperia Z3 LCD & Digitizer Replacement, LCD & Digitizer: adım 14, 3 resimden 1. Sony Xperia Z3 LCD & Digitizer Replacement, LCD & Digitizer: adım 14, 3 resimden 2. Sony Xperia Z3 LCD & Digitizer Replacement, LCD & Digitizer: adım 14, 3 resimden 3.
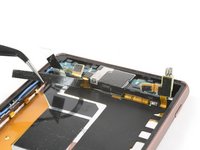
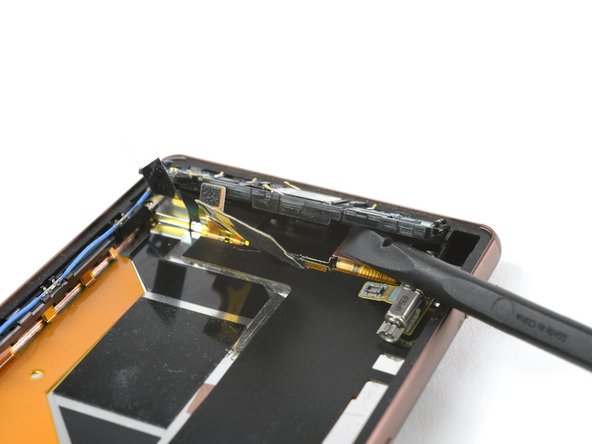
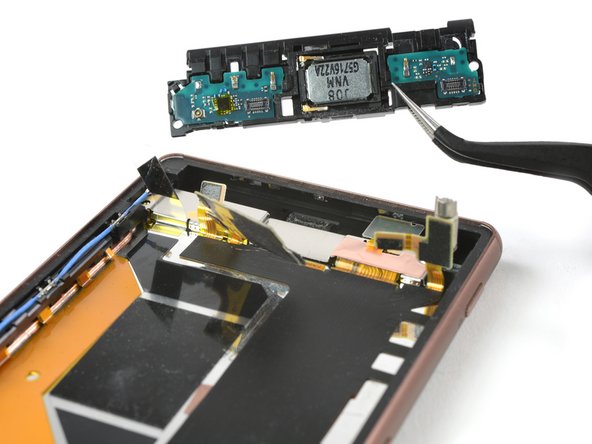
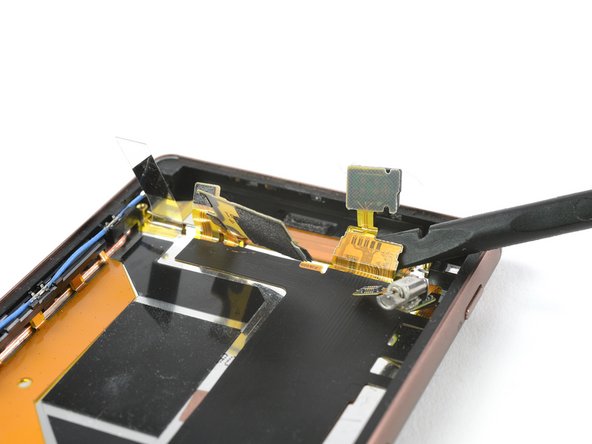
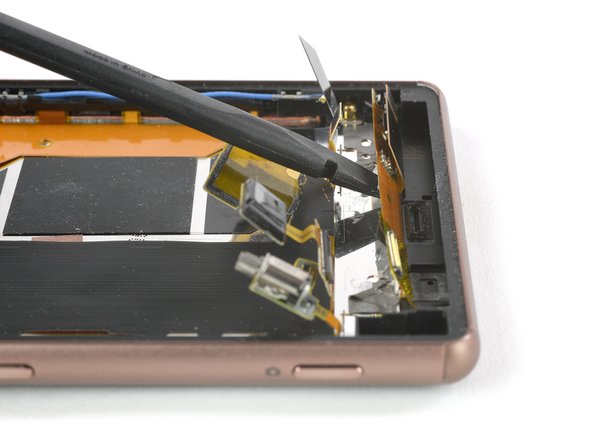
    • Use a spudger to gently slide beneath the display flex cable and lift it up.

  15. Sony Xperia Z3 LCD & Digitizer Replacement: adım 15, 2 resimden 1. Sony Xperia Z3 LCD & Digitizer Replacement: adım 15, 2 resimden 2.
    • Use an iOpener to loosen the adhesive underneath the display of your phone.

    • The stickiest areas are in the upper and lower area of your display. After cooling down, the adhesive will stick to the mid frame again. If needed reheat it.

    • After the adhesive at the lower end of your phone is loosened, pull up the display with your suction handle and insert an opening pick.

  16. Sony Xperia Z3 LCD & Digitizer Replacement: adım 16, 3 resimden 1. Sony Xperia Z3 LCD & Digitizer Replacement: adım 16, 3 resimden 2. Sony Xperia Z3 LCD & Digitizer Replacement: adım 16, 3 resimden 3.
    • After loosening the adhesive in the lower area of your phone with an opening pick, insert an other opening pick approximately 1/16 of an inch and slide it along both sides of the phone to sparate the display from the frame.

    • Take care! While you're loosening the adhesive beneath the upper part of your phone, do not insert the opening pick too deep between the display and the mid frame. The earpiece is placed right beneath the "Sony" Logo and you don't want to damage it.

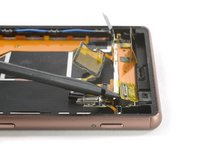
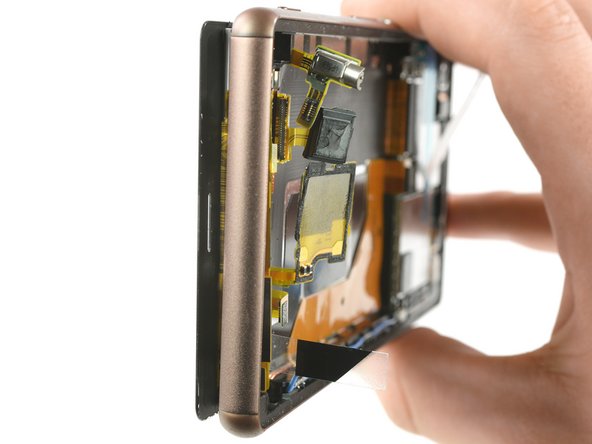
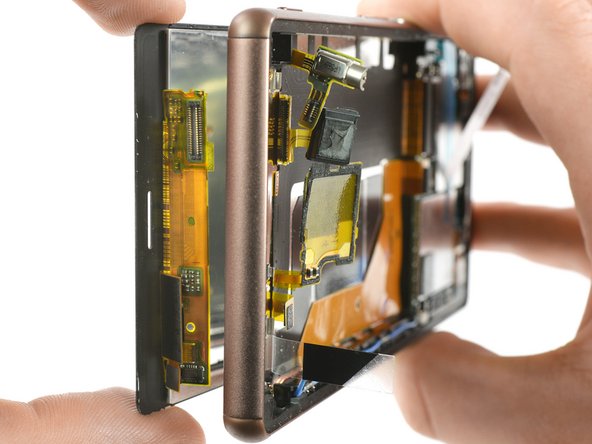
    • After loosening all the adhesive beneath the display twist the opening pick in the lower end of your phone a little bit to lift up the display.

  17. Sony Xperia Z3 LCD & Digitizer Replacement: adım 17, 3 resimden 1. Sony Xperia Z3 LCD & Digitizer Replacement: adım 17, 3 resimden 2. Sony Xperia Z3 LCD & Digitizer Replacement: adım 17, 3 resimden 3.
    • To fully remove the display off your phone, you need to thread the display flex cable through the gap of the mid frame in the bottom end of your phone.

    • Take care of all the connectors of the main flex cable hanging around and of course the display flex cable itself.

  18. Sony Xperia Z3 LCD & Digitizer Replacement: adım 18, 2 resimden 1. Sony Xperia Z3 LCD & Digitizer Replacement: adım 18, 2 resimden 2.
    • If you didn't manage to keep the earpiece in its place while removing the display you have to remove it now.

    • The earpiece is extremely sticky and might be damaged while removing it.

    • Use an iOpener to soften the glue, then use an opening pick to slide between the the earpiece and the display and carefully take off the earpiece speaker.

    • When reassembling put the earpiece speaker back on the frontside of your phone.

Sonuç

To reassemble your device, follow these instructions in reverse order.

37 farklı kişi bu kılavuzu tamamladı.

Dominik Schnabelrauch

Üyelik tarihi: 11/23/16

201.039 İtibar

682 adet Kılavuz yazıldı

Ekip

iFixit iFixit üyesi

Staff

136 Üyeler

16.561 adet Kılavuz yazıldı

7 Yorum

What website is best to obtain a genuine screen and back from?

Stephen Stanley - Yanıt

Do I need a new adhesive sticker to put the backcover back on?

Josua - Yanıt

The back cover won’t fall off Josua but I would definitely recommend new adhesive!

Dominik Schnabelrauch -

But only for the phone to be waterproof? Because mine is definitely not waterproof anymore.. So I think this wouldn’t make any difference.

Josua -

In our case the back cover just held semi tight to the phone assembly without new adhesive. It could happen that the back cover falls off, when you pull the phone out of your pocket or you drop it. New adhesive also protects your phone from dust which can cause overheating.

Dominik Schnabelrauch -

Yorum Ekle

İstatistikleri Görüntüle:

Son 24 Saat: 0

Son 7 gün: 20

Son 30 gün: 110

Her zaman: 42,852