Bu sürüm, hatalı düzenlemeler içerebilir. En son doğrulanmış bellek kopyası dönün.
Neye ihtiyacın var
-
Bu adım çevrilmemiş. Çevrilmesine yardım edin
-
Heat the back cover of your Xperia Z3 to loosen the adhesive underneath.
-
Lift up the back cover with a suction handle and put an opening pick in the gap.
-
Move the pick carefully around the edges to loosen the adhesive on every side of the phone.
-
-
Bu adım çevrilmemiş. Çevrilmesine yardım edin
-
When the edges of the cover are free from adhesive, tilt it to allow access to the battery tabs.
-
Use tweezers to pull the two black adhesive strips out of the phone but don't pull just yet.
-
-
Bu adım çevrilmemiş. Çevrilmesine yardım edin
-
Gently pull out both of the adhesive tabs out of the phone, parallel to the rear cover.
-
-
Bu adım çevrilmemiş. Çevrilmesine yardım edin
-
After pulling out the adhesive tabs, you can lift the back cover and remove it.
-
-
Bu adım çevrilmemiş. Çevrilmesine yardım edin
-
Unplug the battery flex connector.
-
Use a tweezer to gently pull off the adhesive strip on the bottom part of the battery.
-
-
Bu adım çevrilmemiş. Çevrilmesine yardım edin
-
Use a spudger on the left side of the frame to lever out the battery.
-
Remove the battery.
-
-
Bu adım çevrilmemiş. Çevrilmesine yardım edin
-
Unplug the antenna cable with a tweezer.
-
Use a Spudger to unplug the main flex connector and the flex connector of the vibration motor.
-
-
Bu adım çevrilmemiş. Çevrilmesine yardım edin
-
Remove the cover on top of the loudspeaker assembly.
-
Use a spudger to pull out the vibration motor and remove its rubber gasket with a tweezer.
-
-
Bu adım çevrilmemiş. Çevrilmesine yardım edin
-
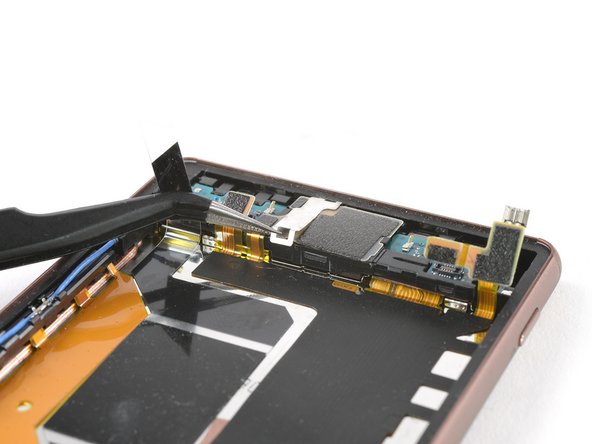
Use a tweezer to remove the adhesive strip of the loudspeaker assembly.
-
Pull up the metal clamp at the upper end of the loudspeaker assembly by using a tweezer and remove it.
-
-
Bu adım çevrilmemiş. Çevrilmesine yardım edin
-
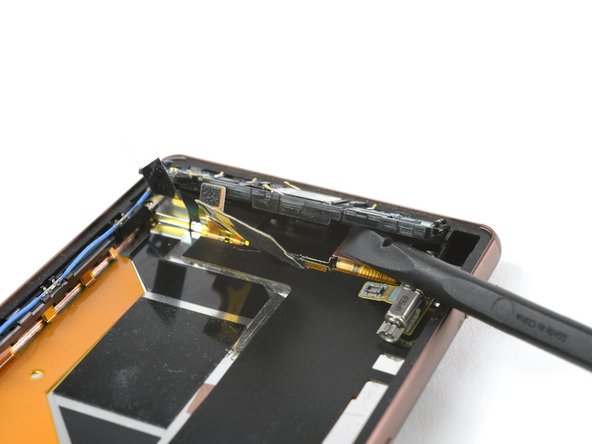
Lift up the main flex cable covering the loudspeaker assembly with a Spudger
-
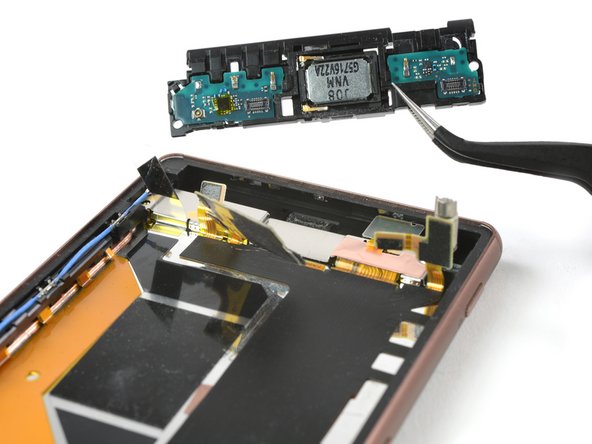
Lift up the whole loudspeaker assembly with a spudger and remove it.
-
-
Bu adım çevrilmemiş. Çevrilmesine yardım edin
-
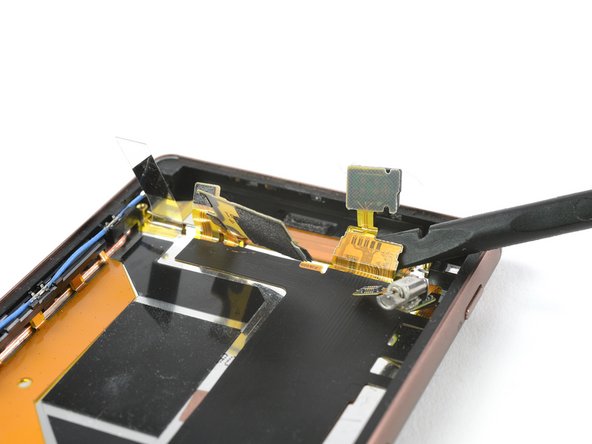
Use a spudger to lift up the end of the main flex.
-
Remove the bronze foil covering the connector of the main flex with a tweezer.
-
-
Bu adım çevrilmemiş. Çevrilmesine yardım edin
-
Lift up the metal plate which is placed beneath the loudspeaker assembly and remove it.
-
Unplug the main flex cable.
-
Use a tweezer to remove the yellow adhesive foil covering the display flex cable.
-
-
Bu adım çevrilmemiş. Çevrilmesine yardım edin
-
Use a pair of tweezers to peel the blue foil off the motherboard.
-
-
-
Bu adım çevrilmemiş. Çevrilmesine yardım edin
-
Use a pair of tweezers to remove the black plastic bracket below the camera in the top left corner of the phone.
-
-
Bu adım çevrilmemiş. Çevrilmesine yardım edin
-
Use a pair of tweezers to remove the black plastic cover from the right edge of the motherboard.
-
-
Bu adım çevrilmemiş. Çevrilmesine yardım edin
-
Use a spudger to pry up and disconnect the magnetic charging flex cable
-
-
Bu adım çevrilmemiş. Çevrilmesine yardım edin
-
Use a spudger to pry up and disconnect the main flex cable.
-
-
Bu adım çevrilmemiş. Çevrilmesine yardım edin
-
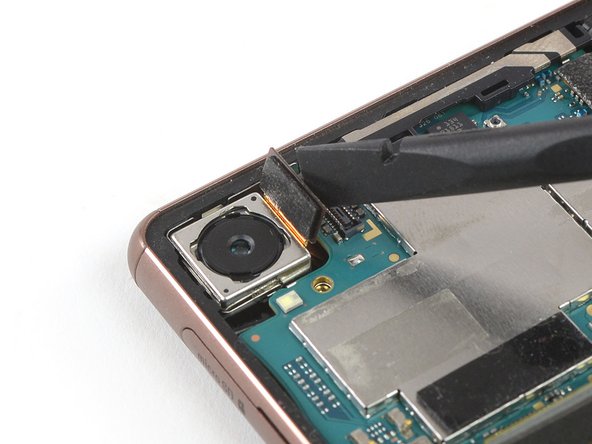
Use a spudger to pry up and disconnect the rear camera flex cable.
-
-
Bu adım çevrilmemiş. Çevrilmesine yardım edin
-
Use a pair of tweezers to lift the rear camera out of its recess and remove it.
-
-
Bu adım çevrilmemiş. Çevrilmesine yardım edin
-
Use a spudger to pry up the plastic cover at the top edge of the motherboard and remove it with a pair of tweezers.
-
-
Bu adım çevrilmemiş. Çevrilmesine yardım edin
-
Use a spudger to pry up and disconnect the headphone jack and microphone flex cable in the top right corner.
-
-
Bu adım çevrilmemiş. Çevrilmesine yardım edin
-
Use a pair of tweezers to carefully pry up and disconnect the antenna cable at the bottom right of the motherboard.
-
-
Bu adım çevrilmemiş. Çevrilmesine yardım edin
-
Insert the flat end of a spudger into the gap between the midframe and the left edge of the motherboard.
-
Use the spudger to carefully lever up the motherboard until you can get a good grip.
-
-
Bu adım çevrilmemiş. Çevrilmesine yardım edin
-
Use a pair of tweezers to remove the black plastic spacer next to the earpiece speaker.
-
-
Bu adım çevrilmemiş. Çevrilmesine yardım edin
-
Use a pair of tweezers to remove the earpiece speaker by carefully prying it out from its left where the spacer was before.
-
-
Bu adım çevrilmemiş. Çevrilmesine yardım edin
-
Use a pair of tweezers to pry up and remove the white plastic piece next to the headphone jack.
-
-
Bu adım çevrilmemiş. Çevrilmesine yardım edin
-
Apply a heated iOpener to the upper end of the screen to loosen the adhesive beneath the headphone jack. Apply the iOpener for at least two minutes.
-
-
Bu adım çevrilmemiş. Çevrilmesine yardım edin
-
Use a pair of tweezers to pry up the black plastic cover on top of the headphone jack.
-
-
Bu adım çevrilmemiş. Çevrilmesine yardım edin
-
Use a pair of tweezers to pull the headphone jack out of its recess and remove it.
-
-
Bu adım çevrilmemiş. Çevrilmesine yardım edin
-
Use a pair of tweezers to pry the blue antenna cable out of the brackets on the edge of the phone and remove it.
-
-
Bu adım çevrilmemiş. Çevrilmesine yardım edin
-
Use a spudger to pry up and disconnect the main flex cable from the display flex connector located at the bottom of the phone.
-
-
Bu adım çevrilmemiş. Çevrilmesine yardım edin
-
Use one arm of a pair of tweezers to pry the topmost gray plastic cover out of its recess on the left edge of the midframe.
-
Remove the plastic cover.
-
-
Bu adım çevrilmemiş. Çevrilmesine yardım edin
-
Use the same procedure to loosen the gray plastic cover below the previous one.
-
Carefully pull up the the cover until it is freed and not blocked by the midframe.
-
-
Bu adım çevrilmemiş. Çevrilmesine yardım edin
-
Use a pair of tweezers and carefully pry the top left part of the main flex cable away from the midframe.
-
-
Bu adım çevrilmemiş. Çevrilmesine yardım edin
-
Flip the phone over and apply a heated iOpener to the right side of the screen to loosen the adhesive beneath the main flex cable. Apply the iOpener for at least two minutes.
-
-
Bu adım çevrilmemiş. Çevrilmesine yardım edin
-
Flip the phone back over and use a pair of tweezers to carefully peel the main flex cable off the midframe.
-
Remove the main flex cable.
-
-
Bu adım çevrilmemiş. Çevrilmesine yardım edin
-
On the right edge of the phone use a pair of tweezers to pry the magnetic charging cable out of its recess.
-
-
Bu adım çevrilmemiş. Çevrilmesine yardım edin
-
Apply a heated iOpener to the left side of the screen to loosen the adhesive beneath the magnetic charging cable. Apply the iOpener for at least two minutes.
-
-
Bu adım çevrilmemiş. Çevrilmesine yardım edin
-
Carefully peel the magnetic charging cable off the midframe and remove it.
-
-
Bu adım çevrilmemiş. Çevrilmesine yardım edin
-
Compare your new replacement part to the original—you may need to transfer remaining components such as the protective foil in the earpiece speaker recess or remove adhesive backings from the new part before installing.
-


İptal et: Bu kılavuzu tamamlamadım.
3 farklı kişi bu kılavuzu tamamladı.

