Ana içeriğe geç

Steam Deck Fan Replacement

Neye ihtiyacın var

  1. Steam Deck Fan Replacement, Prepare your Steam Deck for disassembly: adım 1, 3 resimden 1. Steam Deck Fan Replacement, Prepare your Steam Deck for disassembly: adım 1, 3 resimden 2. Steam Deck Fan Replacement, Prepare your Steam Deck for disassembly: adım 1, 3 resimden 3.
    • Turn on your Steam Deck and allow the battery to discharge below 25% before starting your repairs, as a charged lithium-ion polymer battery can be dangerous if accidentally punctured.

    • As an extra precaution, Valve recommends putting your Steam Deck into battery storage mode within the BIOS before starting any internal repairs. Read how to do that here.

    • Power down your Steam Deck and unplug any cables.

    • If you have a microSD card installed, make sure to remove it before opening the Steam Deck. If you attempt to remove the back cover with it still installed, it could snap right in half.

    • During your repair, it can be helpful at times to lay the Steam Deck face-down into its case to protect the thumbsticks and prevent wobble.

  2. Steam Deck Fan Replacement, Remove the back cover screws: adım 2, 1 resimden 1.
    Bu adımda kullanılan alet:
    FixMat
    $36.95
    Satın Al
    • Use a Phillips driver to remove the eight screws securing the back cover:

    • Four coarse thread 9.5 mm-long screws

    • Four fine thread 5.8 mm-long screws

    • Despite the standards, Phillips screwdrivers can vary in size and shape—two drivers labeled as the same size may fit differently in the same screw. Use the size that fits the snuggest into the screw head.

    • Throughout this repair, keep track of each screw and make sure it goes back exactly where it came from to avoid damaging your Steam Deck.

  3. Steam Deck Fan Replacement, Unclip the back cover: adım 3, 2 resimden 1. Steam Deck Fan Replacement, Unclip the back cover: adım 3, 2 resimden 2.
    • Insert an opening pick into the thin gap between the back cover and the front shell, along the edge of the right grip.

    • If you're having trouble inserting your pick at the grip seam, try starting at either the top or bottom long edges first, then slide the pick towards the grip.

    • Pry up on the back cover to release it from the locking clips.

  4. Steam Deck Fan Replacement, Remove the back cover: adım 4, 3 resimden 1. Steam Deck Fan Replacement, Remove the back cover: adım 4, 3 resimden 2. Steam Deck Fan Replacement, Remove the back cover: adım 4, 3 resimden 3.
    • Once the clips are disconnected from one edge, the rest disconnect easily.

    • Grip the back cover at the opening you just created and pull it up and away from the device to unclip the long edges.

    • Remove the back cover.

  5. Steam Deck Fan Replacement, Uncover the hidden shield screw: adım 5, 2 resimden 1. Steam Deck Fan Replacement, Uncover the hidden shield screw: adım 5, 2 resimden 2.
    • If you have a refreshed Steam Deck version with the black motherboard cover, skip this step.

    • Use a pair of tweezers to remove the piece of foil tape covering the hidden screw on the board shield.

    • If possible, try not to rip or tear this tape so it can be reused. If necessary, you can fashion a replacement by cutting a piece of aluminum foil tape to fit.

  6. Steam Deck Fan Replacement, Remove the shield screws: adım 6, 2 resimden 1. Steam Deck Fan Replacement, Remove the shield screws: adım 6, 2 resimden 2.
    • Use a Phillips driver to remove the three screws securing the board shield:

    • One 3.4 mm screw

    • Two 3.7 mm screws

    • Only the two 3.7 mm screws along the left edge are present in refreshed Steam Decks.

  7. Steam Deck Fan Replacement, Remove the shield: adım 7, 3 resimden 1. Steam Deck Fan Replacement, Remove the shield: adım 7, 3 resimden 2. Steam Deck Fan Replacement, Remove the shield: adım 7, 3 resimden 3.
    • Remove the board shield.

    • Depending on the age of your Steam Deck, this shield may stick to the thermal pads underneath.

    • During reassembly, ensure that the fan cable lays on the side of the board shield and isn't pinched underneath.

  8. Steam Deck Fan Replacement, Disconnect the battery: adım 8, 3 resimden 1. Steam Deck Fan Replacement, Disconnect the battery: adım 8, 3 resimden 2. Steam Deck Fan Replacement, Disconnect the battery: adım 8, 3 resimden 3.
    • Grip the battery cable by its pull tab and pull it directly away from the motherboard to disconnect it.

    • Alternatively, use the flat end of a spudger or a clean fingernail to gently push the connector out of its socket, then disconnect it completely by hand.

  9. Steam Deck Fan Replacement, Remove the heatsink sticker: adım 9, 3 resimden 1. Steam Deck Fan Replacement, Remove the heatsink sticker: adım 9, 3 resimden 2. Steam Deck Fan Replacement, Remove the heatsink sticker: adım 9, 3 resimden 3.
    • Use a pair of tweezers to remove the sticker from the top edge of the fan.

    • If possible, try not to rip or tear this sticker so it can be reused. Use a little bit of heat if necessary to soften the adhesive.

    • If the sticker feels like it might tear, use tweezers to peel up one edge just until you can grip it with your fingers, then remove the rest by hand.

  10. Steam Deck Fan Replacement, Disconnect the fan: adım 10, 3 resimden 1. Steam Deck Fan Replacement, Disconnect the fan: adım 10, 3 resimden 2. Steam Deck Fan Replacement, Disconnect the fan: adım 10, 3 resimden 3.
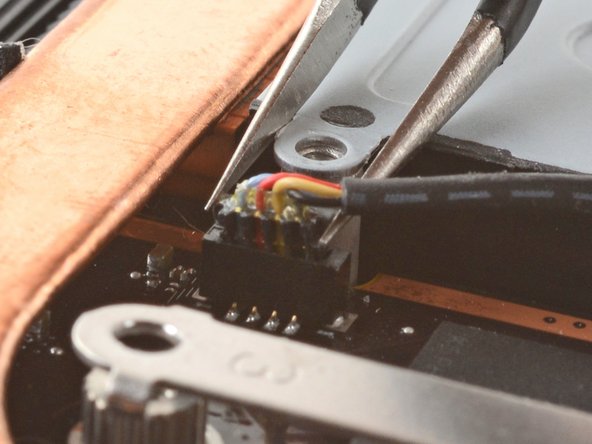
    • Use a pair of tweezers to grip the edges of the fan connector and pull up to disconnect it from the motherboard.

    • Pull the fan cable by its connector, not the wires themselves.

    • During reassembly, be gentle while plugging in the fan connector.

    • If the connector is misaligned, the use of too much force can damage the fragile internal pins.

  11. Steam Deck Fan Replacement, Remove the fan screws: adım 11, 1 resimden 1.
    • Use a Phillips driver to remove the two 3.7 mm screws securing the fan.

    • No, your eyes don't deceive you! The other two fan screws were removed earlier in the disassembly: they double as two back cover screws.

  12. Steam Deck Fan Replacement, Remove the fan: adım 12, 1 resimden 1.
    • Remove the fan.

    • When installing a replacement fan, peel off the plastic liner on the cable adhesive and adhere it to the fan body in the same location as the cable on the old fan, so it'll lay on the side of the board shield and not get pinched underneath.

Sonuç

To reassemble your device, follow these instructions in reverse order.

Take your e-waste to an R2 or e-Stewards certified recycler.

Repair didn’t go as planned? Try some basic troubleshooting, or ask our Steam Deck answers community for help.

74 farklı kişi bu kılavuzu tamamladı.

Carsten Frauenheim

Üyelik tarihi: 03/10/20

112.911 İtibar

338 adet Kılavuz yazıldı

Ekip

iFixit iFixit üyesi

Staff

135 Üyeler

16.734 adet Kılavuz yazıldı

22 Yorum

Hi ifixit Team, as the cooler seems to be a non factory one: how does it compare noise wise to the standard Steam Deck cooler, which is unbearably loud?

Peter Black - Yanıt

I addition to Peter's comment, in would be helpful to know the manufacturer and model. It would seem that there are at least two, perhaps more models being used; one brand in particular being prone to the high-pitched "whining" issue.

Cameron - Yanıt

To those asking, you want a huaying fan as opposed to a delta fan. The delta is terribly bad with its acoustics.

Christopher Stanton - Yanıt

is this the delta or huaying?

Mono Chrome - Yanıt

Yorum Ekle

İstatistikleri Görüntüle:

Son 24 Saat: 25

Son 7 gün: 223

Son 30 gün: 1,008

Her zaman: 94,012