Giriş
In this guide, I will show you how to disassemble a TI-60 calculator and how to fix problems with keys not working and calculators that will not power on.
Neye ihtiyacın var
-
-
Locate the battery compartment.
-
Use the tool to pry open the battery door.
-
Remove the batteries.
-
If the calculator will not power on, you may simply need to clean the contacts in the battery compartment, check those now.
-
-
-
I used a small flathead screwdriver, but it would be better to use a plastic scribe if available.
-
Insert tool between faceplate and case.
-
Gently pry up.
-
Slide tool all the way around, gently prying up as you do.
-
If you break off a little tab, that's ok. Just try not to break off too many :)
-
This step is really optional, but it gives you an opportunity to clean under the faceplate and makes it easier to handle in the next step.
-
-
-
Gently wedge tool in between the two halves of the case.
-
Slide the tool all the way around, gently prying up as you do.
-
Hold the calculator face-down when separating the two halves of the case.
-
-
-
While holding facedown, pull the case apart.
-
It should come apart as shown (but if not, that's ok, see the next steps)
-
-
-
-
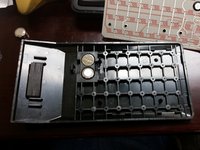
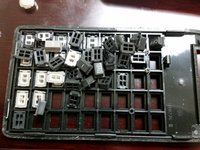
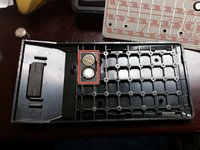
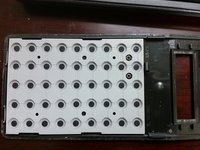
Remove button membrane by pulling it up.
-
This step is optional. It allows you to clean the button contacts a little easier as well as clean the front of the membrane.
-
-
-
If for some reason you ended up with a situation like the second picture, don't worry, just check a site like http://www.datamath.org/Sci/Slanted/TI-6...
-
-
-
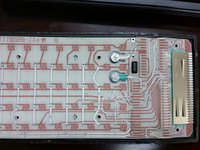
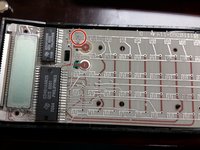
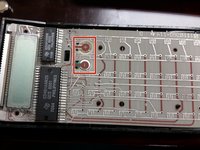
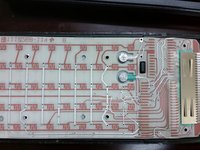
Examine the contact pads for corrosion.
-
To test if the corrosion is causing the calculator to not power on:
-
Place good batteries in the back of the case (proper direction)
-
Lay the circuit board over the batteries (4 little posts will align them)
-
Press down a little over the batteries to make sure they have a good connection (if necessary)
-
Tap a screwdriver to short the "ON" contact pad (top right)
-
If the display comes on, then the corrosion is the problem
-
Follow the same steps for testing if the corrosion is causing a key not to work. Except short the contact pad for that key to test it.
-
-
-
Use the screwdriver (or a small wire brush) to gently scrape away the corrosion on the contact pads.
-
Be sure not to damage any of the traces or other parts.
-
It is probably best to clean them all, but if you just have one key giving you problems, you can concentrate on that one.
-
If the contacts on the back of the button membrane seem dirty, you can also clean them.
-
-
-
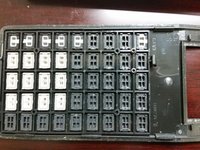
With calculator face down, replace the button membrane, and then the circuit board.
-
Then press the back of the case on and snap it together.
-
There are 4 little posts on the back of the case, these align through the circuit board and button membrane, so make sure those are lined up.
-
It might be tempting to assemble everything on the back of the case (with posts aligned) and then try to press it into the front of the case. But it will be hard to keep the two pieces from falling out while also trying to keep all the keys from falling out!
-
Snap the faceplate back on.
-
Install the batteries.
-


You're calculator should work like new again!
You're calculator should work like new again!
İptal et: Bu kılavuzu tamamlamadım.
2 farklı kişi bu kılavuzu tamamladı.

3Kılavuz Yorumları
It worked for me
Need to replace Battery door (broken). Suggestions on source?
Not sure, but I did see a Reddit post that someone printed one. You might be able to ask them for the stl files: https://www.reddit.com/r/functionalprint...