Ana içeriğe geç
Onarım Topluluğuna Katılın - Hesap Oluşturun

The Claw "Claw" Replacement

Neye ihtiyacın var

  1. The Claw  "Claw" Replacement, Top Cover: adım 1, 1 resimden 1.
    • Place The Claw machine in the up-right position with the control knobs facing you.

    FixBot'a Sor

    Yorum Ekle

  2. The Claw  "Claw" Replacement: adım 2, 1 resimden 1.
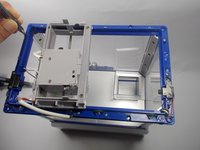
    • Turn The Claw machine upside-down placing the top cover on the surface of your work area.

    FixBot'a Sor

    Yorum Ekle

  3. The Claw  "Claw" Replacement: adım 3, 1 resimden 1.
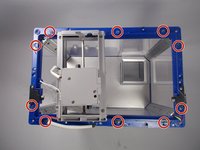
    • Remove all ten 6mm phillips #1 screws underneath the top cover using your #1 phillips head screwdriver.

    • It is helpful to choose a clear, well lit work space. There are multiple tiny screws that are easy to lose.

    FixBot'a Sor

    Yorum Ekle

  4. The Claw  "Claw" Replacement: adım 4, 1 resimden 1.
    • Turn The Claw machine back to the upright position with controls facing you.

    FixBot'a Sor

    Yorum Ekle

  5. The Claw  "Claw" Replacement: adım 5, 1 resimden 1.
    • Remove the top cover of The Claw machine.

    FixBot'a Sor

    Yorum Ekle

  6. The Claw  "Claw" Replacement: adım 6, 2 resimden 1. The Claw  "Claw" Replacement: adım 6, 2 resimden 2.
    • Remove the ten 6 mm phillips #1 screws from the top flange.

    FixBot'a Sor

    Yorum Ekle

  7. The Claw  "Claw" Replacement: adım 7, 1 resimden 1.
    • Lift the flange upward and off to the side of the machine.

    • There is enough wire connecting the flange to the machine that you will not need to cut the wire. The flange can be moved off to the side of the machine while you are working.

    • Cutting or ripping out the wire will cause damage to the machine so try not to put much tension on the wire.

    FixBot'a Sor

    Yorum Ekle

  8. The Claw  "Claw" Replacement, Claw: adım 8, 1 resimden 1.
    • Once you have removed the top cover of the claw you can easily access the claw and you will see that the claw is attached by two small chains.

    • Locate the small rings that attach the chain to the plastic claw.

    FixBot'a Sor

    Yorum Ekle

  9. The Claw  "Claw" Replacement: adım 9, 1 resimden 1.
    Bu adımda kullanılan alet:
    Tweezers
    $4.99
    • Using the precision tweezers or small needle nose pliers, gently widen the small rings enough so that they can be removed from the claw.

    • Replace the claw one ring at a time. The chain needs to be attached to the new claw in the same configuration. One side of the chain opens the claw and the other side is just a hanging support.

    FixBot'a Sor

    Yorum Ekle

Sonuç

To reassemble your device, follow these instructions in reverse order.

İptal et: Bu kılavuzu tamamlamadım.

2 farklı kişi bu kılavuzu tamamladı.

Alain Pierre

Üyelik tarihi: 03/22/16

1.188 İtibar

9 adet Kılavuz yazıldı

Ekip

UMass Dartmouth, Team 4-8, Catania Spring 2016 UMass Dartmouth, Team 4-8, Catania Spring 2016 üyesi

UMASSD-CATANIA-S16S4G8

3 Üyeler

18 adet Kılavuz yazıldı

7Kılavuz Yorumları

Where do I buy a new grabber thing

Oliver Chew - Yanıt Paylaş

The 1st joystick that moves the claw forward and back doesn’t work.

Michelle Bianchini - Yanıt Paylaş

What if the chain won't go down as it deep as it used to be?

Mira DIP - Yanıt Paylaş

Can you reconnect the white cord in picture above in step 6 connecting the claw on top and bottom

Greg Sturges - Yanıt Paylaş

My chain fell off and I dont know how to fix

Kathellyn Da silva - Yanıt Paylaş

Yorum Ekle

İstatistikleri Görüntüle:

Son 24 Saat: 2

Son 7 gün: 28

Son 30 gün: 143

Her zaman: 11,859