Giriş
The following error pattern has appeared on our toaster Philips HD2626:
You can press the toaster lever down and then the toasting process starts, i.e. the heating coils get hot. However, the lever swoops up again immediately when you let go of it. If you don't want to stand next to the toaster all the time, you can try this guide instead.
The cause for me was that the magnetic switch was dirty. There, crumbs got between the magnet and the armature, which prevented the correct function.
Neye ihtiyacın var
-
-
Remove five screws, but the screws at the top left and right are special screws. I was able to loosen them with needle-nosed pliers and some fumbling and replaced them with Phillips screws
-
The second picture shows the very repair-unfriendly screw. Thank you Phillips!
-
-
-
The side wall can now be opened and removed together with the cover.
-
Do this carefully. I broke the cover
-
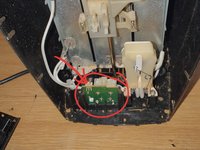
The control electronics are housed on the side wall and attached to the magnetic switch with a plug connection. The plug connection has to be loosened (in my case it almost came off by itself)
-
-
-
-
The arrow points to the plug connection to the control electronics. When assembling, reattach accordingly
-
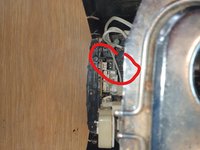
The magnetic switch is held in place by a clamp that is bolted to the bottom of the toaster (see second image).
-
-
-
I had toast crumbs between the magnets and the anchor, which prevented them from working properly. I removed/scraped off these crumbs.
-
Then reassemble in reverse order.
-


Follow the steps in reverse order to reassemble your device.
İptal et: Bu kılavuzu tamamlamadım.
Bir başkası bu kılavuzu tamamladı.
Bu çevirmenlere özel teşekkürler:
100%

oldturkey03 dünyayı onarmamıza yardım ediyor! Katkıda bulunmak ister misiniz?
Çeviriye Başlayın ›