Ana içeriğe geç
Onarım Topluluğuna Katılın - Hesap Oluşturun

Toilet Tank Assembly Replacement

Neye ihtiyacın var

  1. Toilet Tank Assembly Replacement, Tank Lid: adım 1, 3 resimden 1. Toilet Tank Assembly Replacement, Tank Lid: adım 1, 3 resimden 2. Toilet Tank Assembly Replacement, Tank Lid: adım 1, 3 resimden 3.
    • Lift the tank lid up and away from the toilet tank.

    FixBot'a Sor

    Yorum Ekle

  2. Toilet Tank Assembly Replacement, Shutting off the Water Supply to a Toilet: adım 2, 2 resimden 1. Toilet Tank Assembly Replacement, Shutting off the Water Supply to a Toilet: adım 2, 2 resimden 2.
    • Shut off the stop valve underneath the toilet by turning it clockwise until it becomes hand tight.

    • The appearance of this valve may differ from toilet to toilet, but most operate the same. Some valves require multiple turns to stop the water while others only require a quarter turn.

    FixBot'a Sor

    Yorum Ekle

  3. Toilet Tank Assembly Replacement, Draining a Toilet Tank: adım 3, 2 resimden 1. Toilet Tank Assembly Replacement, Draining a Toilet Tank: adım 3, 2 resimden 2.
    • Push down the flush lever.

    • Hold the lever down until water stops draining from the tank.

    • A small amount of water will remain in the bottom of the tank.

    • If the flush lever or pull chain have become disconnected, lift up the toilet flapper to drain the tank.

    FixBot'a Sor

    Yorum Ekle

  4. Toilet Tank Assembly Replacement, Sponge Drying a Toilet Tank: adım 4, 3 resimden 1. Toilet Tank Assembly Replacement, Sponge Drying a Toilet Tank: adım 4, 3 resimden 2. Toilet Tank Assembly Replacement, Sponge Drying a Toilet Tank: adım 4, 3 resimden 3.
    • Use a sponge to soak up and remove any remaining water from the toilet tank.

    • Periodically squeeze the excess water from the sponge.

    FixBot'a Sor

    Yorum Ekle

  5. Toilet Tank Assembly Replacement, Supply Tube: adım 5, 3 resimden 1. Toilet Tank Assembly Replacement, Supply Tube: adım 5, 3 resimden 2. Toilet Tank Assembly Replacement, Supply Tube: adım 5, 3 resimden 3.
    • Place a bucket under the supply tube to catch any dripping water.

    • Turn the coupling nut on the supply tube clockwise until it releases from the threaded shank on the bottom of the tank.

    FixBot'a Sor

    Yorum Ekle

  6. Toilet Tank Assembly Replacement, Tank Assembly: adım 6, 3 resimden 1. Toilet Tank Assembly Replacement, Tank Assembly: adım 6, 3 resimden 2. Toilet Tank Assembly Replacement, Tank Assembly: adım 6, 3 resimden 3.
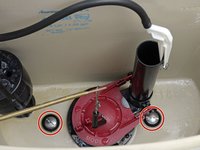
    • Using a socket wrench to hold the nuts, unscrew the two tank bolts with a screwdriver.

    • When reattaching the tank, tighten the bolts with a screwdriver, rather than tightening the nuts. Alternately tighten each bolt in increments, until the tank fits snugly against the toilet.

    • Avoid over-tightening the tank bolts. Too much force can easily crack the toilet tank or toilet bowl.

    FixBot'a Sor

    Yorum Ekle

  7. Toilet Tank Assembly Replacement: adım 7, 2 resimden 1. Toilet Tank Assembly Replacement: adım 7, 2 resimden 2.
    • Lift the tank up from the lower half of the toilet.

    • Set the tank on a thick towel to avoid scraping it against the floor.

    FixBot'a Sor

    Yorum Ekle

Sonuç

To reassemble your device, follow these instructions in reverse order.

İptal et: Bu kılavuzu tamamlamadım.

11 farklı kişi bu kılavuzu tamamladı.

Ron Davis

Üyelik tarihi: 02/17/15

33.479 İtibar

13 adet Kılavuz yazıldı

3Kılavuz Yorumları

Step 5: Clockwise or counter-clockwise depends upon whether you are looking down at the coupling nut from above or up at it from below.

I suspect that, unless it has a left-handed thread, most people would turn it in the direction that works.

John Pretz - Yanıt Paylaş

Close your eyes. Attaching something, the turning motion is (usually) clockwise: Righty-tighty; lefty-loosey.

M J McAllister - Yanıt Paylaş

Thank you for the info.

DonnaRHellman - Yanıt Paylaş

Yorum Ekle

İstatistikleri Görüntüle:

Son 24 Saat: 7

Son 7 gün: 49

Son 30 gün: 225

Her zaman: 18,331