Ana içeriğe geç

Toshiba Dynabook AX 53D Hard Drive Replacement

Neye ihtiyacın var

  1. Toshiba Dynabook AX 53D Hard Drive Replacement, Battery: adım 1, 1 resimden 1.
    • Push apart the two spring loaded plastic tabs labeled #1 and #2.

    • Make sure to unplug any external power sources before working on the computer.

  2. Toshiba Dynabook AX 53D Hard Drive Replacement: adım 2, 1 resimden 1.
    • The battery is now easily removed by pulling up from the notched tab on the inside edge.

  3. Toshiba Dynabook AX 53D Hard Drive Replacement, Hard Drive: adım 3, 1 resimden 1.
    • Start by using the #J1 screw bit to unscrew the the two 4.6 mm hard drive bay screws located on the underside of the laptop. They are located next to the Windows license sticker.

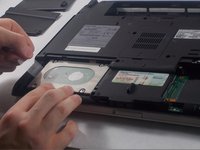
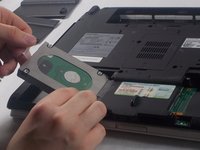
  4. Toshiba Dynabook AX 53D Hard Drive Replacement: adım 4, 2 resimden 1. Toshiba Dynabook AX 53D Hard Drive Replacement: adım 4, 2 resimden 2.
    • Gently pull horizontally on the clear plastic tag to unplug the hard drive.

    • Make sure not to touch the circuit board or connectors on the drive as that may damage them.

  5. Toshiba Dynabook AX 53D Hard Drive Replacement: adım 5, 1 resimden 1.
    • The drive can now be removed from the metal drive retainer by unscrewing the four exposed 4.1 mm #J1 screws on either side of the drive.

  6. Toshiba Dynabook AX 53D Hard Drive Replacement: adım 6, 1 resimden 1.
    • The secondary hard drive can be removed following the same process on the right drive bay.

Sonuç

To reassemble your device, follow these instructions in reverse order.

Christopher

Üyelik tarihi: 03/20/17

510 İtibar

5 adet Kılavuz yazıldı

Ekip

UMass Dartmouth, Team S2-G7, Isaacson Spring 2017 UMass Dartmouth, Team S2-G7, Isaacson Spring 2017 üyesi

UMASSD-ISAACSON-S17S2G7

3 Üyeler

15 adet Kılavuz yazıldı

0 Yorum

Yorum Ekle

İstatistikleri Görüntüle:

Son 24 Saat: 1

Son 7 gün: 4

Son 30 gün: 29

Her zaman: 1,020