Ana içeriğe geç
Onarım Topluluğuna Katılın - Hesap Oluşturun

Toshiba Satellite 1805-S177 DC Adaptor Replacement

Neye ihtiyacın var

  1. Toshiba Satellite 1805-S177 DC Adaptor Replacement, Battery: adım 1, 1 resimden 1.
    • Placing your finger on the raised grip, push the battery casing to the right. It will slide over.

    FixBot'a Sor

    Yorum Ekle

  2. Toshiba Satellite 1805-S177 DC Adaptor Replacement: adım 2, 1 resimden 1.
    • Pull the battery casing gently out toward yourself, until you hear a clicking sound.

    • The battery should pull out to about 2 inches.

    FixBot'a Sor

    Yorum Ekle

  3. Toshiba Satellite 1805-S177 DC Adaptor Replacement: adım 3, 1 resimden 1.
    • Lift the battery casing out of the laptop.

    FixBot'a Sor

    Yorum Ekle

  4. Toshiba Satellite 1805-S177 DC Adaptor Replacement, Hard Drive: adım 4, 2 resimden 1. Toshiba Satellite 1805-S177 DC Adaptor Replacement, Hard Drive: adım 4, 2 resimden 2.
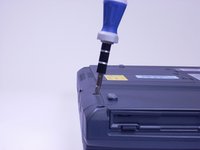
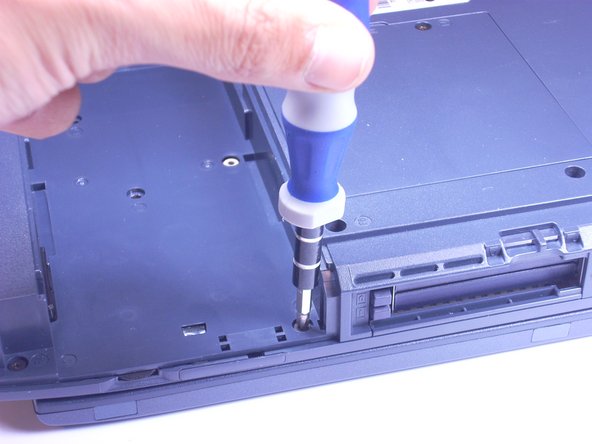
    • Look at the bottom of the laptop. Using a Phillips screwdriver, unscrew and remove the screw labeled F4, located on the cover of the hard drive.

    • The hard drive is located next to the CD drive.

    FixBot'a Sor

    Yorum Ekle

  5. Toshiba Satellite 1805-S177 DC Adaptor Replacement: adım 5, 1 resimden 1.
    • Placing your finger on the raised grip, push up on the hard drive cover. This will remove the hard drive cover from the laptop.

    FixBot'a Sor

    Yorum Ekle

  6. Toshiba Satellite 1805-S177 DC Adaptor Replacement: adım 6, 2 resimden 1. Toshiba Satellite 1805-S177 DC Adaptor Replacement: adım 6, 2 resimden 2.
    • Using a Phillips screwdriver, unscrew and remove the screw surrounded by the white plastic.

    FixBot'a Sor

    Yorum Ekle

  7. Toshiba Satellite 1805-S177 DC Adaptor Replacement: adım 7, 1 resimden 1.
    • Pull the white plastic out toward you. This should remove the hard drive tray from the laptop.

    • This laptop does not have a hard drive, so the tray is empty. On your computer, the hard drive should be in the tray.

    FixBot'a Sor

    Yorum Ekle

  8. Toshiba Satellite 1805-S177 DC Adaptor Replacement, Keyboard: adım 8, 2 resimden 1. Toshiba Satellite 1805-S177 DC Adaptor Replacement, Keyboard: adım 8, 2 resimden 2.
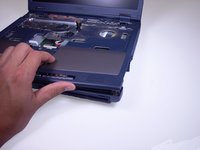
    • Stick a spudger in one of the sides of the top panel. Lift slowly from one side to the other and it will pop off.

    FixBot'a Sor

    Yorum Ekle

  9. Toshiba Satellite 1805-S177 DC Adaptor Replacement: adım 9, 3 resimden 1. Toshiba Satellite 1805-S177 DC Adaptor Replacement: adım 9, 3 resimden 2. Toshiba Satellite 1805-S177 DC Adaptor Replacement: adım 9, 3 resimden 3.
    • Using an Phillips screwdriver, unscrew and remove two screws labeled B2.6.

    FixBot'a Sor

    Yorum Ekle

  10. Toshiba Satellite 1805-S177 DC Adaptor Replacement: adım 10, 1 resimden 1.
    • Using your hands, lift keyboard up toward you, starting from the edge closest to the screen.

    • The keyboard is still connected to the laptop by a ribbon. Place the keyboard gently on top of the trackpad, keys side down.

    FixBot'a Sor

    Yorum Ekle

  11. Toshiba Satellite 1805-S177 DC Adaptor Replacement: adım 11, 2 resimden 1. Toshiba Satellite 1805-S177 DC Adaptor Replacement: adım 11, 2 resimden 2.
    • Find the white ribbon connector (where the keyboard is still attached to the rest of the laptop).

    • Slide the white ribbon connector up and lift the ribbon out of it.

    FixBot'a Sor

    Yorum Ekle

  12. Toshiba Satellite 1805-S177 DC Adaptor Replacement, TrackPad: adım 12, 1 resimden 1.
    • Using a Phillips Screwdriver, unscrew and remove the one F4 screw closest to the center of the laptop.

    • This screw is underneath the battery casing, located on the bottom of the laptop directly under the trackpad.

    FixBot'a Sor

    Yorum Ekle

  13. Toshiba Satellite 1805-S177 DC Adaptor Replacement: adım 13, 1 resimden 1.
    • Using your finger, lift off the plastic covering the trackpad by putting your finger underneath the plastic and pulling towards you. The plastic should just pop off.

    FixBot'a Sor

    Yorum Ekle

  14. Toshiba Satellite 1805-S177 DC Adaptor Replacement: adım 14, 2 resimden 1. Toshiba Satellite 1805-S177 DC Adaptor Replacement: adım 14, 2 resimden 2.
    • Remove the left, brown ribbon by pinching the part of the ribbon connected to the computer and lifting towards you.

    FixBot'a Sor

    Yorum Ekle

  15. Toshiba Satellite 1805-S177 DC Adaptor Replacement: adım 15, 2 resimden 1. Toshiba Satellite 1805-S177 DC Adaptor Replacement: adım 15, 2 resimden 2.
    • Remove the white ribbon on the right by pinching the part connected to the laptop with your fingers and pulling towards you.

    FixBot'a Sor

    Yorum Ekle

  16. Toshiba Satellite 1805-S177 DC Adaptor Replacement: adım 16, 1 resimden 1.
    • Lift the track pad gently towards you, using your fingers.

    FixBot'a Sor

    Yorum Ekle

  17. Toshiba Satellite 1805-S177 DC Adaptor Replacement, Screen: adım 17, 2 resimden 1. Toshiba Satellite 1805-S177 DC Adaptor Replacement, Screen: adım 17, 2 resimden 2.
    • Using a Phillips screwdriver, unscrew and remove 5 screws labeled F6, located on the metal piece on the left side of the keyboard area.

    FixBot'a Sor

    Yorum Ekle

  18. Toshiba Satellite 1805-S177 DC Adaptor Replacement: adım 18, 1 resimden 1.
    • Using your fingers, pinch and lift metal piece away from the laptop and set aside.

    FixBot'a Sor

    Yorum Ekle

  19. Toshiba Satellite 1805-S177 DC Adaptor Replacement: adım 19, 2 resimden 1. Toshiba Satellite 1805-S177 DC Adaptor Replacement: adım 19, 2 resimden 2.
    • Using a Phillips screwdriver, unscrew and remove two screws labeled B25 located closest to the screen.

    FixBot'a Sor

    Yorum Ekle

  20. Toshiba Satellite 1805-S177 DC Adaptor Replacement: adım 20, 3 resimden 1. Toshiba Satellite 1805-S177 DC Adaptor Replacement: adım 20, 3 resimden 2. Toshiba Satellite 1805-S177 DC Adaptor Replacement: adım 20, 3 resimden 3.
    • Using a Phillips screwdriver, unscrew and remove two screws labeled B5.5, located to the right of where the metal piece was.

    • These screws are silver, where all the other screws have been black.

    FixBot'a Sor

    Yorum Ekle

  21. Toshiba Satellite 1805-S177 DC Adaptor Replacement: adım 21, 3 resimden 1. Toshiba Satellite 1805-S177 DC Adaptor Replacement: adım 21, 3 resimden 2. Toshiba Satellite 1805-S177 DC Adaptor Replacement: adım 21, 3 resimden 3.
    • Using a Phillips screwdriver, unscrew and remove two black screws from the back side of the laptop.

    • These screws are not labeled.

    FixBot'a Sor

    Yorum Ekle

  22. Toshiba Satellite 1805-S177 DC Adaptor Replacement: adım 22, 1 resimden 1.
    • Using a Phillips screwdriver, unscrew and remove F4 screw from plastic covering on the bottom of the laptop that only has one screw.

    FixBot'a Sor

    Yorum Ekle

  23. Toshiba Satellite 1805-S177 DC Adaptor Replacement: adım 23, 2 resimden 1. Toshiba Satellite 1805-S177 DC Adaptor Replacement: adım 23, 2 resimden 2.
    • Using fingers,pinch and lift plastic covering up, away from the laptop and set aside.

    FixBot'a Sor

    Yorum Ekle

  24. Toshiba Satellite 1805-S177 DC Adaptor Replacement: adım 24, 2 resimden 1. Toshiba Satellite 1805-S177 DC Adaptor Replacement: adım 24, 2 resimden 2.
    • Using your fingers, pinch the black modem piece, lift and slide the modem up and move it aside.

    • The modem is connected to a red and black wire.

    FixBot'a Sor

    Yorum Ekle

  25. Toshiba Satellite 1805-S177 DC Adaptor Replacement: adım 25, 1 resimden 1.
    • Using a Phillips screwdriver, unscrew and remove one F6 screw from beneath the modem.

    FixBot'a Sor

    Yorum Ekle

  26. Toshiba Satellite 1805-S177 DC Adaptor Replacement: adım 26, 3 resimden 1. Toshiba Satellite 1805-S177 DC Adaptor Replacement: adım 26, 3 resimden 2. Toshiba Satellite 1805-S177 DC Adaptor Replacement: adım 26, 3 resimden 3.
    • Using a Phillips screwdriver, unscrew and remove 5 B20 screws, located along the corners of the bottom of the laptop.

    FixBot'a Sor

    Yorum Ekle

  27. Toshiba Satellite 1805-S177 DC Adaptor Replacement: adım 27, 3 resimden 1. Toshiba Satellite 1805-S177 DC Adaptor Replacement: adım 27, 3 resimden 2. Toshiba Satellite 1805-S177 DC Adaptor Replacement: adım 27, 3 resimden 3.
    • Using a Phillips screwdriver, unscrew and remove 3 B25 screws from the bottom of the laptop.

    FixBot'a Sor

    Yorum Ekle

  28. Toshiba Satellite 1805-S177 DC Adaptor Replacement: adım 28, 3 resimden 1. Toshiba Satellite 1805-S177 DC Adaptor Replacement: adım 28, 3 resimden 2. Toshiba Satellite 1805-S177 DC Adaptor Replacement: adım 28, 3 resimden 3.
    • Using a Phillips screwdriver, unscrew and remove 3 F6 screws from the bottom of the laptop.

    FixBot'a Sor

    Yorum Ekle

  29. Toshiba Satellite 1805-S177 DC Adaptor Replacement: adım 29, 3 resimden 1. Toshiba Satellite 1805-S177 DC Adaptor Replacement: adım 29, 3 resimden 2. Toshiba Satellite 1805-S177 DC Adaptor Replacement: adım 29, 3 resimden 3.
    • Using a Phillips screwdriver, unscrew and remove 3 F4 screws from the battery area of the laptop.

    FixBot'a Sor

    Yorum Ekle

  30. Toshiba Satellite 1805-S177 DC Adaptor Replacement: adım 30, 2 resimden 1. Toshiba Satellite 1805-S177 DC Adaptor Replacement: adım 30, 2 resimden 2.
    • Lift open the screen of the laptop and, using your fingers and the guides on the side of the laptop, push up on the top plastic covering of the laptop, moving from one side of the laptop to the other.

    FixBot'a Sor

    Yorum Ekle

  31. Toshiba Satellite 1805-S177 DC Adaptor Replacement: adım 31, 2 resimden 1. Toshiba Satellite 1805-S177 DC Adaptor Replacement: adım 31, 2 resimden 2.
    • Setting screen next to the base of the laptop, pinch the connecting cable with your fingers and gently pull connecting cable from monitor.

    FixBot'a Sor

    Yorum Ekle

  32. Toshiba Satellite 1805-S177 DC Adaptor Replacement, Optical Drive: adım 32, 2 resimden 1. Toshiba Satellite 1805-S177 DC Adaptor Replacement, Optical Drive: adım 32, 2 resimden 2.
    • As shown by the photo, remove the small green computer part by pinching the top with your fingers and gently lift it away from the laptop.

    FixBot'a Sor

    Yorum Ekle

  33. Toshiba Satellite 1805-S177 DC Adaptor Replacement: adım 33, 3 resimden 1. Toshiba Satellite 1805-S177 DC Adaptor Replacement: adım 33, 3 resimden 2. Toshiba Satellite 1805-S177 DC Adaptor Replacement: adım 33, 3 resimden 3.
    • Using your fingers, slowly slide the optical drive out of the laptop, towards you, until you are able to completely lift it away from the computer.

    FixBot'a Sor

    Yorum Ekle

  34. Toshiba Satellite 1805-S177 DC Adaptor Replacement, DC Adaptor: adım 34, 1 resimden 1.
    • Unscrew and remove single, silver T6 screw.

    FixBot'a Sor

    Yorum Ekle

  35. Toshiba Satellite 1805-S177 DC Adaptor Replacement: adım 35, 1 resimden 1.
    • Remove blue plastic piece by gently pulling away from adaptors on the back of the laptop.

    FixBot'a Sor

    Yorum Ekle

  36. Toshiba Satellite 1805-S177 DC Adaptor Replacement: adım 36, 2 resimden 1. Toshiba Satellite 1805-S177 DC Adaptor Replacement: adım 36, 2 resimden 2.
    • Lift DC adaptor by sliding upwards out of the laptop and hold out of way.

    FixBot'a Sor

    Yorum Ekle

  37. Toshiba Satellite 1805-S177 DC Adaptor Replacement: adım 37, 3 resimden 1. Toshiba Satellite 1805-S177 DC Adaptor Replacement: adım 37, 3 resimden 2. Toshiba Satellite 1805-S177 DC Adaptor Replacement: adım 37, 3 resimden 3.
    • Remove from connector by gently pulling on white connector and cord.

    FixBot'a Sor

    Yorum Ekle

Sonuç

To reassemble your device, follow these instructions in reverse order.

İptal et: Bu kılavuzu tamamlamadım.

7 farklı kişi bu kılavuzu tamamladı.

Hannah

Üyelik tarihi: 06/24/10

251 İtibar

7 adet Kılavuz yazıldı

Ekip

Cal Poly, Team 3-5, Johann Summer 2010 Cal Poly, Team 3-5, Johann Summer 2010 üyesi

CPSU-JOHANN-R10S3G5

4 Üyeler

25 adet Kılavuz yazıldı

1Rehber Yorum

thank you so much

akmal amil - Yanıt Paylaş

Yorum Ekle

İstatistikleri Görüntüle:

Son 24 Saat: 2

Son 7 gün: 16

Son 30 gün: 74

Her zaman: 3,811