Giriş
The WiFi card should be replaced if necessary, it would be too costly and timely to try and repair the WiFi card. This process is easily done within four easy steps and requires one step more than the keyboard replacement guide.
Neye ihtiyacın var
-
-
Turn the laptop over and locate the lock and battery release switches. Unlock the battery by changing the switch on the right from locked to unlocked by sliding the switch outward.
-
-
-
-
Open the laptop so the display screen is bent fully back with the display facing upward, parallel to the surface you are working on.
-
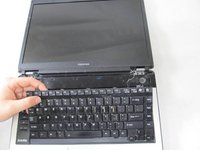
Wedge the Phillips 00 screwdriver above the F1 key, and separate the top piece of plastic from the body of the laptop. Don't worry about breaking it! You will need to forcefully wedge the screwdriver under the plastic, simultaneously pushing upward and forward.
-
Once that section has popped up, work on pulling the rest of the plastic piece up and out, alternating from left to right.
-
-
-
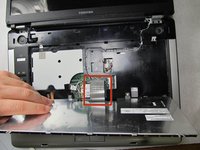
After removing the keyboard completely from the body of the laptop you will have a view of the WiFi card and other components of the inner laptop. (WiFi card labeled in picture 1 of this step section.)
-
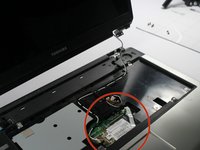
After locating the WiFi card, the first step is to disconnect the the attached wires. (This is labeled in picture 2 of this step section.)
-
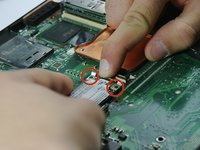
After disconnecting the wires, you can detach the WiFi card by pressing down on the clip that fastens the WiFi card located on the right side.
-
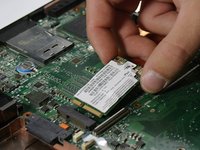
When you detach the card you will be able to pick the WiFi card up by sliding it out of position. Success!
-
You can now replace the WiFi card with another and reassemble the laptop.
-


To reassemble your device, follow these instructions in reverse order.
To reassemble your device, follow these instructions in reverse order.
İptal et: Bu kılavuzu tamamlamadım.
2 farklı kişi bu kılavuzu tamamladı.
Ekip

UMass Dartmouth, Team 4-6, Calaway Spring 2014 UMass Dartmouth, Team 4-6, Calaway Spring 2014 üyesi
UMASSD-CALAWAY-S14S4G6
4 Üyeler
12 adet Kılavuz yazıldı