Bu sürüm, hatalı düzenlemeler içerebilir. En son doğrulanmış bellek kopyası dönün.
Neye ihtiyacın var
-
Bu adım çevrilmemiş. Çevrilmesine yardım edin
-
Flip the phone over so that the back camera is facing you.
-
-
Bu adım çevrilmemiş. Çevrilmesine yardım edin
-
Use your phillips screwdriver to begin removing all the accesible screws.
-
-
Bu adım çevrilmemiş. Çevrilmesine yardım edin
-
Now begin to remove the coverings above and below the middle plate with your hand.
-
-
Bu adım çevrilmemiş. Çevrilmesine yardım edin
-
use your hand or a tool to remove the tabbing on the metal plate covering the battery.
-
-
Bu adım çevrilmemiş. Çevrilmesine yardım edin
-
Use your wedging tool to begin removeing the adhesive under the battery.
-
-
Bu adım çevrilmemiş. Çevrilmesine yardım edin
-
Remove these two screws with your phillips screw driver.
-
-
Bu adım çevrilmemiş. Çevrilmesine yardım edin
-
Begin to use the wedging tool to remove the space bar off of the keyboard.
-
-
-
Bu adım çevrilmemiş. Çevrilmesine yardım edin
-
remove the screws on each end of the space bars vacant lcoation.
-
-
Bu adım çevrilmemiş. Çevrilmesine yardım edin
-
Grab the wedging tool and begin wedging the old keyboard.
-
-
Bu adım çevrilmemiş. Çevrilmesine yardım edin
-
grab your replacement keyboard and connect it to the backing of the old keyboard.
-
-
Bu adım çevrilmemiş. Çevrilmesine yardım edin
-
once placed, hold the keyboard onto the phone while clicking the two metal plates back down to connect the keyboard.
-
-
Bu adım çevrilmemiş. Çevrilmesine yardım edin
-
Use a Phillips #1 screwdriver (PH1 bit) to remove the single 7 mm screw that secures the CD/DVD drive.
-
-
Bu adım çevrilmemiş. Çevrilmesine yardım edin
-
Remove the remaining thirteen 7 mm Phillips screws holding the back cover using the PH1 bit and Magnetic Driver.
-
-
Bu adım çevrilmemiş. Çevrilmesine yardım edin
-
Using the plastic opening tools, separate the back cover from the laptop.
-
-
Bu adım çevrilmemiş. Çevrilmesine yardım edin
-
Remove the three 3 mm Phillips screws holding the fan cable in place using the PH1 bit and Magnetic Driver.
-
Lift the fan cable connector from the fan.
-
-
Bu adım çevrilmemiş. Çevrilmesine yardım edin
-
Remove the fan from the plug by releasing the clamps located on each side of the socket.
-
Slide the connector out of the socket.
-
Lift the computer fan from the motherboard.
-
-
Bu adım çevrilmemiş. Çevrilmesine yardım edin
-
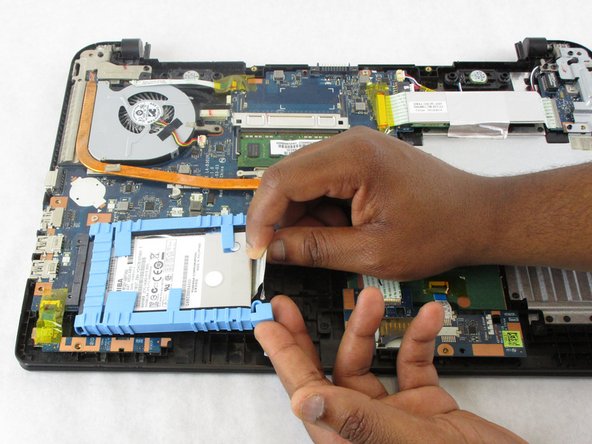
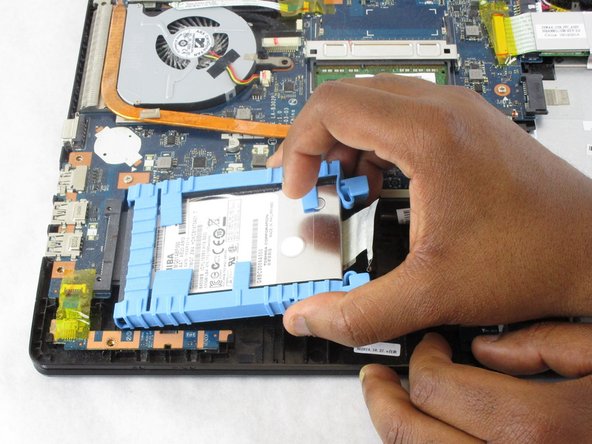
Using the ribbon beneath the hard drive lift it upwards and pull the hard drive out.
-
-
Bu adım çevrilmemiş. Çevrilmesine yardım edin
-
The white touchpad ribbon must be disconnected from the motherboard connection socket.
-
Release the two clamps holding the ribbon in place.
-
Slide the ribbon from the motherboard connection socket.
-
-
Bu adım çevrilmemiş. Çevrilmesine yardım edin
-
Remove the white ribbon connecting the USB ports to the motherboard.
-
Release the two holding clamps.
-
Slide the ribbon out of the motherboard holding socket.
-
-
Bu adım çevrilmemiş. Çevrilmesine yardım edin
-
Remove the 7 mm Phillips screw holding the USB Driver to the motherboard using the PH1 bit and Magnetic Driver.
-
-
Bu adım çevrilmemiş. Çevrilmesine yardım edin
-
Remove the blue ribbon connecting the hard drive hardware to the motherboard by first lifting the yellow protective tape.
-
Slide the blue ribbon from its connection socket.
-
-
Bu adım çevrilmemiş. Çevrilmesine yardım edin
-
Carefully separate the securing tape from the ribbon attaching the keyboard to the motherboard.
-
-
Bu adım çevrilmemiş. Çevrilmesine yardım edin
-
Slide the keyboard ribbon through its holding slot, completely releasing it from the laptop.
-


Ekip

South Arkansas Community College, Team S1-G1, Mitchell Spring 2018 South Arkansas Community College, Team S1-G1, Mitchell Spring 2018 üyesi
SACC-MITCHELL-S18S1G1
4 Üyeler
12 adet Kılavuz yazıldı