Ana içeriğe geç
Toshiba Satellite L455-S5975 LCD Display Replacement

Toshiba Satellite L455-S5975 LCD Display Replacement

Mike Kennedy

Mike Kennedy ve 8 diğer katkıda bulunanlar

En son July 16, 2014 tarihinde güncellendi

30 dakika
Orta

This guide is useful for replacing a broken LCD screen on your laptop. If you are reading this from a laptop, you are looking at an LCD screen. In this replacement guide, you will remove the old LCD panel and install a new one.

Note: Before starting any removal or installation, remember to turn off the device and to remove it from the power source.

Neye ihtiyacın var

Aletler

Daha fazlasını göster…

  1. Toshiba Satellite L455-S5975 LCD Display Replacement, Keyboard: adım 1, 2 resimden 1. Toshiba Satellite L455-S5975 LCD Display Replacement, Keyboard: adım 1, 2 resimden 2.
    • Before repairing your laptop, power down the system, disconnect the charger if necessary and remove the battery.

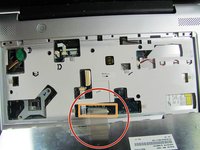
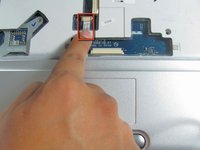
    • Use the flat edge of the plastic opening tool to pry open the narrow plastic strip above the keyboard.

  2. Toshiba Satellite L455-S5975 LCD Display Replacement: adım 2, 1 resimden 1.
    • Remove the three 3mm screws with a Phillips#00 Screwdriver.

  3. Toshiba Satellite L455-S5975 LCD Display Replacement: adım 3, 1 resimden 1.
    • Lift the keyboard away from the top side of the laptop.

    • Do not pull the keyboard away too hard. It is still connected by the fragile ribbon cable (shown in the red square).

  4. Toshiba Satellite L455-S5975 LCD Display Replacement: adım 4, 2 resimden 1. Toshiba Satellite L455-S5975 LCD Display Replacement: adım 4, 2 resimden 2.
    • Disconnect the keyboard cable that is still attached to the keyboard.

    • Unlatch the fastener.

    • Using your hands, pull the keyboard connector out, not up.

  5. Toshiba Satellite L455-S5975 LCD Display Replacement, Fan: adım 5, 2 resimden 1. Toshiba Satellite L455-S5975 LCD Display Replacement, Fan: adım 5, 2 resimden 2.
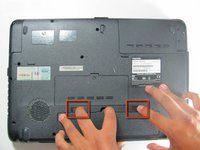
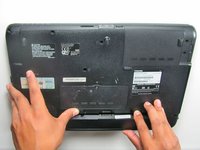
    • Flip the laptop over to access the battery.

    • Remove the battery by sliding fingers away from each other and lifting up the tab at the same time.

  6. Toshiba Satellite L455-S5975 LCD Display Replacement: adım 6, 1 resimden 1.
    • Remove the twelve 10mm screws with a Phillips #00 screwdriver.

    • Remove the cover over the hard drive (upper right in photo) and remove the four 10mm screws at the four corners.

  7. Toshiba Satellite L455-S5975 LCD Display Replacement: adım 7, 1 resimden 1.
    • Remove the three 4mm screws with a Phillips #00 screwdriver.

  8. Toshiba Satellite L455-S5975 LCD Display Replacement: adım 8, 1 resimden 1.
    • Flip the laptop over so it's in the right-side-up position.

    • Lift the grey plastic casing up and unhook any wires attached to the casing.

    • Remove the five 10mm screws, each with a label 'F10' next to them.

  9. Toshiba Satellite L455-S5975 LCD Display Replacement: adım 9, 2 resimden 1. Toshiba Satellite L455-S5975 LCD Display Replacement: adım 9, 2 resimden 2.
    • Disconnect the flat thin wire connecting the track pad to the motherboard by pulling it straight out.

    • Disconnect the thin red wire on the right side of the motherboard.

  10. Toshiba Satellite L455-S5975 LCD Display Replacement: adım 10, 1 resimden 1.
    • Remove the two 6mm screws with a Phillips #00 screwdriver.

  11. Toshiba Satellite L455-S5975 LCD Display Replacement: adım 11, 2 resimden 1. Toshiba Satellite L455-S5975 LCD Display Replacement: adım 11, 2 resimden 2.
    • Disconnect the red and yellow wires connecting the fan to the motherboard by pulling the wires straight out.

    • Remove the fan.

  12. Toshiba Satellite L455-S5975 LCD Display Replacement, LCD Display: adım 12, 2 resimden 1. Toshiba Satellite L455-S5975 LCD Display Replacement, LCD Display: adım 12, 2 resimden 2.
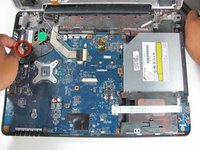
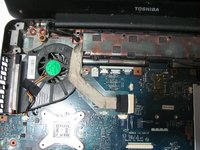
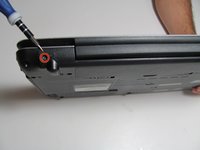
    • Remove the following six screws located at the base of the monitor:

    • Three 5mm Phillip Head Screws

    • Two 6mm Phillip Head Screws

    • One 7mm Phillip Head Screw

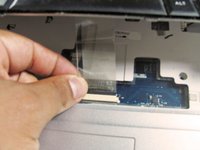
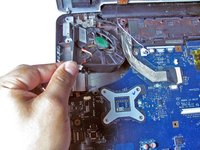
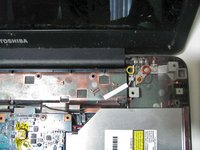
    • Disconnect the long thing grey cable that is attached to the motherboard by pulling it out.

  13. Toshiba Satellite L455-S5975 LCD Display Replacement: adım 13, 2 resimden 1. Toshiba Satellite L455-S5975 LCD Display Replacement: adım 13, 2 resimden 2.
    • Remove 2 plastic plugs using a spudger located behind the corners of the rotating part of the LCD.

    • Remove two 5mm Phillips head screws located where the plugs used to be.

  14. Toshiba Satellite L455-S5975 LCD Display Replacement: adım 14, 1 resimden 1.
    • Remove the black and white wires connected to the LCD. The wires are located under the motherboard and can be accessed through the back panel of the computer.

    • Use a spudger to remove wires by pushing the wires upward, away from the logic board.

  15. Toshiba Satellite L455-S5975 LCD Display Replacement: adım 15, 1 resimden 1.
    • Remove the LCD Screen

Sonuç

To reassemble your device, follow these instructions in reverse order.

4 farklı kişi bu kılavuzu tamamladı.

Mike Kennedy

Üyelik tarihi: 04/18/13

160 İtibar

4 adet Kılavuz yazıldı

Ekip

Cal Poly, Team 2-21, Maness Spring 2013 Cal Poly, Team 2-21, Maness Spring 2013 üyesi

CPSU-MANESS-S13S2G21

4 Üyeler

5 adet Kılavuz yazıldı

0 Yorum

Yorum Ekle

İstatistikleri Görüntüle:

Son 24 Saat: 0

Son 7 gün: 4

Son 30 gün: 11

Her zaman: 3,605