Bu sürüm, hatalı düzenlemeler içerebilir. En son doğrulanmış bellek kopyası dönün.
Neye ihtiyacın var
-
Bu adım çevrilmemiş. Çevrilmesine yardım edin
-
Remove the battery. Slide the locking slider to the unlocked position then slide the other spring-loaded slider against the spring while lifting the battery tab.
-
-
Bu adım çevrilmemiş. Çevrilmesine yardım edin
-
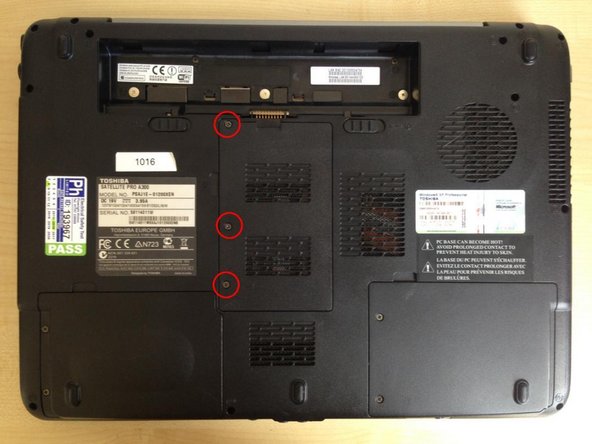
Undo 3 captive screws holding the RAM cover in place, and remove the cover.
-
Remove the RAM stick or sticks by pulling the retaining clips outwards.
-
-
Bu adım çevrilmemiş. Çevrilmesine yardım edin
-
Optionally, lift the two aerial connectors off the WiFi card, remove 2 screws, and remove the WiFi card.
-
-
Bu adım çevrilmemiş. Çevrilmesine yardım edin
-
Undo 2 captive screws in the hard disk bay cover, and remove the cover.
-
Remove 2 screws securing the hard disk in its bay. These are the 2 black screws at the opposite end to the connector.
-
Disengage the hard disk from its connector by pulling on the black plastic tab.
-
-
Bu adım çevrilmemiş. Çevrilmesine yardım edin
-
Undo two captive screws in the 2nd hard disk bay cover and remove the cover.
-
-
Bu adım çevrilmemiş. Çevrilmesine yardım edin
-
Remove the screw which retains the CD/DVD drive, and remove the drive by pushing on the tab that the screw retained.
-
-
-
Bu adım çevrilmemiş. Çevrilmesine yardım edin
-
Remove three silver screws with large heads from the battery compartment.
-
Turn the laptop over and open the screen past the vertical position.
-
Pry out the keyboard bezel. It is retained by 3 clips, one at each end and one in the middle. Disengage the end ones first with a prying tool inserted a short distance in from each end.
-
-
Bu adım çevrilmemiş. Çevrilmesine yardım edin
-
Remove a screw retaining the keyboard.
-
Lift the keyboard from the back to disengage it from clips on the two sides. Take care not to lift it too far or you may damage its connecting ribbon.
-
Turn the keyboard over by lifting the back and turning it towards yourself. Lay it flat on its face.
-
With a fingernail or prying tool, gently lift the black clamping bar on the keyboard ribbon connector and withdraw the ribbon from the connector.
-
-
Bu adım çevrilmemiş. Çevrilmesine yardım edin
-
Close the laptop and lay it upside down.
-
Remove nine 6.5mm screws as follows:
-
Three from the front edge.
-
Four from the 2nd hard disk bay. (One of these is recessed and two others are beneath soft plastic flaps.)
-
One from the corner of the RAM bay.
-
One from a corner of the hard disk bay.
-
-
Bu adım çevrilmemiş. Çevrilmesine yardım edin
-
Remove nine 8mm screws as follows:
-
Six from the back near the corners (either side of the battery bay).
-
Two from the sides.
-
One from near the circular vent.
-
Remove two 3mm screws from the battery bay.
-
-
Bu adım çevrilmemiş. Çevrilmesine yardım edin
-
Turn the laptop over and open the screen.
-
Disconnect the power button and trackpad ribbons by pulling gently on the tabs.
-
From the metal plate beneath the keyboard, remove the following screws:
-
Two 3mm.
-
Four 6.5mm.
-
The front of the laptop should now lift off easily. If not, there's yet another screw that you've missed.
-
-
Bu adım çevrilmemiş. Çevrilmesine yardım edin
-
With the laptop upside down, disconnect the power connector visible in the RAM bay. Turn the laptop right side up again.
-
Disengage 3 connectors from the top of the motherboard:
-
The video connector near the top left.
-
(The small connector adjacent to the video connector need not be disengaged.)
-
A small connector at the bottom right corner of the motherboard
-
The 2nd hard disk bay connector towards the bottom right of the motherboard.
-
-
Bu adım çevrilmemiş. Çevrilmesine yardım edin
-
Disengage two connectors on a small circuit board on the bottom of the 2nd hard disk bay and lift the screened cable off the bay.
-
Remove two 6.5mm black screws. (On reassembly it's important to put these screws back in the right holes otherwise the front cover of the laptop won't fit.
-
Gently lift the motherboard from the right hand edge, first disengaging the audio sockets and volume control from the lower shell, then the connectors from their openings in the left hand side. You can now remove it completely.
-
-
Bu adım çevrilmemiş. Çevrilmesine yardım edin
-
Now is an excellent time to clean the fan and the cooling vanes through which it blows air. If necessary you can use a pin to dislodge dust stuck to the heat exchanger vanes, then a vacuum cleaner crevice tool to suck it out.
-
The backup battery is just to the left of the RAM sockets on a pair of flying leads. Remove the modem module (just above it in the photo - retained by a single screw) in order to disconnect it.
Best if you search for them yourself - if I found one for you I couldn’t guarantee that it would work.
-
-
Bu adım çevrilmemiş. Çevrilmesine yardım edin
-
Lift the WiFi antenna leads out of their routing channels.
-
Whilst supporting the screen, remove six 6.5mm screws from the screen hinge and lift off the screen.
-
To remove and replace the power connector and lead, remove the right hand speaker, secured by two screws at the base of its sound box.
-
-
Bu adım çevrilmemiş. Çevrilmesine yardım edin
-
Remove six screw covers (if present) from the screen bezel, and remove the 6 screws.
-
Use a spudger to release the retaining clips around the edges of the bezel and the bottom of the hinge cover, and lift off the bezel.
-
You now have access to the LCD, the inverter at the bottom of the screen (this powers the backlight) and the WiFi antennae along tne top.
-


İptal et: Bu kılavuzu tamamlamadım.
11 farklı kişi bu kılavuzu tamamladı.

Ekip

12 Yorum
Hello! Please, where is the battery for BIOS this model? Thank you in advance!
Hi Nicky - See Step 14, and the final 2 bullets following the warnings.
Hello Philip
I read your article with big interest because I am having trouble with one similar the one you were showing.
My daughter has forgotten her password and now she cant get access to the laptop.
It´s not a big problem for her as she already has bought herself a new one but I intended to use it for myself even it´s from 2009, as I dont use a computer a lot.
My problem is how do I open the computer? When I try to insert a password it tells me I am wrong and I can do this three times and then the computer goes black.
Toshiba want´s me to send it to the manufacturer and bye bye a lot of money before they even have started to fix it.
Can you help me?
In advance Thanks!
In the first photo in Step 4 you can see a label with a burn mark. This is partially covering a pair of triangular solder pads. (On slightly different models they may or may not be beneath the RAM modules when inserted, and may or may not be hidden by a label.) In a nutshell, you need to short them together while pressing the power button. The laptop will only come on after releasing the short while still holding the power button.
But in practice it may be a bit harder - I did one just recently and it took a while to get the procedure right. You can short out the pads with a flat bladed screwdriver but it’s not easy and you’ll almost certainly need an extra pair of hands. You will save yourself a lot of trouble if you can solder a switch or push button on flying leads to the solder pads, to enable you to short them with the laptop open on the table.
If it doesn’t work at first, try counting up to 10 (or even 20) at different stages between shorting the pads, pressing power, releasing the short and releasing the power button. Try (if you can) with one or both RAM modules inserted.
I was fairly sure the one I did recently had previously been unlocked. When you get into the BIOS, first set the password to something known, make sure you can boot (not just once), go back into the BIOS to clear the password, and then check you can boot a couple more times. It might even be necessary to boot into Window the first time you get past the BIOS password. Keep at it - you’ll get there eventually!
Sorry Philip I hadn´t seen it before you wrote to me.
I will try to see if it works in the weekend and of course let you know what the result may be.
In advance thanks
Bent Thygesen
Thank you for this guide, with your steps I managed to fix a Toshiba Satellite A300 that had a broken display cable, now it’s working again! Cheers!
So glad it helped you!
bios password
not open windows
I found my old laptop last week and I opened it to clean in but when I was putting the pieces back I put something wrong and now my mousepad and keyboard doesn't work at all. The weird thing it's that the led from the mousepad it's working. I know the laptop it's old but I want to see what's inside.
Most likely you haven’t reinsterted the ribbons under the keyboard correctly or you haven’t closed the locking bar. It can be a little tricky to insert the ribbons into the narrow slot they go in. Having closed the locking bar you should be able to pull gently on the ribbon without it coming out.