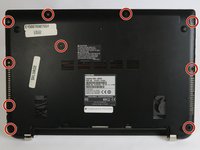
Ana içeriğe geç

Toshiba Satellite S55T-B5335 Cooling Fans Replacement

Neye ihtiyacın var

  1. Toshiba Satellite S55T-B5335 Cooling Fans Replacement, Battery: adım 1, 1 resimden 1.
    • Remove the two 7 mm Phillips #1 screws that hold the battery in place.

  2. Toshiba Satellite S55T-B5335 Cooling Fans Replacement: adım 2, 3 resimden 1. Toshiba Satellite S55T-B5335 Cooling Fans Replacement: adım 2, 3 resimden 2. Toshiba Satellite S55T-B5335 Cooling Fans Replacement: adım 2, 3 resimden 3.
    • Pull the battery from laptop.

  3. Toshiba Satellite S55T-B5335 Cooling Fans Replacement, Bottom Cover: adım 3, 2 resimden 1. Toshiba Satellite S55T-B5335 Cooling Fans Replacement, Bottom Cover: adım 3, 2 resimden 2.
    • Remove the ten 7 mm Phillips #1 screws that secure the back cover.

  4. Toshiba Satellite S55T-B5335 Cooling Fans Replacement: adım 4, 1 resimden 1.
    • Wedge the tip of a plastic opening tool between the back cover and the metal frame.

    • Twist the plastic opening tool, while wedged, in order to release the retaining tabs from the frame.

    • Repeat these steps in a circular pattern around the laptop to release all retaining tabs.

  5. Toshiba Satellite S55T-B5335 Cooling Fans Replacement: adım 5, 1 resimden 1.
    • Once all retaining tabs are released from the frame, you can pull up on the back cover to remove it.

  6. Toshiba Satellite S55T-B5335 Cooling Fans Replacement, Cooling Fans: adım 6, 1 resimden 1.
    • Remove the two 3.5 mm Phillips #1 screws that hold the cooling fan in place.

  7. Toshiba Satellite S55T-B5335 Cooling Fans Replacement: adım 7, 1 resimden 1.
    • Wedge the flat end of the spudger between the connector and its socket.

    • Twist back and forth in order to pry the connector loose from its socket.

    • Although you can pull on the connector wires to remove it from the socket, it is not recommended until the connector is loose to prevent damage to the wires.

  8. Toshiba Satellite S55T-B5335 Cooling Fans Replacement: adım 8, 1 resimden 1.
    • Lift up on the cooling fan to remove it from the laptop.

    • Repeat steps 6-8 for the other cooling fan.

Sonuç

To reassemble your device, follow these instructions in reverse order.

Bir başkası bu kılavuzu tamamladı.

George Gillespie

Üyelik tarihi: 09/15/16

721 İtibar

7 adet Kılavuz yazıldı

Ekip

USF Tampa, Team 2-1, Blackwell Fall 2016 USF Tampa, Team 2-1, Blackwell Fall 2016 üyesi

USFT-BLACKWELL-F16S2G1

4 Üyeler

7 adet Kılavuz yazıldı

0 Yorum

Yorum Ekle

İstatistikleri Görüntüle:

Son 24 Saat: 0

Son 7 gün: 3

Son 30 gün: 13

Her zaman: 1,496