Giriş
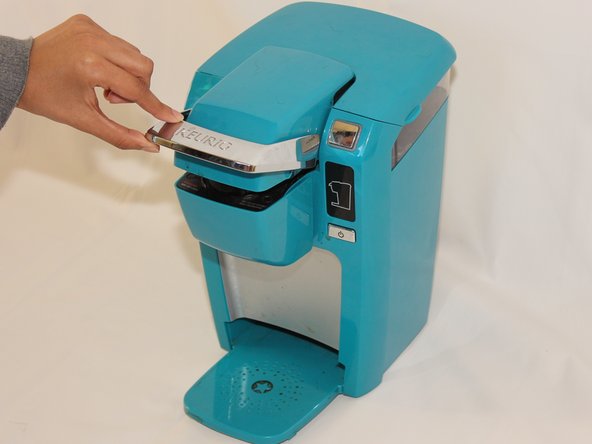
Diese Anleitung hilft dir dabei, deinen Wasserabgabeschlauch von Verstopfungen befreien. Um an den Schlauch zu gelangen, benötigst du einen Kreuzschlitzschraubendreher Nr. 1.
Neye ihtiyacın var
-
-
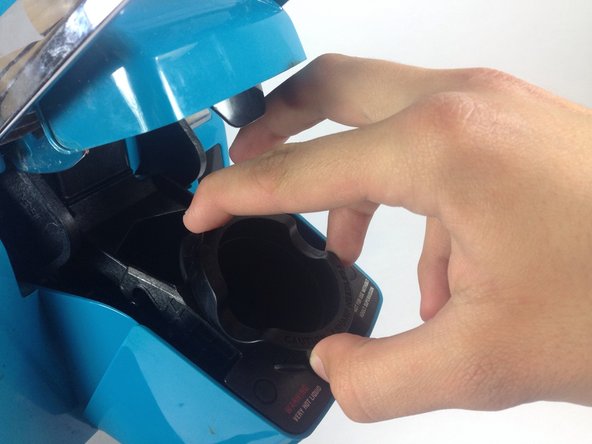
Lege einen Finger fest auf jede der drei Laschen, die den K-Cup-Halter in Position halten, und drücke sie leicht ein. Die Laschen sind schwer zu sehen, aber sie sind vorhanden und erleichtern das Herausnehmen.
-
Die obere Lasche befindet sich an der gleichen Stelle wie das weiße Dreieck und die unteren beiden befinden sich unter den in der Abbildung hervorgehobenen Kunststoffhöckern.
You may want to show a picture of the needles to show what exactly to avoid even though it might be blatantly obvious.
You should write "They" between "inside the K-cup because" and "may puncture your hand"
I did the needle up the 2 pin hole trick and it's working now!
What is a needle up the 2 pin hole trick?
Gina -
-
-
-
Öffnen den oberen Deckel der Keurig.
-
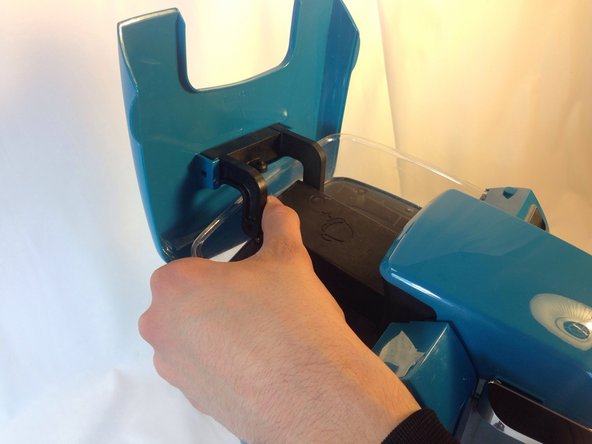
Ziehe einen der Arme, die den oberen Deckel festhalten, direkt nach außen. Es wird etwas Kraft erfordern, den Arm vom Stift zu lösen. Sobald eine Seite ab ist, wiederhole den Vorgang am zweiten Arm.
This step isn’t necessary.
Thank you!! Since I sure cldnt get both arms to come off!
I cannot get the arms to come off at all!
-
-
-
-
Stelle die Keurig aufrecht so hin, dass die Vorderseite in deine Richtung zeigt.
-
Ziehe die Abdeckung von der Oberseite der Keurig ab. Sie sollte sich einfach, mit wenig Kraft abnehmen lassen.
Not coming off easily. Pull toward front a little helps.
There are two plastic latching tabs that hold down the back of this cover, about 5/8 inch in from either side. It should be possible to locate them by probing along the back parting line with a thin-blade screwdriver and release them by pressing forward. Or apply excessive force like I did and break them off.
Thx for warning, Lytle!
The two tabs face forward so pushing on them won't help. Instead, push the cover BACK while wiggling its sideways. The cover may stick a little at first. You can pry it up SLIGHTLY but once a small gap opens, quit prying...just push back and wiggle sideways until the cover moves back about quarter inch and comes loose.
-
-
-
Greife den Schlauch fest und ziehe ihn von der Kunstoffdüse ab.
Before pulling, you can see if this portion of the tube is clogged. If clogged at the other end, you may be wasting time going further. See comments at the last step.
Maybe, but it’s unlikely to be the case. The transition from roomy hose to cramped needle outlets is where syphoned up coffee grounds get caked up. And you might not see it. I squeezed the hose at the union a few times and that made black crud come loose. A visual inspection only would not have shown that.
Our unit's hose end was secured with a plastic zip tie that had to be cut off. When replacing the hose, a new zip tie was required.
DO NOT cut it. Just slide the zip tie with your fingers. Then when reattaching the hose, put on hose first then shimmy zip tie back over union.
Thanks so much Sr Sr Jr for both comments here!
-
-
-
Entferne die beiden 9mm PH1 Kreuzschlitzschrauben an der Oberseite des Geräts.
-
-
-
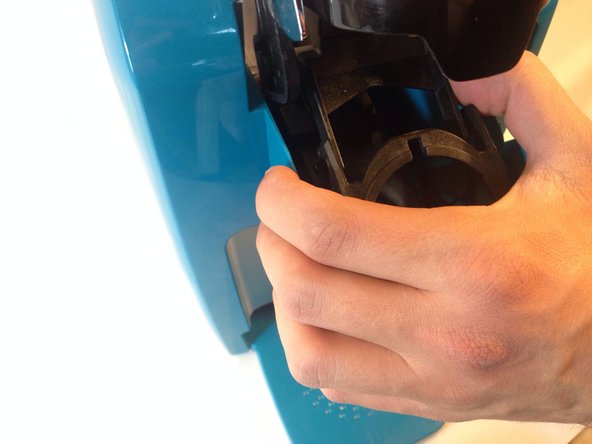
Drücke leicht auf die Düse, an welche der Schlauch angeschlossen war. Das Kunststoffgehäuse mit der Nadel sollte mit wenig Kraft abspringen.
Handle needs to be in upright position, then it pops out without force.
The screws for the top cover are hard to get back in because they are not attracted to magnets. But they are honestly unnecessary to put back, and most likely there to keep the cover in place during assembly and transport. It clips in nicely on its own and won’t come off during normal use.
-
-
-
Wenn die Nadel entfernt ist, öffne das Gerät, indem du den Griff hochziehst.
-
-
-
Drücke in einen der Arme der an dem K-Cups Halter Kunststoffgehäuse befestigt ist, um ihn von seinen Schienen zu entfernen. Die Arme für beide Seiten sind zueinander identisch, wenn also eine Seite frei ist, wiederhole den Vorgang für die zweite Seite.
-
Sobald die Arme entfernt sind, sollte es wie im Bild aussehen. Das K-Cup Halter Gehäuse sollte von den Armen getrennt sein.
My Keurig has white, nylon half-grommets to reduce wear, where the post of each arm slides in its slot. Take care that they do not fall down into the machine and that you do not lose them.
That just happened,( lost the grommet), I can hear it but can't get it out from inside the machine. I put everything back together and it is working. One note: may I suggest removing just the k-cup holder then removing the two screws for the top. you can then access the upper part of the hose. after that I used a long tie wrap (pipe cleaner would have been better, (I had given my tobacco pipes and cleaning equipment away last week.) Also I ran a bread tie down the top connection for the hose and into the needle. That is where I found the last of my clog. So now all I need is to find that little plastic piece and it will be perfect but it is working without it
Getting this part put back together is near impossible. White pieces keep falling off & don't seem to line up correctly with plastic arms. Over 1 hour to get to this point. Frustrating.
Don't take it apart at this point! Move on to the next step, then it is super easy to remove this front part in the same way but from the bottom pegs, if you want to clean all the small spaces covered in coffee dust and
Yes, the arm will break. Apparently after struggling with it for about an hour, it weakened the plastic enough to snap off the left arm of the cup holder. The machine now works, though! I’ll just have to be mindful when I use it. Looking back, I wish I had tried just cleaning out the needle first. Might have saved me significant frustration with the reassembly of this step.
I think you need to tell people that the arms with the white roller will break off after all the struggling the left side broke off Thank for the worthless info. Ron Nelson
At this point, I skipped remaining steps 13-16, mainly because I felt those steps are too much work to end up trying to “push out” grounds with my fingers (as described in step 16). Instead, I ran water through the mini-K as if I were making coffee—to remove all the grounds that I saw gunked up in the hose. I aimed the hose into a large bowl.
I ran water through as many times as needed to get water that was completely clear of any grinds—which took about six 8-ounce cups.
Thanks to others, whose comments helped me as I was going through the previous steps. :D
-
-
-
Hebe den Arm hoch und ziehe die Griff-Baugruppe hoch. Sie sollte einfach abgehen.
-
Diese weiße Lasche kann leicht abfallen, entferne sie und lege sie beiseite, damit sie nicht verloren geht.
The first picture is a little on the dark side, but I could still tell what you're trying to say in the picture. Maybe make it a little brighter?
The second picture in this step shows the white plastic 'slide guide thinger', it is however upside down. During reassembly make sure to have it the other way so that the handle assembly will stay up when installing a k cup. If not the handle will fall everytime you let it go making for a frustrating coffee going experience especially if your not a morning person. :)
If your clog is in the other end of the hose, you are out of luck. I had only used my machine about 6 times before it wouldn't dispense. I disassembled the contraption, and stuck a pipe cleaner down the hose. There is no clog. Keurig is sending me a $50 coupon to apply toward a new machine.
-
-
-
Hebe den Arm der Keurig Mini an, um ihn aus dem Weg zu bekommen.
-
Halte den Wasserschlauch an der Basis, drücke ihn dabei fest zusammen.
-
Schiebe, während weiter Druck auf den Schlauch ausgeübt wird, deine Finger den Schlauch entlang, um alles Material herauszudrücken, welches den Schlauch verstopft.
-
Wiederhole den Vorgang, bis alle Verstopfungen entfernt sind.
What if the clog is at the other end of the hose?
See above for my fix with the syringe with boiling water.
To kimthetoollady. Where can I find your "above" fix?
Our tube had visible grounds clogs deep into the tube. So took our house vacuum hose and cupped my hand around it and the tube. Clogs instantly sucked into the vaccum - even pulled a few drops of water from the tank. Took no time, no boiling water and did not have to take out the needle to do. Will work with shop-vac hose as well.
I need the white rubber piece in the picture mine has tear in it and it caused water to not seal
-


Um dein Gerät wieder zusammenzubauen, folge diesen Anweisungen in umgekehrter Reihenfolge.
Um dein Gerät wieder zusammenzubauen, folge diesen Anweisungen in umgekehrter Reihenfolge.
İptal et: Bu kılavuzu tamamlamadım.
38 farklı kişi bu kılavuzu tamamladı.
Bu çevirmenlere özel teşekkürler:
100%


Bu çevirmenler dünyayı onarmamıza yardım ediyor! Katkıda bulunmak ister misiniz?
Çeviriye Başlayın ›
Ekip

Cal Poly, Team 17-1, Forte Winter 2014 Cal Poly, Team 17-1, Forte Winter 2014 üyesi
CPSU-FORTE-W14S17G1
5 Üyeler
17 adet Kılavuz yazıldı
42 Yorum
To clear the hose I needn't have gone beyond step 9. Once the hose is detached one can run a pipe cleaner down it. I was amazed how many coffee grounds were stuck way up there where there shouldn't be any!
A tip would be to use a magnetized screwdriver: I was worried that the screws would fall into the workings of the machine.
For the final step of reattaching the lid, having a second person would help or perhaps holding it between your knees might help - trying to apply pressure to the screws also made the arms/compartment want to collapse/ close so that was a bit of a challenge.
Very informative instructions and I now have a Keurig that works again!! :)
Thumbs up on the magnetized screwdriver tip
M A -
The screws are stainless steel and are thus not magnetic.
jastpeel -
The screws were magnetic for me.. they are probably a carbon steel Or galvanized. They aren’t stainless.
Amanda T -
While you have your brewer this far apart it would be wise to take a small wire or even a sewing needle and run it down the slightly squared, open side of both of the Keurig needles. You'll be surprised at how grounds have gotten in there and slowed the flow of output liquid, mine flows like a new one again.
Your comment saved me a lot of hassle. I didn't even have to go to step 2. I just threaded a small wire through the hole, and it went from completely blocked to like new. Thanks for the wire threading idea. I didn't have to take apart anything!
Grateful -
I have never been able to follow an instruction manual in my life but I'm feeling pretty good right now. Not only did I fix my Kuerig but I managed to get all the pieces back where they were supposed to be. Thanks for the great directions!
I was able to clear the hose using just canned air!! I just pointed the little red straw into one of the holes in the Keurig needle, closed off the other holes in the needle with my thumb and first finger, gave it a blast and BAM, the water was flowing again. Maybe my clog was in the needle, but I think that's unlikely because I had already cleaned it out throughly with a sewing pin. I know the seal with my fingers wasn't great, but apparently it was good enough to push the air all the way through the tube because I could hear it bubbling up in the water reservoir. It's worth a try before you take your machine apart!
I am with wheelers3. You directions were good, but the OTHER end is where the clog is. I can't blow air through it, pipe cleaners were not long enough. How do I get the water reservoir off? Please advise. Your directions were good & easy to follow, just stopped one step too soon. TIA. Kim
http://s1378.photobucket.com/user/spikem...
I found this step by step album, it's excellent work! My complements and thanks to the owner. hope it helps you
Our tube had visible grounds clogs deep into the tube. So took our house vacuum hose and cupped my hand around it and the tube. Clogs instantly sucked into the vaccum - even pulled a few drops of water from the tank. Took no time, no boiling water and did not have to take out the needle to do. Will work with shop-vac hose as well.
M A -
Worked like a charm. Thanks
Thank you you helped me so much...XOXO
This worked great as a guide to disassembling the keurig wheather your clog is in the needle or the hose. Its nice too know whats involved in something before you go tearing into it. My clog was deep in the hose and i was without pipe cleaners so i used my faucet on low to run water thru the hose backwardss and also blew thru it. I then dumped out the water by turning the whole thing upside down and repeated until all of the debris came out. One thing to note during assembly is the direction of the white plastic piece that acts as a slide guide that the author made reference to when noting that it fallls out easily. I used the photo he posted as directional reference and found that if assembled in this way the handle assembly will not lock in the upright position when installing a new kcup. btw does anyone have any good tips for preventing debris from entering the system in the first place
Our debris was 100% coffee grounds, so grounds must back up into the pipe because of back pressure during the brewing process. Then if those grounds sit in the tube and in the needle for a while, they harden up. Two tips then: 1. immediately remove used K-cup after brewing so the needle is not sitting in the K-cup's pile of cooling, hardening grounds, 2. "brew" a cup of hot water, no K-cup, every second or third cup to clear the tube/needle with no back pressure and 3) paper clip the needle regularly so its channels stay open and reduce back pressure. Brew on!
M A -
After trying all of this, fighting like a dog to take it apart from the bottom to no avail because I figured that was where my clog was, I decided to try something outside the box. I felt that there was goop inside the bottom part of my white hose. I took a syringe and injected boiling water down the white tube. A turkey baster would work too! I pushed in boiling water until it spewed back at me. I let it sit for a few minutes, tipped the whole contraption upside down to drain the water out and then repeated my hot water syringe again. Tipped the water out as best I could, but its okay if water is still in the tube. I then went through the normal process of making a cup of coffee, less the K-cup, and let it run through and viola! it worked! I've run it a few times to make sure it is running through. I have now poured vinegar into the system and letting it set to clear out any other sediments, and will run it through a few more times. I'm happy I was able to fix this!
Okay so I cleaned out the hose and put it back together but now when I try to brew, the "Brew" button won't highlight. It's stuck between telling me to add water and to add a Kcup. Please tell me I'm not the only one who had this problem. And how to fix it. I must have done something wrong because the previous commenters seem like they had no problems!
You're not the only one. Our button would not even light. So tried to disassemble from the bottom to get to the switch. A nightmare, so gave up, reassembled assuming I would have to go to step 17 - order new unit. Well, it "came back to life" after reassembly but on persnickety basis - the button has to be rolled around in just the right way! So because it was my mother-in-law's "must have" brewer, I went to step 17 anyway for her as Mother's Day gift and kept the precocious one to take to my office. It works but must be lovingly handled. All parallels to a successful marital strategy are purely coincidental - grin.
M A -
This helped so much, I used a syringe to pull through the tube. Although very happy that it's brewing again, cool water is trickling down to my cup as water is heating. What could be causing this?
Classic - my thoughts as well!
I skipped these steps and instead stuck a needle up into the big top "needle." Clean as a whistle now!
YESSSS worked like a charm!! Excellent step by step guide-- the pictures were incredibly helpful. Thank you!!
Wow! Thanks for the superb advice!
Thank you so much! I ended up just having to fill the tube with my faucet and then suck whatever was stuck in there out, since I didn't have pipe cleaners or anything. Maybe not the safest or most sanitary option but whatever was stuck came out!
Extremely helpful. Yay coffee again
You don't know how much I appreciate the step by step w pictures, thank you so much!!
Great instructions! I might recommend instructing users who think their hose is clogged to be sure it’s not the needle first (which can be cleared with a paperclip and minimal disassembling). These directions were spot on though, and reassembly wasn’t difficult!
Thank you ever so much. I was about the throw out the machine before I read your easy to follow steps to fix. I only needed to go to step 9 to unclog the hose and I am back to using my machine. 5 stars to you.
Great advice and directions with photos! Thanks, it worked and yes you only have to get to the tubing by removing the lift handle decorative cover, then the screws to remove the cover where the actual tubing connects to cup below. Was easy to just pull off the tubing, fill the cup of water into the tank, open lift handle allowing water into the pump area, hit brew and have the tubing ready to shoot out quickly into a bucket or deep pitcher and all the grinds or scales will come out instantly. You can do a few more times to be sure. Worked like a charm! Put back on the tubing and put small tie strap back on if you prefer. Reattach the 2 small screws from the lift handle cover ( one that was hiding the tubing) put top decorative cover back on and wa-la! You are done! * Hint: If you think it needs descaled go ahead and do your vinegar cleanse at this time with the water in cup to completely clean out. TGonnsen 3/27/2018
The instructions were good! I thought something was wrong with my keurig until I cam across these instructions. Keep up the good work!
Thank you for the easy to follow step by step instructions!
The original manufacturer’s instructions state to press up on the outlet of the k-cup holder to remove it. It simply pops right out for cleaning.
I experienced the problem of no water coming and reviewed the above method of restoring the flow and decided to try an easier fix. I sat the Keurig on the edge of the counter and shined a light up so I could see the upper blades where the water comes into the cup. I then put a thin wire made for cleaning spray guns through the hole in the blades several times and then put water through the brew cycle and a lot of grounds came out and flow was restored to normal. You can buy spray gun needles at most any hardware store.
It would've been nice if you included the reasembly instructions as well. Concluding w just follow steps in reverse was just plain inconsiderate and downright stupid. After 2 hrs of struggle and trying to follow your steps in reverse, my Keurig is now unworkable and has to be thrown away. Thanks for 3 wasted hrs. Before anyone else attempts this, go on YouTube for much more easier ways to fix a probably small issue rather then taking the whole thing apart then not able to reassemble it and have to get rid of it anyways.
You really should have put pictures for reassembly. I put it back together but now it doesn’t work. These instructions should be removed. First it took me over an hour to take it apart for a tiny clog, and then when I reassembled it, it stopped working. Now I have to buy a new one, and they’re not cheap. I wished I had scrolled down and chose other instructions but this one was the first one that pops up on Google search.
My, My! To bas4764 and katym72 specifically - your negative comments on the very informative and helpful tutorial speaks loudly and in volumes greater than you probably expected ( I bet you thought you’d get a full bandwagon of ingrates to jump in with you) of your ineptness! since you seem to appreciate rudeness I thought I would accommodate you
Considering the cost of this machine, Keurig should be ashamed. It is a piece of junk.
we have this unit so i was very thankful that you have put this info out thier. i have taken the unit apart to the steps that you have shown. how far can the unit be disassembled if the blockage is further inside the unit. you can hear the pump cycle but no flow just leakage from the bottom. the unit is not used every day and i believe that this is possibly the root cause. everything else appears to be snap together assembly, and i am conserned that i will just break a few of the tabs trying to go deeper into the unit