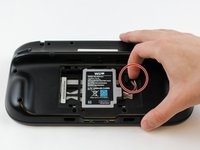
Ana içeriğe geç

Wii U GamePad Outer Case Replacement

Neye ihtiyacın var

  1. Wii U GamePad Outer Case Replacement, Battery: adım 1, 1 resimden 1.
    • Place Gamepad face down and remove the two 4.7 mm screws with a Phillips size #00 screwdriver.

  2. Wii U GamePad Outer Case Replacement: adım 2, 1 resimden 1.
    • Lift and remove the battery plate.

  3. Wii U GamePad Outer Case Replacement: adım 3, 3 resimden 1. Wii U GamePad Outer Case Replacement: adım 3, 3 resimden 2. Wii U GamePad Outer Case Replacement: adım 3, 3 resimden 3.
    • With your finger, press down and pull back on the battery connector plug.

    • Remove the battery from the battery case.

  4. Wii U GamePad Outer Case Replacement, Outer Case: adım 4, 3 resimden 1. Wii U GamePad Outer Case Replacement, Outer Case: adım 4, 3 resimden 2. Wii U GamePad Outer Case Replacement, Outer Case: adım 4, 3 resimden 3.
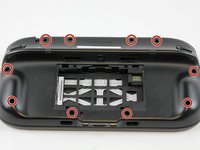
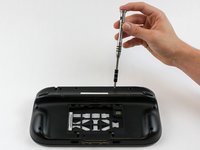
    • Remove 10 9mm screws with Tri-Wing size Y1 screwdriver around the outer case.

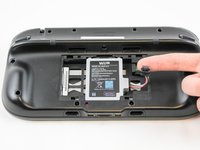
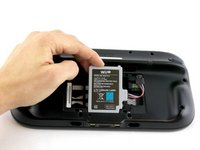
    • Lift up on the back of case.

    • Lift gently because the rumble motor in the back of the case is still connected by a cable to the motherboard.

  5. Wii U GamePad Outer Case Replacement: adım 5, 1 resimden 1.
    • Unplug outer case rumble motor connector from the motherboard with your fingers.

Sonuç

To reassemble your device, follow these instructions in reverse order.

4 farklı kişi bu kılavuzu tamamladı.

Valentina Cerruty

Üyelik tarihi: 02/10/16

3.345 İtibar

7 adet Kılavuz yazıldı

Ekip

USF Tampa, Team 1-6, Sullivan Spring 2016 USF Tampa, Team 1-6, Sullivan Spring 2016 üyesi

USFT-SULLIVAN-S16S1G6

4 Üyeler

40 adet Kılavuz yazıldı

2 Yorum

This doesn't show anything about taking the front of the housing off, is that relatively straightforward?

Will Prosser - Yanıt

This doesn't show anything about the L and R sticks like moving on its own when i play, do you how to fix that?

Victoria Gonzalez - Yanıt

Yorum Ekle

İstatistikleri Görüntüle:

Son 24 Saat: 6

Son 7 gün: 35

Son 30 gün: 160

Her zaman: 6,311