Ana içeriğe geç
Onarım Topluluğuna Katılın - Hesap Oluşturun

Xbox Fan Replacement

Neye ihtiyacın var

Videoya Genel Bakış

    1. Xbox Fan Replacement, Fan Replacement: adım 1, 1 resimden 1.
      • Turn the Xbox on its back and remove the rubber feet in each corner using a flathead screwdriver.

      FixBot'a Sor

      Yorum Ekle

    2. Xbox Fan Replacement: adım 2, 1 resimden 1.
      • Peel off the stickers on the bottom side of the Xbox and unscrew all six screws using a Torx 20 screwdriver bit. Set the screws off to the side so you don't misplace them.

      FixBot'a Sor

      Yorum Ekle

    3. Xbox Fan Replacement: adım 3, 1 resimden 1.
      • Turn the console upright and remove the lid.

      • If you are having some trouble getting the lid off, try gently shaking the device while you pull up.

      FixBot'a Sor

      Yorum Ekle

    4. Xbox Fan Replacement: adım 4, 1 resimden 1.
      • In order to remove the IDE cable, pull firmly on the cable straight back from the hard drive.

      • This may be slightly difficult; wiggling the cable back and forth will help to unfasten it.

      FixBot'a Sor

      Yorum Ekle

    5. Xbox Fan Replacement: adım 5, 1 resimden 1.
      • Remove the screw from underneath the IDE cable using a Torx 10 screwdriver.

      • This screw is located between the hard drive and DVD drive.

      FixBot'a Sor

      Yorum Ekle

    6. Xbox Fan Replacement: adım 6, 1 resimden 1.
      • Remove the hard drive by pulling it directly up and out of the case.

      • The hard drive is attached to a power cable, but you shouldn't need to remove the power cable to get the drive out unless you are replacing the hard drive.

      FixBot'a Sor

      Yorum Ekle

    7. Xbox Fan Replacement: adım 7, 1 resimden 1.
      • Remove the cable the same way that the hard drive cable was removed. Simply pull the cable straight out from the DVD drive.

      FixBot'a Sor

      Yorum Ekle

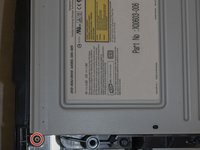
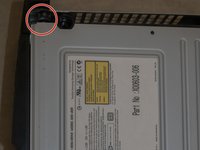
    8. Xbox Fan Replacement: adım 8, 2 resimden 1. Xbox Fan Replacement: adım 8, 2 resimden 2.
      • Remove the screws from each end of the DVD drive using a Torx 10 screwdriver.

      FixBot'a Sor

      Yorum Ekle

    9. Xbox Fan Replacement: adım 9, 1 resimden 1.
      • Once both screws have been removed pull straight upwards to remove the drive.

      FixBot'a Sor

      Yorum Ekle

    10. Xbox Fan Replacement: adım 10, 1 resimden 1.
      • Unscrew all eleven screws that hold the mother board in place. Use a Torx 10 screwdriver to unscrew them.

      FixBot'a Sor

      Yorum Ekle

    11. Xbox Fan Replacement: adım 11, 1 resimden 1.
      • Remove the power cord by gently lifting it out at a 45 degree angle.

      • After the power cord is removed gently lift out the mother board by placing your fingers around the edges inside the case and lifting straight up and out.

      FixBot'a Sor

      Yorum Ekle

    12. Xbox Fan Replacement: adım 12, 1 resimden 1.
      • Remove the old fan by pressing gently on the clips on each side with a flathead screwdriver and then carefully clip in a new fan.

      FixBot'a Sor

      Yorum Ekle

Sonuç

To reassemble your device, follow these instructions in reverse order.

İptal et: Bu kılavuzu tamamlamadım.

4 farklı kişi bu kılavuzu tamamladı.

Keiko McMaster

Üyelik tarihi: 10/10/18

247 İtibar

1 Kılavuz yazıldı

0Kılavuz Yorumları

Yorum Ekle

İstatistikleri Görüntüle:

Son 24 Saat: 9

Son 7 gün: 55

Son 30 gün: 238

Her zaman: 9,595