Neye ihtiyacın var
-
-
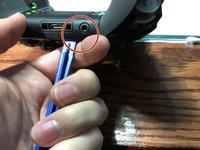
Remove the 5 Torx Security Bit (TR9) screws.
all the T8 screws on my controller have a clear filling in them, WTF?!?!?
all my T8 screws have a clear filling in them, WTF?!?!?!
I've never seen that, I can't advise much other than scrapping it out with an xacto knife
My screws have a tiny metal pin in the center. Looks like I need a TR8 bit, not a T8. This might be what you are mistaking for a clear filling.
Thanks it might be TR8 i’ll update the guide
@isbelldl thanks, updated to specify TR9
TORX TR8 worked form the ifixit kit
My anolog stick is lagging on my elite 1 controller. Can I remove a anolog module from a normal xbox 1 controller and then put into the elite 1 controller would it be compatible. I have all the soldering irons and stuff. It's only that I dont have any money and wanted to no if thay would work . Thanks guy appreciate your time kris
-
-
-
You can pop the connector up to remove the ribbon easily.
-
Ribbon Cable
My connector did not look like this and popping it up broke it
please post a picture of the connector so we can update this, you also might have a newer revision of the motherboard
@joe you can try tape, or even hot glue (easy to remove with rubbing alcohol), that might hold it down. I wasn’t able to find the connector but i’m sure if you count the number of pins and measure it you’d be able to locate a replacement connector on something like mouser.
God i wish or a vid on this
-
-
-
-
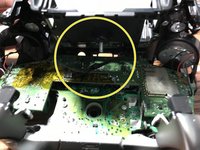
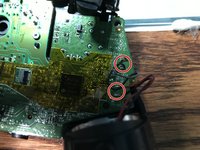
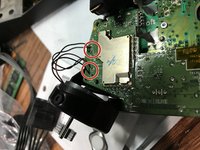
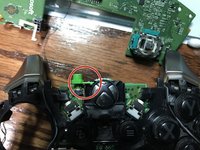
Desolder the 4 wires on each side, these control the vibrations and the RT LT.
-
-
-
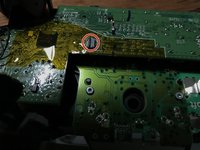
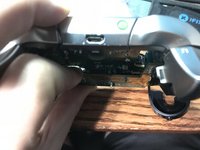
Pull up from the "top" side of the controller on the daughterboard.
Hi,
I would like to know if I could get from you a Motherboard . In case you don' t have it, where could I find one?
Thank you
You mean like this one? Xbox One Elite Controller (1698) Daughterboard
Hi, I have 2 not working controllers (both 1698 and 1708). The 1708 broke the bumper switch, I manage to fix it but as always, postponed. So, can I either swap Xbox One Elite comtroller (1698) into Xbox One (1708) shell/housing or vice versa??
Or can I mix both motherboard together so I can make one of them working?
It might work…it might damage one of the boards but probably wouldn’t
I don’t work for ifixit, I don’t know if they see comments on a private made guide.
I decided to toss all this stuff in the trash at this point as I am not going to spend +$50 on equipment and replacement parts to fix a $60 controller. But thanks for the educational manual all the same.
-
-
-
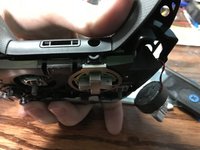
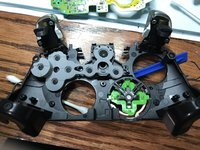
Unscrew the 6 Torx (T6) screws.
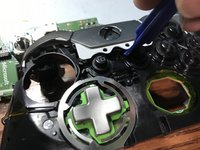
On the 2nd picture: the D-pad dome switches are covered by a clear plastic film: is possible to remove it/reattach that plastic film? I believe there might be something stuck underneath the dome switches that’s interfering with the d-pad buttons working reliably/consistently. I know I could just replace the daughterboard, but I’m trying to avoid doing that if I can just clean it some how/find a way around it
This is just tacom tape :), feel free to buy more and replace
Hi anyone know of where to find that rubber thing that goes on lb/rb trigger?
rubber thing? You mean the lb and rb part itself? or the home button section?
The lb/rb white rubber behind the button supoort rubber i dont know how its called
-
-
-
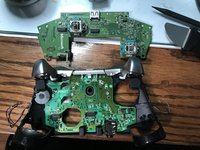
Now you can remove the buttons themselves.
how Is this considered difficult took me 15 mins
Cool it, no need to be like that. You're the one using their tutorial, how about you just say thanks
Same, also if anyone’s wondering the stick drift I had was just caused by hair and gunk in the mechanisms of the controller, same with the d pad not working, just by simply taking the controller apart and fully cleaning it and bending a few things back into place all issues are gone
Rip my ribbon cable
-


To reassemble your device, follow these instructions in reverse order.
To reassemble your device, follow these instructions in reverse order.
İptal et: Bu kılavuzu tamamlamadım.
42 farklı kişi bu kılavuzu tamamladı.

14Kılavuz Yorumları
Is there any way I could just do step 8, removing the Home cover? I simply need to fix my USB port so i dont really wanna take it completely apart just for that.
Desoldering the rumble motors isn't necessary, nor is removing the first motherboard. Once you get that back panel off, you're golden.
Ya hi i opened my controller and right away i don’t see ether bolt in both handles. 4 i believe to top two bottom.
Suggestions please.
I found using a TQ5 for the 2 motherboard screws worked the best on my controller not a T6
Thanks for the info
Awesome guide. After taking mine apart it won’t turn on without plugging it in first. When I plug it in it turns on and I can unplug it and use it like normal but the Xbox button won’t turn the controller on by itself. Have you ever encountered that?
I have never run into this, that is definitely an unusual problem
how to glue this sh*ty ribbon? mine also badly removed by itself
You probably would want to count the wires in the ribbon and then buy a replacement
Anyone have a solution for the incredibly uncommon problem where: maximum input to left analog ↑ forward and depressed (sprint/tactical sprint for Modern Warfare) will be read as a pull or incredibly rapid pulls on the right trigger? Have an elite II that I needed to send in cause of another left stick issue (ridiculous) an I pulled out my old elite 1 that worked perfectly before but suddenly I have this going on. its not a mapping issue and it will stop if I change to another stick attachment but after a minute or so will start again. Change stick, start again, etc. Ready to leave the soldering iron over the middle of the device and go for a long walk…
Unless you are replacing the motherboard, you probably don’t have to de-solder the wires to the rumble motors or triggers. I carefully pulled the trigger wires out of their channels and had plenty of room to move the motherboard out of the way to pull the daughterboard. This allows a lot of replacement without having to solder anything. Note that it helps a lot to tape the rumble motors into their slots since they are just sitting in there and may fall out while you are trying to manipulate the daughterboard.
Mine the right bumper broke a clip or something on the outside part n it will drop or move n get stuck or make the trigger stuck n not work drives me inside is there a fast easy way to say remove it without taking it all apart don't don't do that n I'll map it to the lower ones or something? And do these have a warranty some say it dose jw thanks to any who help or reply to this in advance
how would i fix drift on the joysticks