Bu sürüm, hatalı düzenlemeler içerebilir. En son doğrulanmış bellek kopyası dönün.
Neye ihtiyacın var
-
Bu adım çevrilmemiş. Çevrilmesine yardım edin
-
To open your Xbox, you're going to have to cut or peel up this tamper-evident tape. But don't worry—Microsoft can't legally void your warranty, as long as you don't damage anything. Have fun!
-
-
Bu adım çevrilmemiş. Çevrilmesine yardım edin
-
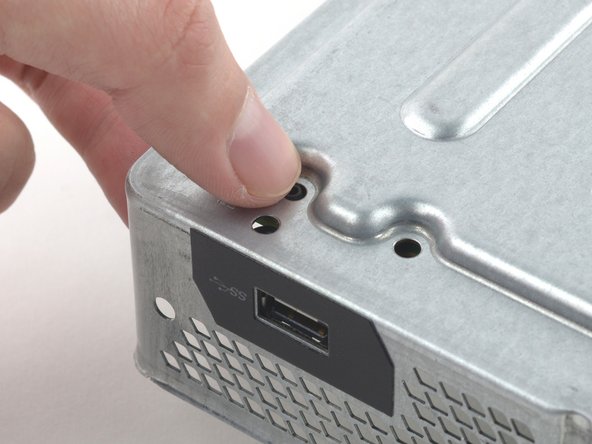
Use a plastic opening tool to pry up and remove the plastic vent that surrounds the side USB port.
-
The vent is fairly flexible, and held in place with weak plastic clips—start prying from the back and peel it out.
-
-
Bu adım çevrilmemiş. Çevrilmesine yardım edin
-
Insert the flat end of a spudger between the upper and lower case where they meet at the rear of the side vent opening.
-
-
Bu adım çevrilmemiş. Çevrilmesine yardım edin
-
Insert a plastic opening tool between the upper and lower case to separate the clip over the rear vent.
-
-
Bu adım çevrilmemiş. Çevrilmesine yardım edin
-
Keep moving along the rear of the Xbox, prying up clips.
-
-
Bu adım çevrilmemiş. Çevrilmesine yardım edin
-
Keep popping clips. It may help to slide the plastic opening tool across the clips.
-
-
Bu adım çevrilmemiş. Çevrilmesine yardım edin
-
Starting with the spudger you left in the crack, pry the upper case up to free the last few clips.
-
Lift the upper case slightly and shift it to give access to the front panel board.
-
-
Bu adım çevrilmemiş. Çevrilmesine yardım edin
-
Use tweezers to lift the blue plastic retaining loop over the white connector on the board.
-
Use the tip of a spudger to push the connector's locking tab toward the cable to unlatch it.
-
-
Bu adım çevrilmemiş. Çevrilmesine yardım edin
-
Use tweezers to pull the cable straight out of the connector on the board.
-
Remove the upper case.
-
-
Bu adım çevrilmemiş. Çevrilmesine yardım edin
-
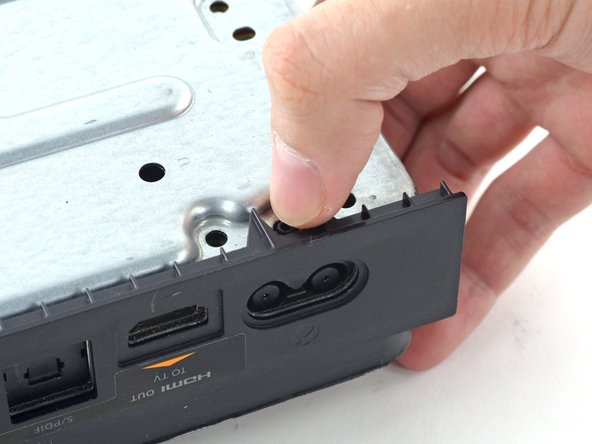
Use the flat end of a spudger to free the clips securing the front panel to the upper case.
-
Remove the front panel from the rest of the upper case.
-
-
Bu adım çevrilmemiş. Çevrilmesine yardım edin
-
Replace the top part of the upper case.
-
Line up the clips and press firmly to re-seat them around the perimeter.
-
-
Bu adım çevrilmemiş. Çevrilmesine yardım edin
-
Support the front panel near the front of the Xbox.
-
Use tweezers to replace the front button cable in its ZIF socket.
-
Use the flat end of a spudger to push the ZIF lock to the left to secure the cable.
-
-
-
Bu adım çevrilmemiş. Çevrilmesine yardım edin
-
With the front panel at a 45 degree angle, interlock its plastic hooks with those in the lower case.
-
Push the top of the front panel into the Xbox, like closing a mailbox. Press firmly so that the clips securing the front panel to the upper case lock securely.
-
-
Bu adım çevrilmemiş. Çevrilmesine yardım edin
-
Gently pull up on the speaker cable connector to disconnect it from the front panel board.
-
Use the flat end of a spudger to disconnect the antenna cable from the front panel board.
-
-
Bu adım çevrilmemiş. Çevrilmesine yardım edin
-
Remove the two 9.5 mm T8 Torx screws from the WI-Fi board.
-
Lift the Wi-Fi board straight up from its socket in the upper metal case.
-
Leaving the Wi-Fi board antenna cable in place, move the Wi-Fi board aside, exposing the screw labeled "C3" that was beneath it.
-
-
Bu adım çevrilmemiş. Çevrilmesine yardım edin
-
Remove the eight 65 mm Torx T10 screws from the top of the upper metal case.
-
-
Bu adım çevrilmemiş. Çevrilmesine yardım edin
-
Disconnect the Wi-Fi board interconnect cable from the motherboard.
-
-
Bu adım çevrilmemiş. Çevrilmesine yardım edin
-
Disconnect the hard drive SATA power and data cables from the motherboard.
-
-
Bu adım çevrilmemiş. Çevrilmesine yardım edin
-
Disconnect the optical drive power and SATA data cables from the motherboard.
-
-
Bu adım çevrilmemiş. Çevrilmesine yardım edin
-
Remove the three 9.5 mm T9 Torx screws securing the front panel board.
-
-
Bu adım çevrilmemiş. Çevrilmesine yardım edin
-
Disconnect the front panel board from its socket in the front of the motherboard.
-
-
Bu adım çevrilmemiş. Çevrilmesine yardım edin
-
Pinch the arms together and pull the barbs out through the frame to remove the posts.
-
-
Bu adım çevrilmemiş. Çevrilmesine yardım edin
-
Remove the 8.3 mm T9 Torx screw securing the white plastic screw post to the lower metal frame.
-
Remove the white plastic screw post from the frame.
-
-
Bu adım çevrilmemiş. Çevrilmesine yardım edin
-
Remove the following screws from the bottom of the lower frame:
-
Four 11.2 mm T10 Torx screws
-
Four 9.5 mm T9 Torx screws
-
-
Bu adım çevrilmemiş. Çevrilmesine yardım edin
-
Lift the motherboard and heat sink/fan assembly out of the lower metal case.
-
-
Bu adım çevrilmemiş. Çevrilmesine yardım edin
-
Insert the tip of a small flathead screwdriver between the post and the outer edge of one arm of the X-clamp.
-
Gently rotate the screwdriver, lifting the arm of the X-clamp up and off of the post.
-
-
Bu adım çevrilmemiş. Çevrilmesine yardım edin
-
Use the same rotating technique to free one more arm of the X-clamp from its post.
-
Remove the X-clamp.
-
-
Bu adım çevrilmemiş. Çevrilmesine yardım edin
-
Lift the motherboard off of the fan/heat sink assembly.
-
-
Bu adım çevrilmemiş. Çevrilmesine yardım edin
-
Use a plastic opening tool to pry the two clips on one side out of the channel in the side of the heat sink.
-


İptal et: Bu kılavuzu tamamlamadım.
40 farklı kişi bu kılavuzu tamamladı.

5 Yorum
Can you by chance get the measurements for the heatsink such as the mounting points and height of the heatsink?
Hi.I've just wondering can i put a liquid metal thermal paste i think the radiator has to be copper and that's all , pluses of the procedure that liquid metal thermal paste doesn't age, and the xbox will need only fan cleaning
Pry on the sides in a x formation, and when you get it on the post, just push down till you see it click in to the groove on the heatsink post
Disassembled removed dust with a brush, replaced the thermal paste and reassembled in 50 minutes. Feeling like a pro lmao.