Bu sürüm, hatalı düzenlemeler içerebilir. En son doğrulanmış bellek kopyası dönün.
Neye ihtiyacın var
-
Bu adım çevrilmemiş. Çevrilmesine yardım edin
-
Before you begin, switch off your phone.
-
Apply a heated iOpener to the rear glass to loosen the adhesive beneath the edges. Apply the iOpener for at least two minutes.
-
-
Bu adım çevrilmemiş. Çevrilmesine yardım edin
-
Secure a suction handle to the lower edge of the rear glass, as close to the edge as possible.
-
Lift the rear glass with the suction handle to create a gap between the glass and the frame.
-
Insert an opening pick into the gap.
-
Slide the opening pick to the bottom right corner of the phone.
-
-
Bu adım çevrilmemiş. Çevrilmesine yardım edin
-
Insert a second opening pick and slide it to the bottom left corner to cut the adhesive.
-
Leave the opening picks in place to prevent the adhesive from resealing.
-
-
Bu adım çevrilmemiş. Çevrilmesine yardım edin
-
Insert a third opening pick at the bottom left corner.
-
Start to slide the opening pick from the bottom left corner along the side of the Xiaomi Mi 9 to cut the adhesive.
-
Leave the opening pick in the top left corner to prevent the adhesive from resealing.
-
-
Bu adım çevrilmemiş. Çevrilmesine yardım edin
-
Insert a fourth opening pick under the top left corner of the rear glass.
-
Slide the opening pick along the top to cut the adhesive.
-
Leave the opening pick in the top right corner to prevent the adhesive from resealing.
-
-
-
Bu adım çevrilmemiş. Çevrilmesine yardım edin
-
Insert a fifth opening pick at the top right corner of the phone.
-
Slide the opening pick along the right edge to cut the remaining adhesive.
-
-
Bu adım çevrilmemiş. Çevrilmesine yardım edin
-
Remove the ten Phillips #00 screws (3 mm length) that secure the motherboard cover.
-
-
Bu adım çevrilmemiş. Çevrilmesine yardım edin
-
Insert an opening pick at the top right corner of the motherboard cover.
-
Twist the opening pick sideways to pry up and slightly lift the motherboard cover.
-
-
Bu adım çevrilmemiş. Çevrilmesine yardım edin
-
Carefully remove the motherboard cover including the charging coil / NFC antenna.
-
-
Bu adım çevrilmemiş. Çevrilmesine yardım edin
-
Use a spudger to pry up and disconnect the battery flex cable.
-
-
Bu adım çevrilmemiş. Çevrilmesine yardım edin
-
Use a pair of tweezers to pell the copper tape off the motherboard and fold it out of the way.
-
-
Bu adım çevrilmemiş. Çevrilmesine yardım edin
-
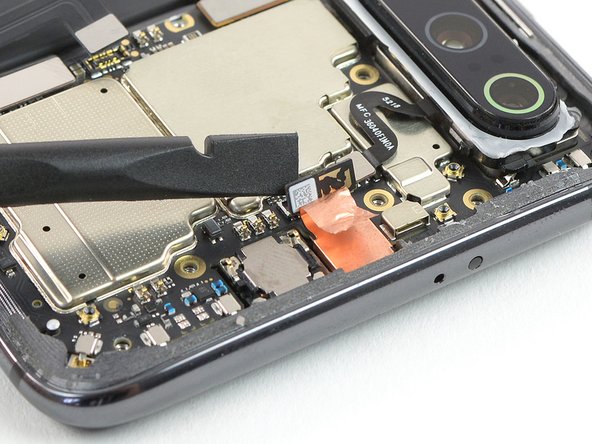
Use the flat end of a spudger to pry up and disconnect the flex cable of the front camera.
-
-
Bu adım çevrilmemiş. Çevrilmesine yardım edin
-
Use a pair of tweezers to lift the front camera out of its recess and remove it.
-


İptal et: Bu kılavuzu tamamlamadım.
Bir başkası bu kılavuzu tamamladı.


4 Yorum
Can you suggest a replacement Front camera where I can purchase?
Muchísimas gracias por la guía. Pude Limpiar la cámara frontal sin ningún problema.
Hello,
is there also a possibility to exchange a display on a Mi9?
Best Regards
Frank
Hi Frank,
this AMOLED & Digitizer guide might be the one you’re looking for.