Ana içeriğe geç
Onarım Topluluğuna Katılın - Hesap Oluşturun

Yuneec Breeze 4K Camera Replacement

Neye ihtiyacın var

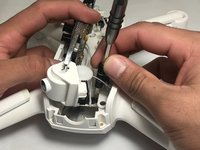
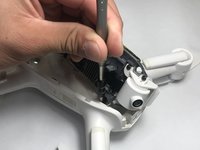
  1. Yuneec Breeze 4K Camera Replacement, Camera: adım 1, 2 resimden 1. Yuneec Breeze 4K Camera Replacement, Camera: adım 1, 2 resimden 2.
    • Before you begin start by putting on a ESD wrist strap to prevent ESD damage and remove the battery.

    • Once the battery is taken out, flip over the drone so that the cameras are now facing up.

    FixBot'a Sor

    Yorum Ekle

  2. Yuneec Breeze 4K Camera Replacement: adım 2, 1 resimden 1.
    • Using small pliers grip the connector of the wire and pull it out slowly.

    FixBot'a Sor

    Yorum Ekle

  3. Yuneec Breeze 4K Camera Replacement: adım 3, 1 resimden 1.
    • Remove the four white rubber dampeners located in each corner of the frame that hold the it in place.

    FixBot'a Sor

    Yorum Ekle

  4. Yuneec Breeze 4K Camera Replacement: adım 4, 1 resimden 1.
    • Unplug the two vertical plugs located in the rear of the M7 board.

    FixBot'a Sor

    Yorum Ekle

  5. Yuneec Breeze 4K Camera Replacement: adım 5, 1 resimden 1.
    • Slightly lift the M7 board to remove the two plugs located under the rear of the board.

    FixBot'a Sor

    Yorum Ekle

  6. Yuneec Breeze 4K Camera Replacement: adım 6, 1 resimden 1.
    • Once all plugs on top of the M7 board are disconnected, carefully lift the M7 board onto its side and remove all plugs on the bottom.

    FixBot'a Sor

    Yorum Ekle

  7. Yuneec Breeze 4K Camera Replacement: adım 7, 2 resimden 1. Yuneec Breeze 4K Camera Replacement: adım 7, 2 resimden 2.
    • Tilt the M7 board onto its side. Using the Phillips #00 screwdriver remove the two black screws connected to the large black two pronged input.

    FixBot'a Sor

    Yorum Ekle

  8. Yuneec Breeze 4K Camera Replacement: adım 8, 1 resimden 1.
    • Using a pair of pliers pull apart the battery connector.

    FixBot'a Sor

    Yorum Ekle

  9. Yuneec Breeze 4K Camera Replacement: adım 9, 1 resimden 1.
    • Flip over the entire frame along with the M7 board and the A9 board.

    FixBot'a Sor

    Yorum Ekle

  10. Yuneec Breeze 4K Camera Replacement: adım 10, 1 resimden 1.
    • There will be 4 screws that hold the A9 board together. Using a H1.5 Alan bit unscrew those bolts to take the A9 board apart.

    FixBot'a Sor

    Yorum Ekle

  11. Yuneec Breeze 4K Camera Replacement: adım 11, 1 resimden 1.
    • Unplug the only wire that is connected to the A9 board.

    FixBot'a Sor

    Yorum Ekle

  12. Yuneec Breeze 4K Camera Replacement: adım 12, 1 resimden 1.
    • Pull apart the frame from the other board. The camera will be connected by a plug and it should pull out easily.

    FixBot'a Sor

    Yorum Ekle

  13. Yuneec Breeze 4K Camera Replacement: adım 13, 1 resimden 1.
    • Unscrew the four screws that are holding the camera to the frame.

    FixBot'a Sor

    Yorum Ekle

Sonuç

To reassemble your device, follow these instructions in reverse order.

İptal et: Bu kılavuzu tamamlamadım.

3 farklı kişi bu kılavuzu tamamladı.

Wes Knutson

Üyelik tarihi: 10/04/18

481 İtibar

3 adet Kılavuz yazıldı

Ekip

UW Stout, Team S6-G5, Ogden Fall 2018 UW Stout, Team S6-G5, Ogden Fall 2018 üyesi

UWSTOUT-OGDEN-F18S6G5

4 Üyeler

4 adet Kılavuz yazıldı

1Rehber Yorum

Excellent! I don’t think that the process could of have been any more clear than this.

neonjohn25 - Yanıt Paylaş

Yorum Ekle

İstatistikleri Görüntüle:

Son 24 Saat: 0

Son 7 gün: 3

Son 30 gün: 35

Her zaman: 2,396