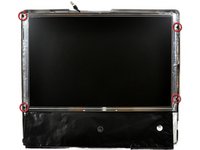
Ana içeriğe geç

iMac Intel 17" Display Replacement

Neye ihtiyacın var

  1. iMac Intel 17" Display Replacement, Access Door: adım 1, 2 resimden 1. iMac Intel 17" Display Replacement, Access Door: adım 1, 2 resimden 2.
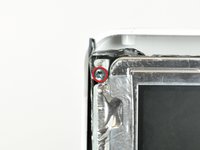
    • Loosen the two captive Phillips screws securing the access door to the iMac.

    • Remove the access door from the iMac.

    • Before beginning the repair, unplug the computer and press and hold the power switch for 20-30 seconds, to discharge internal capacitors.

  2. iMac Intel 17" Display Replacement, Front Bezel: adım 2, 1 resimden 1.
    • Remove the following four screws:

    • Three 6 mm T8 Torx.

    • One 8 mm T8 Torx.

  3. iMac Intel 17" Display Replacement: adım 3, 2 resimden 1. iMac Intel 17" Display Replacement: adım 3, 2 resimden 2.
    • Flip your iMac over and lay it stand-side down on a flat surface.

    • To lift the front bezel off the iMac, simultaneously:

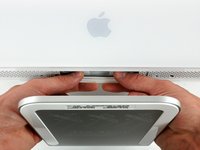
    • Use your thumbs to press in the RAM arms and hold the iMac down.

    • Use your index fingers to pull the small bridge of material on the front bezel toward yourself.

    • Pull the Front bezel up with your index fingers.

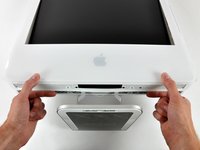
    • Once the small bridge of material has cleared the RAM arms, lift the front bezel by its lower edge just enough to clear the bottom edge of the rear case.

  4. iMac Intel 17" Display Replacement: adım 4, 3 resimden 1. iMac Intel 17" Display Replacement: adım 4, 3 resimden 2. iMac Intel 17" Display Replacement: adım 4, 3 resimden 3.
    Bu adımda kullanılan alet:
    Plastic Cards
    $2.99
    Satın Al
    • Re-orient your iMac so it sits upright on the stand.

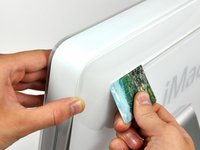
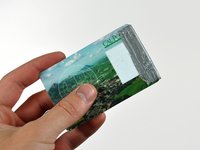
    • Insert a plastic card up into the corner of the air vent slot near the top of the rear case.

    • Push the card toward the top of the iMac to release the front bezel latch.

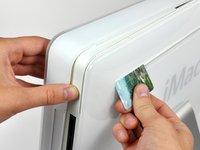
    • Pull the front bezel away from the rear case.

    • Repeat this process for the other side of the front bezel.

    • It may be necessary to apply several layers of duct tape to the top of the access card to aid in releasing the latches.

    • If the bezel refuses to release, try pressing the lower edge back onto the rear case and repeat this opening process.

  5. iMac Intel 17" Display Replacement: adım 5, 1 resimden 1.
    • Lay your iMac stand-side down on a table.

    • Lift the front bezel from its lower edge and rotate it away from the rest of your iMac, minding the RAM arms that may get caught.

    • Lay the front bezel above the rest of the iMac.

  6. iMac Intel 17" Display Replacement: adım 6, 1 resimden 1.
    • If necessary, remove the piece of kapton tape(it is ok to toss this) wrapped around the microphone and camera cables.

  7. iMac Intel 17" Display Replacement: adım 7, 2 resimden 1. iMac Intel 17" Display Replacement: adım 7, 2 resimden 2.
    • Disconnect both the camera and microphone cables.

  8. iMac Intel 17" Display Replacement, Display: adım 8, 1 resimden 1.
    • Peel up the lower EMI shield from the rear case.

    • It is only necessary to peel the shield up from three sides. Leave it attached to the display.

    • We have found it helpful to tape the EMI shield against the display to keep it out of the way.

  9. iMac Intel 17" Display Replacement: adım 9, 2 resimden 1. iMac Intel 17" Display Replacement: adım 9, 2 resimden 2.
    • Remove the two 4.8 mm T6 Torx screws securing the display data cable to the logic board.

    • Grab the display data cable connector by its black tab and pull it straight up off the logic board.

  10. iMac Intel 17" Display Replacement: adım 10, 1 resimden 1.
    • Inverter cable on 24inch iMac pulls off to the left.

    • Pull the inverter cable connector straight up off its socket on the logic board.

  11. iMac Intel 17" Display Replacement: adım 11, 1 resimden 1.
    • Peel back the aluminum EMI tape from the two vertical edges of the display.

    • During reassembly, it is helpful to use several small strips of tape to hold the EMI shielding along the left and right edges of the display footprint out of the way before lowering the display into the rear case of your iMac.

  12. iMac Intel 17" Display Replacement: adım 12, 2 resimden 1. iMac Intel 17" Display Replacement: adım 12, 2 resimden 2.
    Bu adımda kullanılan alet:
    TR10 Torx Security Screwdriver
    $5.99
    Satın Al
    • Allow the EMI shield to hang down from the display.

    • Remove the four 8 mm with 2 mm thick head coarse-thread T10 Torx screws securing the display to the rear case.

    • These screws are recessed, so a thin screwdriver such as this is essential for removal. Bit drivers tend to be too short for this application.

    • It is strongly recommended to use a magnetized screwdriver so the screws won't fall into the iMac.

  13. iMac Intel 17" Display Replacement: adım 13, 1 resimden 1.
    • Lift the display from its lower edge and pull it toward yourself to peel off the EMI shield attached to its top edge.

    • Be mindful of any cables that may get caught during removal.

Sonuç

To reassemble your device, follow these instructions in reverse order.

51 farklı kişi bu kılavuzu tamamladı.

2 Yorum

Please be careful at step 5. This is because the wiring attached to the microphone is very delicate and might snap when you are wiggling the bezel free from the rest of the computer. I did this and spent a lot of time soldering back the thin microphone wires. Pull the bezel away carefully, taking care not to snap any of the wires.

ERIC - Yanıt

This is really a good tutorial! just put in a new display, and it works perfectly.

So proud and happy now :-)

Thanks !!!

marjolein - Yanıt

Yorum Ekle

İstatistikleri Görüntüle:

Son 24 Saat: 0

Son 7 gün: 14

Son 30 gün: 52

Her zaman: 65,981