Ana içeriğe geç

iMac Intel 17" Power Supply Replacement

Neye ihtiyacın var

  1. iMac Intel 17" Power Supply Replacement, Access Door: adım 1, 2 resimden 1. iMac Intel 17" Power Supply Replacement, Access Door: adım 1, 2 resimden 2.
    • Loosen the two captive Phillips screws securing the access door to the iMac.

    • Remove the access door from the iMac.

    • Before beginning the repair, unplug the computer and press and hold the power switch for 20-30 seconds, to discharge internal capacitors.

  2. iMac Intel 17" Power Supply Replacement, Front Bezel: adım 2, 1 resimden 1.
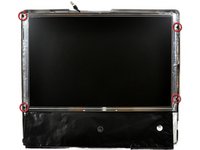
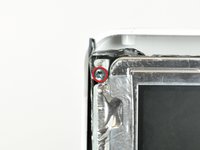
    • Remove the following four screws:

    • Three 6 mm T8 Torx.

    • One 8 mm T8 Torx.

  3. iMac Intel 17" Power Supply Replacement: adım 3, 2 resimden 1. iMac Intel 17" Power Supply Replacement: adım 3, 2 resimden 2.
    • Flip your iMac over and lay it stand-side down on a flat surface.

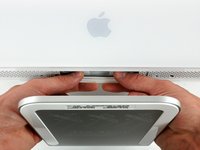
    • To lift the front bezel off the iMac, simultaneously:

    • Use your thumbs to press in the RAM arms and hold the iMac down.

    • Use your index fingers to pull the small bridge of material on the front bezel toward yourself.

    • Pull the Front bezel up with your index fingers.

    • Once the small bridge of material has cleared the RAM arms, lift the front bezel by its lower edge just enough to clear the bottom edge of the rear case.
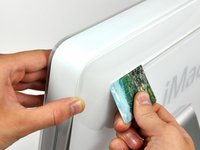
  4. iMac Intel 17" Power Supply Replacement: adım 4, 3 resimden 1. iMac Intel 17" Power Supply Replacement: adım 4, 3 resimden 2. iMac Intel 17" Power Supply Replacement: adım 4, 3 resimden 3.
    Bu adımda kullanılan alet:
    Plastic Cards
    $2.99
    Satın Al
    • Re-orient your iMac so it sits upright on the stand.

    • Insert a plastic card up into the corner of the air vent slot near the top of the rear case.

    • Push the card toward the top of the iMac to release the front bezel latch.

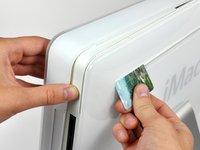
    • Pull the front bezel away from the rear case.

    • Repeat this process for the other side of the front bezel.

    • It may be necessary to apply several layers of duct tape to the top of the access card to aid in releasing the latches.

    • If the bezel refuses to release, try pressing the lower edge back onto the rear case and repeat this opening process.

  5. iMac Intel 17" Power Supply Replacement: adım 5, 1 resimden 1.
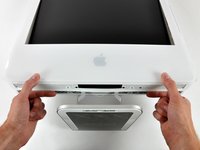
    • Lay your iMac stand-side down on a table.

    • Lift the front bezel from its lower edge and rotate it away from the rest of your iMac, minding the RAM arms that may get caught.

    • Lay the front bezel above the rest of the iMac.

  6. iMac Intel 17" Power Supply Replacement: adım 6, 1 resimden 1.
    • If necessary, remove the piece of kapton tape(it is ok to toss this) wrapped around the microphone and camera cables.

  7. iMac Intel 17" Power Supply Replacement: adım 7, 2 resimden 1. iMac Intel 17" Power Supply Replacement: adım 7, 2 resimden 2.
    • Disconnect both the camera and microphone cables.

  8. iMac Intel 17" Power Supply Replacement, Display: adım 8, 1 resimden 1.
    • Peel up the lower EMI shield from the rear case.

    • It is only necessary to peel the shield up from three sides. Leave it attached to the display.

    • We have found it helpful to tape the EMI shield against the display to keep it out of the way.

  9. iMac Intel 17" Power Supply Replacement: adım 9, 2 resimden 1. iMac Intel 17" Power Supply Replacement: adım 9, 2 resimden 2.
    • Remove the two 4.8 mm T6 Torx screws securing the display data cable to the logic board.

    • Grab the display data cable connector by its black tab and pull it straight up off the logic board.

  10. iMac Intel 17" Power Supply Replacement: adım 10, 1 resimden 1.
    • Inverter cable on 24inch iMac pulls off to the left.

    • Pull the inverter cable connector straight up off its socket on the logic board.

  11. iMac Intel 17" Power Supply Replacement: adım 11, 1 resimden 1.
    • Peel back the aluminum EMI tape from the two vertical edges of the display.

    • During reassembly, it is helpful to use several small strips of tape to hold the EMI shielding along the left and right edges of the display footprint out of the way before lowering the display into the rear case of your iMac.

  12. iMac Intel 17" Power Supply Replacement: adım 12, 2 resimden 1. iMac Intel 17" Power Supply Replacement: adım 12, 2 resimden 2.
    Bu adımda kullanılan alet:
    TR10 Torx Security Screwdriver
    $5.99
    Satın Al
    • Allow the EMI shield to hang down from the display.

    • Remove the four 8 mm with 2 mm thick head coarse-thread T10 Torx screws securing the display to the rear case.

    • These screws are recessed, so a thin screwdriver such as this is essential for removal. Bit drivers tend to be too short for this application.

    • It is strongly recommended to use a magnetized screwdriver so the screws won't fall into the iMac.

  13. iMac Intel 17" Power Supply Replacement: adım 13, 1 resimden 1.
    • Lift the display from its lower edge and pull it toward yourself to peel off the EMI shield attached to its top edge.

    • Be mindful of any cables that may get caught during removal.

  14. iMac Intel 17" Power Supply Replacement, Hard Drive: adım 14, 1 resimden 1.
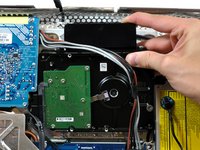
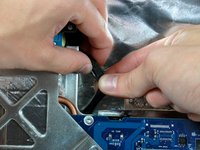
    • De-route the bundle of power supply cables from behind the hard drive bracket.

  15. iMac Intel 17" Power Supply Replacement: adım 15, 3 resimden 1. iMac Intel 17" Power Supply Replacement: adım 15, 3 resimden 2. iMac Intel 17" Power Supply Replacement: adım 15, 3 resimden 3.
    • A hard drive thermal sensor may be present on some models. If your logic board is missing the hard drive thermal sensor socket highlighted in red in the first picture, skip this step.

    • Pull the hard drive thermal sensor connector away from its socket on the logic board.

    • Pull this connector parallel to the face of the logic board toward the top edge of the iMac.

    • Use a spudger to pry the thermal sensor and adhesive off the hard drive and install it in the same location on the replacement drive.

  16. iMac Intel 17" Power Supply Replacement: adım 16, 1 resimden 1.
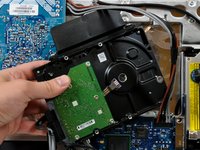
    • Press the hard drive bracket down to free it from the rear case, then rotate the top of the drive toward yourself.

    • Pressing the top of the hard drive bracket down to release it from the rear case requires a substantial amount of force, so we recommend laying your iMac stand-side down on a table to avoid knocking it over.

    • If you have trouble releasing the hard drive bracket, it can be removed from the hard drive, by removing the two T8 or T10 Torx screws securing the bracket to the drive.

  17. iMac Intel 17" Power Supply Replacement: adım 17, 2 resimden 1. iMac Intel 17" Power Supply Replacement: adım 17, 2 resimden 2.
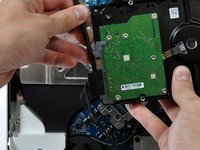
    • Lift the hard drive off its lower pins and pull it out of the rear case, minding the power supply cables that may get caught.

    • When reinstalling your hard drive, be careful not to push the two rubber grommets through their holes in the chassis. Retrieving them would require removing the logic board.

  18. iMac Intel 17" Power Supply Replacement: adım 18, 2 resimden 1. iMac Intel 17" Power Supply Replacement: adım 18, 2 resimden 2.
    • Insert a spudger between the SATA connectors and twist it to separate the connector from the hard drive.

    • Disconnect both SATA connectors.

  19. iMac Intel 17" Power Supply Replacement, Power Supply: adım 19, 1 resimden 1.
    • The next few steps bring your hands close to the exposed face of the power supply. Do not touch the face of the power supply to avoid a high voltage shock from the many large capacitors attached to the board.

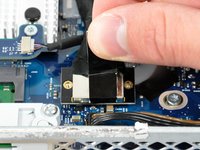
    • Unplug the power supply cable bundle from the logic board by simultaneously depressing the locking mechanism (toward yourself) with a spudger and pulling the connector away from its socket.

    • The locking mechanism faces the rear case.

  20. iMac Intel 17" Power Supply Replacement: adım 20, 1 resimden 1.
    • If necessary, remove the piece of tape holding the AC-in cable under the chassis.

  21. iMac Intel 17" Power Supply Replacement: adım 21, 2 resimden 1. iMac Intel 17" Power Supply Replacement: adım 21, 2 resimden 2.
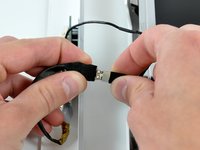
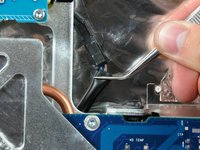
    • Use a pair of tweezers to pull the AC-in cable out from underneath the chassis.

    • Disconnect the AC-in cable by simultaneously depressing its locking mechanism and pulling the connector away from its socket.

  22. iMac Intel 17" Power Supply Replacement: adım 22, 1 resimden 1.
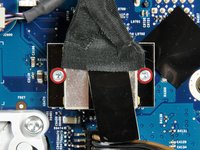
    • Remove the four T10 Torx screws securing the power supply to the rear case.

    • Two 14mm fine-thread screws on the right.

    • One 14mm coarse-thread screw in lower left corner.

    • One 20mm coarse-thread screw in upper left corner.

  23. iMac Intel 17" Power Supply Replacement: adım 23, 1 resimden 1.
    • Lift the power supply out of the rear case, minding the AC inlet cable that may get caught on the chassis.

Sonuç

To reassemble your device, follow these instructions in reverse order.

57 farklı kişi bu kılavuzu tamamladı.

5 Yorum

It was quite easy, but a little fiddly. I didn't need to remove the hardrive to replace the power supply.

cjmaxwell - Yanıt

The PSU in the 17” is smaller than shown and has the DC - DC convertor above it.

Marcus Evans - Yanıt

DC - DC convertor is above the psu in the 17” model and the psu is half the size than that shown.

Marcus Evans - Yanıt

I wanna try this because my imac no longer turns on, but i dont know if its my power supply. I press the power button and it turns on barely for a second and then turn off completely. it makes the sound when a mac turns on and the screen turns on for a sec…..what should I do?

Jess - Yanıt

@jess : Check this out: My iMac will not turn on? – it explains how to read the diagnostic LEDs.

Ernst de Haan - Yanıt

Yorum Ekle

İstatistikleri Görüntüle:

Son 24 Saat: 2

Son 7 gün: 8

Son 30 gün: 29

Her zaman: 44,564