Ana içeriğe geç

iMac Intel 20" EMC 2105 and 2118 Hard Drive Replacement

Neye ihtiyacın var

  1. iMac Intel 20" EMC 2105 and 2118 Hard Drive Replacement, Access Door: adım 1, 2 resimden 1. iMac Intel 20" EMC 2105 and 2118 Hard Drive Replacement, Access Door: adım 1, 2 resimden 2.
    • Loosen the two Phillips screws securing the access door to your iMac.

    • Both screws remain captive within the access door.

    • Remove the access door.

    • Before beginning the repair, unplug the computer and press and hold the power switch for 20-30 seconds, to discharge internal capacitors.

  2. iMac Intel 20" EMC 2105 and 2118 Hard Drive Replacement, Front Bezel: adım 2, 1 resimden 1.
    • Remove the following screws along the lower edge of your iMac:

    • Three 6 mm T8 Torx screws

    • One 8 mm T8 Torx screw (Right side of the RAM slot on 2105)

  3. iMac Intel 20" EMC 2105 and 2118 Hard Drive Replacement: adım 3, 3 resimden 1. iMac Intel 20" EMC 2105 and 2118 Hard Drive Replacement: adım 3, 3 resimden 2. iMac Intel 20" EMC 2105 and 2118 Hard Drive Replacement: adım 3, 3 resimden 3.
    Bu adımda kullanılan alet:
    Plastic Cards
    $2.99
    Satın Al
    • Re-orient your iMac so it sits upright on the stand.

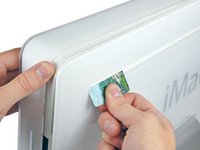
    • Insert a plastic card up into the corner of the air vent slot near the top of the rear case.

    • Push the card toward the top of the iMac to release the front bezel latch.

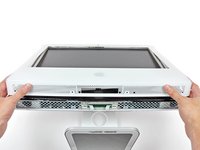
    • Pull the front bezel away from the rear case.

    • Repeat this process for the other side of the front bezel.

    • It may be necessary to apply several layers of duct tape to the top of the access card to aid in releasing the latches. Or use two cards for the additional thickness.

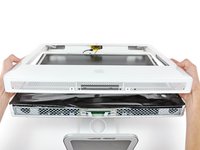
    • If the bezel refuses to release, try lifting the lower edge of the front bezel slightly away from the rear case (detailed in the next few steps) and repeat the latch release process.

  4. iMac Intel 20" EMC 2105 and 2118 Hard Drive Replacement: adım 4, 2 resimden 1. iMac Intel 20" EMC 2105 and 2118 Hard Drive Replacement: adım 4, 2 resimden 2.
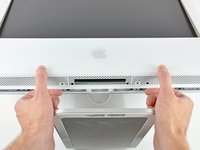
    • Lay your iMac stand-side down on a flat surface.

    • To lift the front bezel off the iMac, simultaneously:

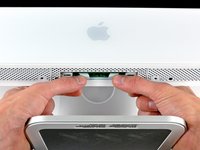
    • Use your thumbs to press in the RAM arms and hold the iMac down.

    • Use your index fingers to pull the small bridge of material on the front bezel toward yourself.

    • Pull the front bezel up with your index fingers.

    • Once the small bridge of material has cleared the RAM arms, lift the front bezel by its lower edge just enough to clear the bottom edge of the rear case.

  5. iMac Intel 20" EMC 2105 and 2118 Hard Drive Replacement: adım 5, 2 resimden 1. iMac Intel 20" EMC 2105 and 2118 Hard Drive Replacement: adım 5, 2 resimden 2.
    • Lift the front bezel off the rear case and rotate it away from the bottom edge of the iMac, minding the camera and microphone cables still attached to its upper edge.

  6. iMac Intel 20" EMC 2105 and 2118 Hard Drive Replacement: adım 6, 1 resimden 1.
    • If necessary, remove the strip of tape covering the microphone cable connector.

    • The microphone connector is located near the inside of top edge of your iMac.

  7. iMac Intel 20" EMC 2105 and 2118 Hard Drive Replacement: adım 7, 3 resimden 1. iMac Intel 20" EMC 2105 and 2118 Hard Drive Replacement: adım 7, 3 resimden 2. iMac Intel 20" EMC 2105 and 2118 Hard Drive Replacement: adım 7, 3 resimden 3.
    • Disconnect the microphone cable.

    • Disconnect the camera cable by pulling its connector away from the socket on the camera board.

    • The camera cable connector and socket are delicate and easily bent. Remove with caution.

  8. iMac Intel 20" EMC 2105 and 2118 Hard Drive Replacement, Lower EMI Shield: adım 8, 1 resimden 1.
    • Peel up the lower EMI shield from the rear case.

    • It is only necessary to peel the shield up from three sides. Leave it attached to the display.

    • If you happen to rip the EMI shield, use a piece of foil tape to cover the tear.

  9. iMac Intel 20" EMC 2105 and 2118 Hard Drive Replacement: adım 9, 1 resimden 1.
    • Tape the EMI shield to the face of the display to keep it out of the way.

  10. iMac Intel 20" EMC 2105 and 2118 Hard Drive Replacement, Display: adım 10, 2 resimden 1. iMac Intel 20" EMC 2105 and 2118 Hard Drive Replacement, Display: adım 10, 2 resimden 2.
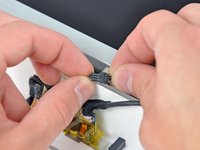
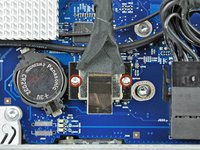
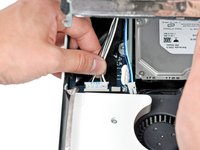
    • Remove the two 5 mm T6 Torx screws securing the display data cable connector to the logic board.

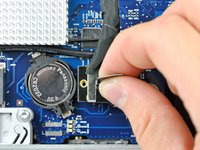
    • Pull the display data cable connector up off the logic board by its black pull tab.

  11. iMac Intel 20" EMC 2105 and 2118 Hard Drive Replacement: adım 11, 1 resimden 1.
    • Peel back the EMI tape from the two vertical edges of the display.

    • During reassembly, it is helpful to use several small strips of tape to hold the EMI shielding along the left and right edges of the display footprint out of the way before lowering the display into the rear case of your iMac.

  12. iMac Intel 20" EMC 2105 and 2118 Hard Drive Replacement: adım 12, 2 resimden 1. iMac Intel 20" EMC 2105 and 2118 Hard Drive Replacement: adım 12, 2 resimden 2.
    • Allow the lower EMI shield to hang down from the display.

    • Remove the four 7.5 mm T10 Torx screws securing the display to the rear case.

    • The screws are recessed, so a thin magnetic screwdriver aids in removal. Most bit drivers are too short to reach these screws.

  13. iMac Intel 20" EMC 2105 and 2118 Hard Drive Replacement: adım 13, 1 resimden 1.
    • Lift the lower edge of the display and rotate it toward the top edge of your iMac.

    • Do not lift it too much, as the inverter cables are still attached.

  14. iMac Intel 20" EMC 2105 and 2118 Hard Drive Replacement: adım 14, 2 resimden 1. iMac Intel 20" EMC 2105 and 2118 Hard Drive Replacement: adım 14, 2 resimden 2.
    • Disconnect both inverter cables from the inverter board.

    • These connectors are seated very tightly in their sockets. It is helpful to use your fingernails or the tip of a spudger to push the ears on either side of the connectors to dislodge them from their sockets. A small pair of hemostats helps a lot.

  15. iMac Intel 20" EMC 2105 and 2118 Hard Drive Replacement: adım 15, 1 resimden 1.
    • Disconnect the two inverter cables at the top edge of the inverter using the method explained in the previous step.

  16. iMac Intel 20" EMC 2105 and 2118 Hard Drive Replacement: adım 16, 1 resimden 1.
    • Rotate the display until it is nearly perpendicular to the rear case and lift it up to peel it off the EMI shield stuck to its top edge.

  17. iMac Intel 20" EMC 2105 and 2118 Hard Drive Replacement, Hard Drive: adım 17, 1 resimden 1.
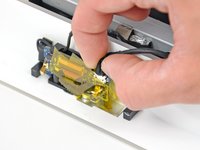
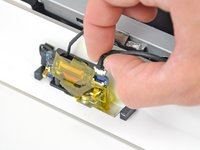
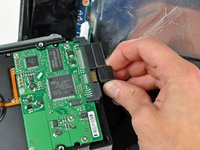
    • Disconnect the hard drive thermal sensor from the top edge of the logic board.

    • Pull the connector parallel to the face of the logic board.

  18. iMac Intel 20" EMC 2105 and 2118 Hard Drive Replacement: adım 18, 1 resimden 1.
    • Remove the two 9.2 mm T10 Torx screws securing the hard drive bracket to the rear case.

  19. iMac Intel 20" EMC 2105 and 2118 Hard Drive Replacement: adım 19, 1 resimden 1.
    • Lift the hard drive from its left edge enough to clear the inverter and pull it toward the left edge of your iMac to unseat the mounting pins from the chassis.

    • During installation, do not push the rubber grommets through the chassis with the hard drive mounting pins as retrieving them will require removing the logic board.

  20. iMac Intel 20" EMC 2105 and 2118 Hard Drive Replacement: adım 20, 2 resimden 1. iMac Intel 20" EMC 2105 and 2118 Hard Drive Replacement: adım 20, 2 resimden 2.
    • Pull both the SATA power and data cable connectors away from the hard drive.

    • Be careful when de-routing the hard drive thermal sensor cable from under the heat sink framework.

  21. iMac Intel 20" EMC 2105 and 2118 Hard Drive Replacement, Hard Drive: adım 21, 2 resimden 1. iMac Intel 20" EMC 2105 and 2118 Hard Drive Replacement, Hard Drive: adım 21, 2 resimden 2.
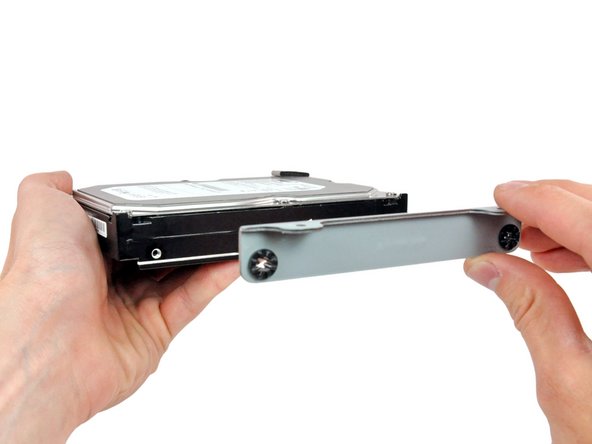
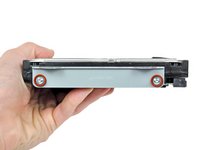
    • Remove the two 12 mm shouldered T8 Torx screws holding the hard drive bracket to the connector side of the hard drive.

    • After removing these two screws, the bracket will fall away from the hard drive.

  22. iMac Intel 20" EMC 2105 and 2118 Hard Drive Replacement: adım 22, 1 resimden 1.
    • Remove the two 9.2 mm T8 Torx pins from the other side of the hard drive.

  23. iMac Intel 20" EMC 2105 and 2118 Hard Drive Replacement: adım 23, 1 resimden 1.
    • Use the flat end of a spudger to pry the thermal sensor board off the adhesive securing it to the hard drive.

    • If you're replacing your hard drive, transfer this sensor to the same position on the new drive.

    • Users have reported that without the sensor connected, the fans will run consistently at maximum speed.

Sonuç

To reassemble your device, follow these instructions in reverse order.

343 farklı kişi bu kılavuzu tamamladı.

19 Yorum

I was able to exchange hard drives between a 17" model and a 20" model. The 17" model has a slightly different architecture inside, but I have made some notes about that on the appropriate Step.

robino - Yanıt

I recently used this guide to install an Hitachi 3 TB 7200rpm drive. Works like a champ.

iFixit is a great resource. Thank you!

John C - Yanıt

I used this guide in conjunction with this video for reference that was really helpful: http://www.youtube.com/watch?v=ShY8zuT-w... (and part 2). Repair went really easy (just take it slow). Hardest part for me was pulling out the screen. The torx screws are pretty far in and the 26 piece kit I bought from here wasn't long enough to reach (the extension has a large round magnet on it that will not insert far enough because of limited space). Thankfully I had a torx at home that was longer for that specific size, so I was able to unscrew just enough with MY torx and use the magnetic one to grab the screw (absolutely necessary to have a magnetic version). Bought the Western Digital drive and found out that it would not format with the original OS Tiger disk. Only OS Snow Leopard's Disk Utility would read the HD properly and format for Mac. If buying the Western Digital, make sure you have a newer OS to install than Tiger. I read about possible problems with OS Leopard's Disk Utility and WD drives as well, but I cannot speak specifically for that.

rympeters - Yanıt

Great guide! I can't think of anything to add. Read it over several times to take in all for the tips, they are helpful. I replaced my dead HD with a 120GB SSD (OCZ Vertex 3 VTX3-25SAT3-120G). It is working great with Snow Leopard. I had to use Trim Enabler but that seems to be working fine. The 2.5 to 3.5 drive adapter was too small to fit the apple attachment be the two sided tape mount seems very secure.

Charlie Tracy - Yanıt

A small feedback from my iman. (Late 2006, early 2007 20" display 2.16 intel core 2 duo):

Just changed my hdd and everything worked out fine. Two things are important as I found out that they differed from this guide:

1. In order to release the front bezel latches the card must be not be inserted vertically as shown in the pictures but with a slight angle using the direction from inside towards the upper corner of the bezel. I saw this in the following youtube video:

http://youtu.be/fOQ3joWnU-s

2. The torx requested to release the display screws is not a No 6 but a smaller one. Probably a No. 4, Ι am not sure exactly as I did not have one so I used a normal small screwdriver instead.

I hope I helped, the rest of the guide was very accurate and quite easy to follow.

Peppitos - Yanıt

Yorum Ekle

İstatistikleri Görüntüle:

Son 24 Saat: 9

Son 7 gün: 45

Son 30 gün: 174

Her zaman: 292,074