Ana içeriğe geç

iMac Intel 21.5" EMC 2889 Hard Drive Replacement

Neye ihtiyacın var

  1. iMac Intel 21.5" EMC 2889 Hard Drive Replacement, Display Assembly: adım 1, 1 resimden 1.
    Bu adımda kullanılan alet:
    iMac Intel 21.5" Cardboard Service Wedge
    $4.99
    Satın Al
    • With the hinge free to move, the iMac will be unbalanced and hard to work on. Repairs are fast and easy with an iMac service wedge, but can be completed without one.

    • If you are using the iFixit cardboard service wedge, follow these assembly directions to put it together.

    • Before beginning any work on your iMac: Unplug the computer and press and hold the power button for ten seconds to discharge the power supply's capacitors.

    • Be very careful not to touch the capacitor leads or any exposed solder joints on the back of the power supply. Only handle the board by the edges.

  2. iMac Intel 21.5" EMC 2889 Hard Drive Replacement: adım 2, 2 resimden 1. iMac Intel 21.5" EMC 2889 Hard Drive Replacement: adım 2, 2 resimden 2.
    • Starting on the left of the display, near the power button, insert the iMac Opening Tool into the gap between the glass panel and the rear enclosure.

    • The hub on the iMac Opening Tool will keep you from pushing the wheel in too far. If using a different tool, insert no more than 3/8" into the display. Otherwise, you risk severing antenna cables and causing serious damage.

  3. iMac Intel 21.5" EMC 2889 Hard Drive Replacement: adım 3, 3 resimden 1. iMac Intel 21.5" EMC 2889 Hard Drive Replacement: adım 3, 3 resimden 2. iMac Intel 21.5" EMC 2889 Hard Drive Replacement: adım 3, 3 resimden 3.
    • Use the tool like a pizza cutter—roll it along through the gap, and it will cut the foam adhesive through the center.

    • Be sure to always push with the handle behind the cutting wheel. If you pull, the wheel might get pulled out of the handle.

    • Run the tool up along the left side of the display.

  4. iMac Intel 21.5" EMC 2889 Hard Drive Replacement: adım 4, 3 resimden 1. iMac Intel 21.5" EMC 2889 Hard Drive Replacement: adım 4, 3 resimden 2. iMac Intel 21.5" EMC 2889 Hard Drive Replacement: adım 4, 3 resimden 3.
    • Continue running the tool up around the top left corner.

  5. iMac Intel 21.5" EMC 2889 Hard Drive Replacement: adım 5, 2 resimden 1. iMac Intel 21.5" EMC 2889 Hard Drive Replacement: adım 5, 2 resimden 2.
    • Cut the adhesive along the top left of the display.

  6. iMac Intel 21.5" EMC 2889 Hard Drive Replacement: adım 6, 2 resimden 1. iMac Intel 21.5" EMC 2889 Hard Drive Replacement: adım 6, 2 resimden 2.
    • Continue along the top of the display.

    • You may want to run the tool back and forth through what you've already cut a few times, to ensure you get as much of the adhesive separated as possible.

  7. iMac Intel 21.5" EMC 2889 Hard Drive Replacement: adım 7, 3 resimden 1. iMac Intel 21.5" EMC 2889 Hard Drive Replacement: adım 7, 3 resimden 2. iMac Intel 21.5" EMC 2889 Hard Drive Replacement: adım 7, 3 resimden 3.
    • Push the tool around the top right corner of the display.

  8. iMac Intel 21.5" EMC 2889 Hard Drive Replacement: adım 8, 2 resimden 1. iMac Intel 21.5" EMC 2889 Hard Drive Replacement: adım 8, 2 resimden 2.
    • Wheel the tool down along the right side of the display.

  9. iMac Intel 21.5" EMC 2889 Hard Drive Replacement: adım 9, 2 resimden 1. iMac Intel 21.5" EMC 2889 Hard Drive Replacement: adım 9, 2 resimden 2.
    • Finish pushing the opening tool to the bottom of the right side of the display.

    • At this point, you'll want to run the tool back around the entire display, to ensure you cut as much adhesive as possible.

  10. iMac Intel 21.5" EMC 2889 Hard Drive Replacement: adım 10, 3 resimden 1. iMac Intel 21.5" EMC 2889 Hard Drive Replacement: adım 10, 3 resimden 2. iMac Intel 21.5" EMC 2889 Hard Drive Replacement: adım 10, 3 resimden 3.
    Bu adımda kullanılan alet:
    Plastic Cards
    $2.99
    Satın Al
    • While the opening tool cut most of the adhesive, the display will still be slightly adhered to the case. A plastic card will be necessary to free up the last of this adhesive.

    • Set the iMac face-up on a table.

    • Starting from the top right corner of the iMac, wedge a plastic card between the display and frame.

    • Be careful not to insert the plastic card more than 3/8", or you may damage internal components.

  11. iMac Intel 21.5" EMC 2889 Hard Drive Replacement: adım 11, 2 resimden 1. iMac Intel 21.5" EMC 2889 Hard Drive Replacement: adım 11, 2 resimden 2.
    • Gently twist the plastic card sideways to create a gap between the display and frame.

    • Move slowly and be careful not to stress the display glass too much—you only need to make a gap of about 1/4".

  12. iMac Intel 21.5" EMC 2889 Hard Drive Replacement: adım 12, 3 resimden 1. iMac Intel 21.5" EMC 2889 Hard Drive Replacement: adım 12, 3 resimden 2. iMac Intel 21.5" EMC 2889 Hard Drive Replacement: adım 12, 3 resimden 3.
    • Slide the card toward the center of the display to cut any of the remaining adhesive along the top right corner of the iMac.

    • Be sure to stop before the iSight camera, or you may damage it.

  13. iMac Intel 21.5" EMC 2889 Hard Drive Replacement: adım 13, 2 resimden 1. iMac Intel 21.5" EMC 2889 Hard Drive Replacement: adım 13, 2 resimden 2.
    • Wedge the plastic card into the top right corner once again, and leave it there to prevent the adhesive from resticking.

  14. iMac Intel 21.5" EMC 2889 Hard Drive Replacement: adım 14, 3 resimden 1. iMac Intel 21.5" EMC 2889 Hard Drive Replacement: adım 14, 3 resimden 2. iMac Intel 21.5" EMC 2889 Hard Drive Replacement: adım 14, 3 resimden 3.
    • Insert a second plastic card into the gap between the display and frame near the top left corner of the iMac.

  15. iMac Intel 21.5" EMC 2889 Hard Drive Replacement: adım 15, 2 resimden 1. iMac Intel 21.5" EMC 2889 Hard Drive Replacement: adım 15, 2 resimden 2.
    • Gently twist the card upward, slightly increasing the space between the display and frame.

    • As with the other side, twist slowly to allow the adhesive time to separate, and be careful not to over-stress the display glass.

  16. iMac Intel 21.5" EMC 2889 Hard Drive Replacement: adım 16, 3 resimden 1. iMac Intel 21.5" EMC 2889 Hard Drive Replacement: adım 16, 3 resimden 2. iMac Intel 21.5" EMC 2889 Hard Drive Replacement: adım 16, 3 resimden 3.
    • Slide the plastic card toward the center, again stopping just before the iSight camera.

  17. iMac Intel 21.5" EMC 2889 Hard Drive Replacement: adım 17, 2 resimden 1. iMac Intel 21.5" EMC 2889 Hard Drive Replacement: adım 17, 2 resimden 2.
    • Wedge the plastic card back into the top left corner.

  18. iMac Intel 21.5" EMC 2889 Hard Drive Replacement: adım 18, 3 resimden 1. iMac Intel 21.5" EMC 2889 Hard Drive Replacement: adım 18, 3 resimden 2. iMac Intel 21.5" EMC 2889 Hard Drive Replacement: adım 18, 3 resimden 3.
    • With both plastic cards inserted as shown near the corners, gently twist the cards sideways to increase the gap between display and case.

    • If there are any sections that seem to stick and won't separate, stop twisting and use one of the cards to cut the remaining adhesive.

    • Begin to lift the top of the display up from the frame.

    • Only lift the display a few inches—the display data and power cables are still connected to the logic board.

  19. iMac Intel 21.5" EMC 2889 Hard Drive Replacement, Display Assembly Cables: adım 19, 2 resimden 1. iMac Intel 21.5" EMC 2889 Hard Drive Replacement, Display Assembly Cables: adım 19, 2 resimden 2.
    • Lift the display up enough to have easy access to the connector, but not so much that you stretch the cables and stress their connections (about 8").

    • Hold the display with one hand while using your other hand to unplug the display power cable.

  20. iMac Intel 21.5" EMC 2889 Hard Drive Replacement: adım 20, 3 resimden 1. iMac Intel 21.5" EMC 2889 Hard Drive Replacement: adım 20, 3 resimden 2. iMac Intel 21.5" EMC 2889 Hard Drive Replacement: adım 20, 3 resimden 3.
    • Continuing to support the display with one hand, flip up the metal retaining bracket on the display data cable.

    • Carefully pull the display data cable from its socket on the logic board.

    • Be sure to pull the display data cable connector straight out of its socket, keeping it parallel to the motherboard, to avoid damaging it.

  21. iMac Intel 21.5" EMC 2889 Hard Drive Replacement, Display Assembly Separation: adım 21, 2 resimden 1. iMac Intel 21.5" EMC 2889 Hard Drive Replacement, Display Assembly Separation: adım 21, 2 resimden 2.
    • Lift the display up to a near-vertical position.

    • At this point there is still a strip of adhesive along the bottom of the display that will hold the display to the frame like a hinge. You can loosen this adhesive by working the display up and down a few times.

  22. iMac Intel 21.5" EMC 2889 Hard Drive Replacement: adım 22, 3 resimden 1. iMac Intel 21.5" EMC 2889 Hard Drive Replacement: adım 22, 3 resimden 2. iMac Intel 21.5" EMC 2889 Hard Drive Replacement: adım 22, 3 resimden 3.
    Bu adımda kullanılan alet:
    Plastic Cards
    $2.99
    Satın Al
    • Be very careful not to touch the capacitor leads or any exposed solder joints on the back of the power supply (boxed in red).

    • Grasp the small tab at the end of one of the bottom edge display adhesive strips and pull the adhesive toward the top of the iMac to remove it.

    • Repeat this step with the other adhesive strip and remove it.

    • If either adhesive strip breaks before it's removed, use a plastic card to slice through the remaining adhesive.

  23. iMac Intel 21.5" EMC 2889 Hard Drive Replacement: adım 23, 3 resimden 1. iMac Intel 21.5" EMC 2889 Hard Drive Replacement: adım 23, 3 resimden 2. iMac Intel 21.5" EMC 2889 Hard Drive Replacement: adım 23, 3 resimden 3.
    • Lift the display up from the frame and remove it from the iMac.

    • It may be necessary to slowly lift from one side to peel against the remaining adhesive.

    • Be very careful handling the display—it's big, heavy, and made of glass.

    • After the adhesive is cut, it cannot be used to re-seal the display in place. Follow this guide to replace the adhesive strips that secure the display to the rear enclosure.

  24. iMac Intel 21.5" EMC 2889 Hard Drive Replacement, Hard Drive Brackets: adım 24, 1 resimden 1.
    • Remove the following T10 Torx screws securing the hard drive brackets to the iMac:

    • Two 21 mm screws

    • One 9 mm screw

    • One 27 mm screw

  25. iMac Intel 21.5" EMC 2889 Hard Drive Replacement: adım 25, 2 resimden 1. iMac Intel 21.5" EMC 2889 Hard Drive Replacement: adım 25, 2 resimden 2.
    • Remove the left and right hard drive brackets from the iMac.

  26. iMac Intel 21.5" EMC 2889 Hard Drive Replacement, Hard Drive Assembly: adım 26, 3 resimden 1. iMac Intel 21.5" EMC 2889 Hard Drive Replacement, Hard Drive Assembly: adım 26, 3 resimden 2. iMac Intel 21.5" EMC 2889 Hard Drive Replacement, Hard Drive Assembly: adım 26, 3 resimden 3.
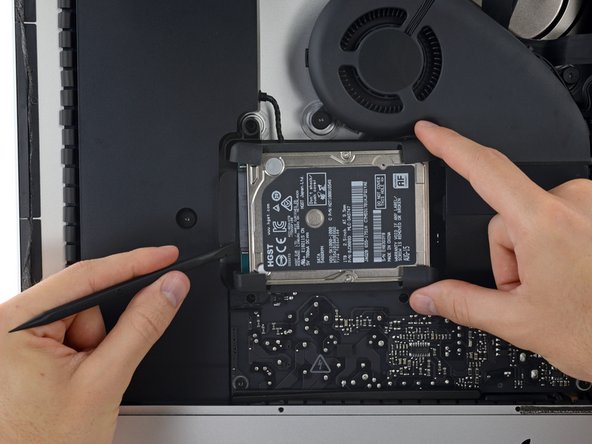
    • Lift the hard drive from the edge nearest the logic board and pull it slightly out of its recess.

    • The hard drive is still attached by its SATA cable; do not attempt to fully remove it from the iMac yet.

  27. iMac Intel 21.5" EMC 2889 Hard Drive Replacement: adım 27, 3 resimden 1. iMac Intel 21.5" EMC 2889 Hard Drive Replacement: adım 27, 3 resimden 2. iMac Intel 21.5" EMC 2889 Hard Drive Replacement: adım 27, 3 resimden 3.
    • Use a spudger to disconnect the single SATA cable by prying it gently away from the hard drive.

    • Remove the hard drive assembly from the iMac.

  28. iMac Intel 21.5" EMC 2889 Hard Drive Replacement, Hard Drive: adım 28, 3 resimden 1. iMac Intel 21.5" EMC 2889 Hard Drive Replacement, Hard Drive: adım 28, 3 resimden 2. iMac Intel 21.5" EMC 2889 Hard Drive Replacement, Hard Drive: adım 28, 3 resimden 3.
    • Peel the rubber bumper off one side of the hard drive.

    • Repeat for the other side.

    • When installing a new drive, it's helpful to use double-sided tape to stick the bumpers to your new drive.

Sonuç

To reassemble your device, follow these instructions in reverse and use our Adhesive Strips Guide to reattach the display glass.

72 farklı kişi bu kılavuzu tamamladı.

Jeff Suovanen

Üyelik tarihi: 08/06/13

426.545 İtibar

259 adet Kılavuz yazıldı

Ekip

iFixit iFixit üyesi

Staff

135 Üyeler

16.475 adet Kılavuz yazıldı

10 Yorum

Well done and thank you for this very precise description to access the hard drive. After that, reconnecting the hard drive or SSD is difficult because the very short SATA connector wires do not allow it to be presented well in the axis of the drive connector and it is impossible to hold it firmly with your fingers. Space is very small.

Hubert Despré - Yanıt

Thank you SO MUCH for this guide. I bought my iMac used from someone who was upgrading to a newer SSD model, and once I got it home and reset, I was understood all too well why he upgraded. So I ordered the kit here and followed these directions. With my iPad propped up next to the iMac on my table, I was able to follow it right through. As others have commented, the drive cable is very short, but I held back the rubber bumpers until I got it connected, and then everything else went smoothly. Now my iMac is like a new machine (minus the newer Thunderbolt ports and other newer amenities). Thanks again!

Glenn Pettit - Yanıt

I was just looking at the dismal trade in options for all my old apple products, and just assumed Id be buying a new computer every 2-3 yrs at retail whenever apple decided mine was out of date, but after stumbling on this site i love the mission, and am actually excited to try some of these articles on my old products and maybe learn a few things. Thank you for all this work its awesome and appreciated.

Christopher Pina - Yanıt

Can someone explicitly answer if the Temperature Sensor is need for this model? The internet says yes, but the space inside says no.

Thurston - Yanıt

I’ve the same question Thurston made. I’m planning to upgrade to a SSD but I’m worried about thermal sensor and the kernel_task issue some that some people mention. Is there a solution? This should be a concern?

Leonardo Lellis - Yanıt

Yorum Ekle

İstatistikleri Görüntüle:

Son 24 Saat: 10

Son 7 gün: 54

Son 30 gün: 267

Her zaman: 37,164