Bu sürüm, hatalı düzenlemeler içerebilir. En son doğrulanmış bellek kopyası dönün.
Neye ihtiyacın var
-
Bu adım çevrilmemiş. Çevrilmesine yardım edin
-
Stick a heavy-duty suction cup near each of the two top corners of the glass panel.
-
While lightly holding the suction cup against the glass, raise the movable handle until it is parallel with the other handle (as indicated by the third picture).
-
-
Bu adım çevrilmemiş. Çevrilmesine yardım edin
-
Gently lift the glass panel perpendicular to the face of the LCD, enough to clear the steel mounting pins attached along the underside of the top edge of the glass panel.
-
Pull the glass panel away from the lower edge of the iMac and carefully set it aside.
-
-
Bu adım çevrilmemiş. Çevrilmesine yardım edin
-
Remove the eight T10 Torx screws securing the LCD to the outer case.
-
-
Bu adım çevrilmemiş. Çevrilmesine yardım edin
-
Carefully lay the iMac stand-side down on a flat surface.
-
Use a thin hooked tool to lift one side of the top edge of the display by its steel outer frame.
-
-
Bu adım çevrilmemiş. Çevrilmesine yardım edin
-
Using your fingers, carefully pull the vertical sync cable out of its socket on the LED driver board near the top left corner of your iMac.
-
-
Bu adım çevrilmemiş. Çevrilmesine yardım edin
-
Squeeze the two display data cable connector arms together to unlock it from its socket on the logic board.
-
Pull the display data cable connector away from its socket on the logic board.
-
-
-
Bu adım çevrilmemiş. Çevrilmesine yardım edin
-
Rotate the display out of the outer case enough to disconnect the LED backlight power cable from the LED driver board.
-
-
Bu adım çevrilmemiş. Çevrilmesine yardım edin
-
Lift the display for enough clearance to disconnect the LCD thermal sensor cable connector from its socket on the logic board.
-
-
Bu adım çevrilmemiş. Çevrilmesine yardım edin
-
Carefully pull the display toward the top edge of your iMac and lift it out of the outer case.
-
-
Bu adım çevrilmemiş. Çevrilmesine yardım edin
-
Remove the four T10 Torx screws securing the optical drive to the outer case.
-
-
Bu adım çevrilmemiş. Çevrilmesine yardım edin
-
Pull the optical drive thermal sensor connector straight away from its socket on the logic board.
-
-
Bu adım çevrilmemiş. Çevrilmesine yardım edin
-
Insert a spudger between the optical drive connector and the optical drive.
-
Twist the spudger to slightly separate the optical drive connector from the optical drive, then use your fingers to pull the connector away from the drive.
-
-
Bu adım çevrilmemiş. Çevrilmesine yardım edin
-
Lift the left edge of the optical drive slightly and pull it away from the right side of the outer case.
-
During reassembly, note that there are two holes in the optical drive face plate into which two stubby plastic posts must engage for proper positioning.
-
-
Bu adım çevrilmemiş. Çevrilmesine yardım edin
-
Peel back the portion of aluminum tape highlighted in red, leaving the rest attached to the black plastic optical drive bracket.
-
-
Bu adım çevrilmemiş. Çevrilmesine yardım edin
-
Remove the two T10 Torx screws from each side of the optical drive (four screws total).
-
-
Bu adım çevrilmemiş. Çevrilmesine yardım edin
-
Use the tip of a spudger to press each of the optical drive bracket tabs out of their slots on the bottom of the optical drive.
-
Rotate the optical drive bracket slightly away from the optical drive.
-
Pull the optical drive bracket away from the open end of the optical drive, minding any tabs that may get caught.
-
-
Bu adım çevrilmemiş. Çevrilmesine yardım edin
-
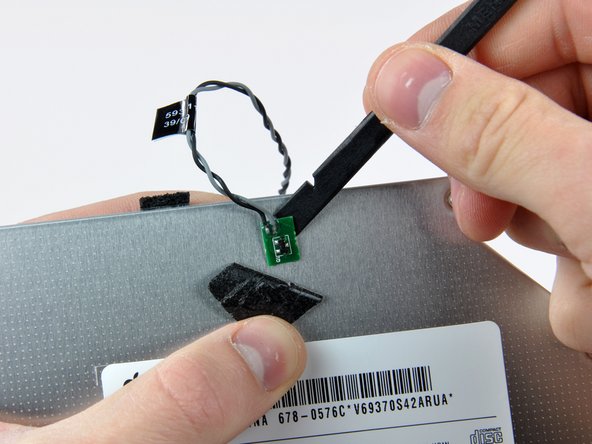
Use the tip of a spudger to peel back the piece of foam tape covering the optical drive thermal sensor.
-
Use the flat end of a spudger to carefully pry the thermal sensor up off the adhesive securing it to the optical drive.
-
If you have a disc or anything else stuck inside your optical drive, we have a guide to fix it.
-


İptal et: Bu kılavuzu tamamlamadım.
24 farklı kişi bu kılavuzu tamamladı.


4 Yorum
Great Guide!, Worked for me, I didn't need the hook tool, or suction cups.
Thank you Brett!!
Great guide. I did this at same time as replacing my failed internal 1Tb Seagate hard drive (second disc factory fitted). All running great now.
I replaced my failed Sony AD-5680 superdrive with a compatible Hitach GA32N, only problem I had was that it was quite tricky to get the new drive in the caddy with the mounting srew holes lined up, needed a fair bit of pressure whilst lining up screws. Good gide - Thanks!