Ana içeriğe geç
iMac Intel 27" EMC 2546 Heat Sink Replacement

iMac Intel 27" EMC 2546 Heat Sink Replacement

Andrew Optimus Goldheart

Andrew Optimus Goldheart ve 5 diğer katkıda bulunanlar

En son March 29, 2024 tarihinde güncellendi

Tahmin yok
Orta
Salt Önkoşul
Bu kılavuz yalnızca diğer kılavuzlar için bir ön koşul olarak kullanılmak üzere tasarlanmıştır. Tek başına eksiktir.

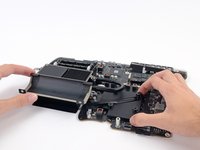
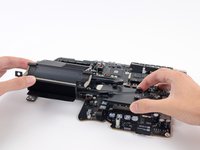
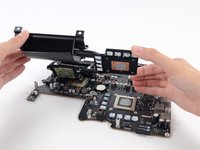
prerequisite for logic board, heat sink, and CPU

Neye ihtiyacın var

Aletler

Daha fazlasını göster…

  1. iMac Intel 27" EMC 2546 Heat Sink Replacement, Heat Sink: adım 1, 3 resimden 1. iMac Intel 27" EMC 2546 Heat Sink Replacement, Heat Sink: adım 1, 3 resimden 2. iMac Intel 27" EMC 2546 Heat Sink Replacement, Heat Sink: adım 1, 3 resimden 3.
    • Remove the four 7.5 mm T8 screws from behind the GPU on the logic board.

    • These screws are set inside large, spring-loaded Phillips #2 screws. To prevent the larger screws from spinning when you loosen the T8 screws, hold them with a fingertip or Phillips #2 screwdriver.

  2. iMac Intel 27" EMC 2546 Heat Sink Replacement: adım 2, 1 resimden 1.
    • Remove the bracket from behind the GPU heat sink.

  3. iMac Intel 27" EMC 2546 Heat Sink Replacement: adım 3, 1 resimden 1.
    • Remove four black stickers from the back of the CPU heat sink.

  4. iMac Intel 27" EMC 2546 Heat Sink Replacement: adım 4, 1 resimden 1.
    • Remove four 12.3 mm T10 screws from the back of the CPU heat sink.

  5. iMac Intel 27" EMC 2546 Heat Sink Replacement: adım 5, 3 resimden 1. iMac Intel 27" EMC 2546 Heat Sink Replacement: adım 5, 3 resimden 2. iMac Intel 27" EMC 2546 Heat Sink Replacement: adım 5, 3 resimden 3.
    • Remove the spring plate from behind the CPU heat sink.

    • Lift and remove the backing plate from behind the CPU heat sink. The backing plate has two posts that fit into alignment holes in the logic board.

  6. iMac Intel 27" EMC 2546 Heat Sink Replacement: adım 6, 3 resimden 1. iMac Intel 27" EMC 2546 Heat Sink Replacement: adım 6, 3 resimden 2. iMac Intel 27" EMC 2546 Heat Sink Replacement: adım 6, 3 resimden 3.
    • Lift the heat sink up from the logic board.

    • The CPU will most likely stick to the heat sink, so be careful about where you put it down.

Sonuç

To reassemble your device, follow these instructions in reverse order.

Andrew Optimus Goldheart

Üyelik tarihi: 10/17/09

508.811 İtibar

407 adet Kılavuz yazıldı

Ekip

iFixit iFixit üyesi

Staff

119 Üyeler

19.481 adet Kılavuz yazıldı

0 Yorum

Yorum Ekle

İstatistikleri Görüntüle:

Son 24 Saat: 0

Son 7 gün: 3

Son 30 gün: 16

Her zaman: 226