Ana içeriğe geç

iPad 2 Touch Screen Replacement Video tutorial

Arşivlenmiş Kılavuz
Bu kılavuz sadece arşivsel amaçlarla muhafaza edilmiştir. Onarımınızı gerçekleştirmek için kılavuzun güncel halini kullanın.

Neye ihtiyacın var

Videoya Genel Bakış

  1. iPad 2 Touch Screen Replacement Video tutorial, Front Panel Assembly: adım 1, 2 resimden 1. iPad 2 Touch Screen Replacement Video tutorial, Front Panel Assembly: adım 1, 2 resimden 2.
    • Use the edge of a plastic opening tool to carefully flip up the retaining flaps on the two digitizer ribbon cable ZIF sockets.

    • Be sure you are prying up on the hinged retaining flaps, not the sockets themselves.

    • The retaining flaps are highlighted in red in the second picture.

  2. iPad 2 Touch Screen Replacement Video tutorial: adım 2, 2 resimden 1. iPad 2 Touch Screen Replacement Video tutorial: adım 2, 2 resimden 2.
    • Use the edge of a plastic opening tool to peel the digitizer cable off the shields on the logic board.

    • Carefully pull the digitizer cable off the adhesive securing it to the side of the rear case.

  3. iPad 2 Touch Screen Replacement Video tutorial: adım 3, 1 resimden 1.
    • Pull the digitizer ribbon cable straight out of its two sockets on the logic board.

  4. iPad 2 Touch Screen Replacement Video tutorial: adım 4, 2 resimden 1. iPad 2 Touch Screen Replacement Video tutorial: adım 4, 2 resimden 2.
    • In order to remove the front panel assembly, the ribbon cable needs to slide out between the case and the LCD. You'll need to move the LCD to make some room.

    • Be very careful when moving the LCD, and do not attempt to remove it from the iPad—its cable will remain connected while it is rotated over.

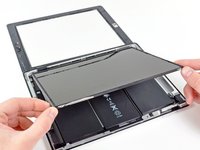
    • Lift the LCD from its long edge farthest from the digitizer cable and gently flip it toward the rear case—like closing a book.

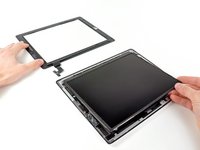
    • While holding the LCD up, gently slide the front panel away from the iPad. Be careful not to snag the digitizer cable on the rear case or LCD.

    • Set the LCD back into the body for safekeeping.

Sonuç

To reassemble your device, follow these instructions in reverse order.

4 farklı kişi bu kılavuzu tamamladı.

ZFix

Üyelik tarihi: 12/09/13

191.278 İtibar

330 adet Kılavuz yazıldı

Ekip

Master Techs Master Techs üyesi

Community

322 Üyeler

2.528 adet Kılavuz yazıldı

Bir Yorum

We replaced the screen successfully and it turns on all looks beautiful except the touch screen isn’t working at all—any thoughts? We are beginners

shelley fiedler - Yanıt

Yorum Ekle

İstatistikleri Görüntüle:

Son 24 Saat: 0

Son 7 gün: 0

Son 30 gün: 1

Her zaman: 4,465