Ana içeriğe geç

Bu kılavuzda güncel değişiklikler var. En son onaylanmamış sürüme geçin.

iPad 3 4G Headphone Jack Assembly Replacement

Salt Önkoşul
Bu kılavuz yalnızca diğer kılavuzlar için bir ön koşul olarak kullanılmak üzere tasarlanmıştır. Tek başına eksiktir.

Neye ihtiyacın var

  1. iPad 3 4G Headphone Jack Assembly Replacement, Headphone Jack Assembly: adım 1, 1 resimden 1.
    • Peel back and remove the adhesive tape covering the headphone jack assembly.

  2. iPad 3 4G Headphone Jack Assembly Replacement: adım 2, 1 resimden 1.
    • Remove the single 2.6 mm Phillips #0 screw securing the camera cable to the headphone jack assembly.

  3. iPad 3 4G Headphone Jack Assembly Replacement: adım 3, 3 resimden 1. iPad 3 4G Headphone Jack Assembly Replacement: adım 3, 3 resimden 2. iPad 3 4G Headphone Jack Assembly Replacement: adım 3, 3 resimden 3.
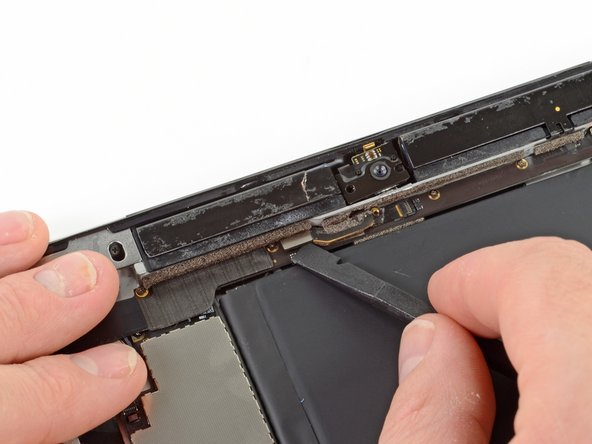
    • Using the flat end of a spudger, pry the front-facing camera off of its socket on the headphone jack assembly.

    • Without removing the spudger, slide the spudger to the right, releasing the adhesive holding down the camera cable.

  4. iPad 3 4G Headphone Jack Assembly Replacement: adım 4, 3 resimden 1. iPad 3 4G Headphone Jack Assembly Replacement: adım 4, 3 resimden 2. iPad 3 4G Headphone Jack Assembly Replacement: adım 4, 3 resimden 3.
    • Using the tip of the spudger, flip up the retaining flap on the microphone cable ZIF connector.

    • Insert the tip of the spudger underneath the microphone ribbon cable, removing it from its ZIF connector.

    • Slide the spudger to the left, releasing the adhesive holding the microphone ribbon cable to the headphone jack assembly.

  5. iPad 3 4G Headphone Jack Assembly Replacement: adım 5, 1 resimden 1.
    • Use the flat end of the spudger to pry up the antenna connector cable out of its socket on the headphone jack assembly board.

  6. iPad 3 4G Headphone Jack Assembly Replacement: adım 6, 2 resimden 1. iPad 3 4G Headphone Jack Assembly Replacement: adım 6, 2 resimden 2.
    • Flip up the retaining flap securing the volume/power button ribbon cable connector to the headphone jack assembly board.

    • Remove the volume button ribbon cable from its ZIF connector.

  7. iPad 3 4G Headphone Jack Assembly Replacement: adım 7, 3 resimden 1. iPad 3 4G Headphone Jack Assembly Replacement: adım 7, 3 resimden 2. iPad 3 4G Headphone Jack Assembly Replacement: adım 7, 3 resimden 3.
    • Remove the following screws from the headphone jack assembly:

    • Five 2.6 mm Phillips #0

    • Two 2.2 mm Wide Head Phillips #00

    • Two 2.6 mm Phillips #00

    • These screws are angled into the aluminum frame. Be sure to hold the screwdriver so that the screwdriver is in line with the screw, to avoid stripping the screw.

  8. iPad 3 4G Headphone Jack Assembly Replacement: adım 8, 2 resimden 1. iPad 3 4G Headphone Jack Assembly Replacement: adım 8, 2 resimden 2.
    • Holding onto the ribbon cable of the headphone jack assembly, carefully pull the assembly parallel to the iPad, toward the bottom of the device.

  9. iPad 3 4G Headphone Jack Assembly Replacement: adım 9, 3 resimden 1. iPad 3 4G Headphone Jack Assembly Replacement: adım 9, 3 resimden 2. iPad 3 4G Headphone Jack Assembly Replacement: adım 9, 3 resimden 3.
    • Grasping the headphone jack assembly with both hands, pull the assembly from the iPad, minding any cables that may get caught.

Sonuç

To reassemble your device, follow these instructions in reverse order.

Brett Hartt

Üyelik tarihi: 04/12/10

127.665 İtibar

143 adet Kılavuz yazıldı

Ekip

iFixit iFixit üyesi

Staff

135 Üyeler

16.476 adet Kılavuz yazıldı

0 Yorum

Yorum Ekle

İstatistikleri Görüntüle:

Son 24 Saat: 0

Son 7 gün: 0

Son 30 gün: 0

Her zaman: 93