Ana içeriğe geç

iPad 4 CDMA Adhesive Strips Replacement (Existing Panel)

Neye ihtiyacın var

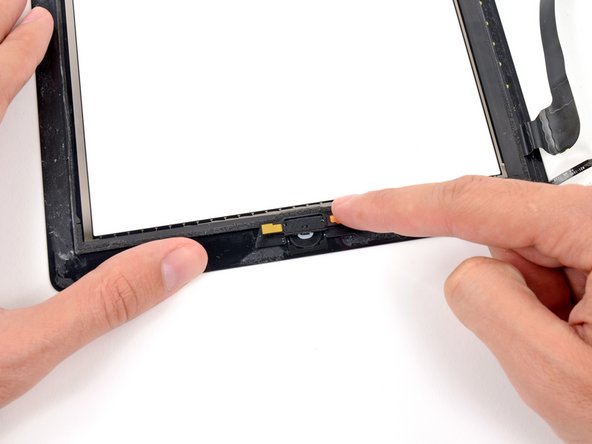
  1. iPad 4 CDMA Adhesive Strips Replacement (Existing Panel), Home Button Control Board: adım 1, 1 resimden 1.
    • Remove the two 2.1 mm Phillips #00 Phillips screws securing the home button control board to the home button mounting bracket.

    I have just replaced the adhesive on an iPad 4 and did not need to remove and replace the home button. There seemed no reason to remove the button because the adhesive strips did not encroach on the button mount. Removing adhesive is aided by rubbing it with iso propyl alcohol (rubbing alcohol) after striping back the plastic film that covers it. It would be nice if the adhesive would come away with the plastic film but this does not happen even with gentle heat. If you use shart instruments to remove the adhesive its very easy to damage the underlying paint.

    geoffrey - Yanıt

  2. iPad 4 CDMA Adhesive Strips Replacement (Existing Panel): adım 2, 2 resimden 1. iPad 4 CDMA Adhesive Strips Replacement (Existing Panel): adım 2, 2 resimden 2.
    • Wedge the flat edge of a plastic opening tool in between the right end of the home button control board and the home button mounting bracket.

    • Depress the plastic opening tool downwards to pry the adhesive securing the home button control board from the home button mounting bracket.

    • Repeat the procedure to release the adhesive underneath the left end of the home button control board.

  3. iPad 4 CDMA Adhesive Strips Replacement (Existing Panel): adım 3, 1 resimden 1.
    • Lift and remove the home button control board up off the home button mounting bracket.

  4. iPad 4 CDMA Adhesive Strips Replacement (Existing Panel): adım 4, 2 resimden 1. iPad 4 CDMA Adhesive Strips Replacement (Existing Panel): adım 4, 2 resimden 2.
    • Use the flat edge of a spudger to scrape the old adhesive off the bottom right corner of the front panel assembly.

    • If necessary, gently peel the old adhesive with a pair of tweezers.

  5. iPad 4 CDMA Adhesive Strips Replacement (Existing Panel): adım 5, 2 resimden 1. iPad 4 CDMA Adhesive Strips Replacement (Existing Panel): adım 5, 2 resimden 2.
    • Gently place the home button control board on top of the home button mounting bracket.

    • Make sure the home button control board is lined up with the bottom of the home button mounting bracket.

  6. iPad 4 CDMA Adhesive Strips Replacement (Existing Panel): adım 6, 1 resimden 1.
    • Insert the two 2.1 mm Phillips #00 Phillips screws back into the home button control board to secure it against the home button mounting bracket.

  7. iPad 4 CDMA Adhesive Strips Replacement (Existing Panel), Adhesive Strips (Existing Panel): adım 7, 3 resimden 1. iPad 4 CDMA Adhesive Strips Replacement (Existing Panel), Adhesive Strips (Existing Panel): adım 7, 3 resimden 2. iPad 4 CDMA Adhesive Strips Replacement (Existing Panel), Adhesive Strips (Existing Panel): adım 7, 3 resimden 3.
    • In the following steps, you will be placing the remaining pieces of adhesive on the front panel.

    • Do not peel the clear backing off the strips just yet.

    • Place the bridge shaped adhesive strip between the top edge of the inner frame of the front panel and the camera mounting bracket.

    • Smooth the strip down from the center out, taking care to not trap any air bubbles between the strip and the front panel.

  8. iPad 4 CDMA Adhesive Strips Replacement (Existing Panel): adım 8, 2 resimden 1. iPad 4 CDMA Adhesive Strips Replacement (Existing Panel): adım 8, 2 resimden 2.
    • Place the elongated C shaped adhesive strip on the right side of the front panel.

  9. iPad 4 CDMA Adhesive Strips Replacement (Existing Panel): adım 9, 2 resimden 1. iPad 4 CDMA Adhesive Strips Replacement (Existing Panel): adım 9, 2 resimden 2.
    • It is recommened to lift the home button ribbon cable aside while placing the next adhesive strip.

    • Place the straight, medium length adhesive strip on the bottom right side of the front panel, underneath the home button ribbon cable.

  10. iPad 4 CDMA Adhesive Strips Replacement (Existing Panel): adım 10, 2 resimden 1. iPad 4 CDMA Adhesive Strips Replacement (Existing Panel): adım 10, 2 resimden 2.
    • Place the tabbed rectangular adhesive strip on the bottom right side of the front panel.

  11. iPad 4 CDMA Adhesive Strips Replacement (Existing Panel): adım 11, 2 resimden 1. iPad 4 CDMA Adhesive Strips Replacement (Existing Panel): adım 11, 2 resimden 2.
    • Place the long L-shaped adhesive strip on the bottom left corner of the front panel.

  12. iPad 4 CDMA Adhesive Strips Replacement (Existing Panel): adım 12, 2 resimden 1. iPad 4 CDMA Adhesive Strips Replacement (Existing Panel): adım 12, 2 resimden 2.
    • Place the short rectangular shaped adhesive strip on the top left side of the front panel.

  13. iPad 4 CDMA Adhesive Strips Replacement (Existing Panel): adım 13, 2 resimden 1. iPad 4 CDMA Adhesive Strips Replacement (Existing Panel): adım 13, 2 resimden 2.
    • Place the last, short L-shaped adhesive strip on the top left corner of the front panel.

  14. iPad 4 CDMA Adhesive Strips Replacement (Existing Panel): adım 14, 2 resimden 1. iPad 4 CDMA Adhesive Strips Replacement (Existing Panel): adım 14, 2 resimden 2.
    • Use a pair of tweezers to peel the clear backing up off the adhesive strip directly underneath the home button ribbon cable.

    • Lay the home button ribbon cable down on the adhesive strip and smooth the cable down from the center out, taking care to not trap any air bubbles between the strip and the front panel.

    • Do not peel the clear backing off the strips just yet.

  15. iPad 4 CDMA Adhesive Strips Replacement (Existing Panel): adım 15, 1 resimden 1.
    • Use a dry microfiber cloth to clean the LCD and inside of the front panel glass. You may want to use canned air or an air compressor to blow away and dust.

    • Use a pair of tweezers to peel the clear backing up off each adhesive strip.

    • Close the front panel down onto the iPad, careful to place it within the plastic bezel, and careful not to get any dirt or fingerprints between the glass and LCD.

    • To ensure a good seal, place the iPad face down on a padded envelope or cloth and pile a couple of books above it to weigh the screen down. Leave it like this for a few hours before using.

    Just anted to remind everyone to connect all your cables BEFORE sticking the screen down!!

    Eric Viitala - Yanıt

    …before attaching the LCD, in fact.

    To go a step further in caution, leave the backing on the adhesive strips, attach all the cables (and replace the tape over them if you like), making sure all of the motherboard screws are in place. Then lay the LCD on top (without screwing it down), lay the glass on top of that, and TEST. Make sure you have full LCD and digitizer function. If not, do a hard reset and test again. If still not, dismantle everything and re-check the cables—they should be fully inserted (usually the white line should not show at all), with their latches down and no sharp crimps. It’s surprising how small a change in digitizer insertion can make a black screen suddenly function just fine.

    Bonnie Baxter - Yanıt

Sonuç

To reassemble your device, follow these instructions in reverse order.

18 farklı kişi bu kılavuzu tamamladı.

0 Yorum

Yorum Ekle

İstatistikleri Görüntüle:

Son 24 Saat: 1

Son 7 gün: 4

Son 30 gün: 8

Her zaman: 7,869