Ana içeriğe geç

iPad Mini 3 Wi-Fi Front Panel Assembly Replacement

Salt Önkoşul
Bu kılavuz yalnızca diğer kılavuzlar için bir ön koşul olarak kullanılmak üzere tasarlanmıştır. Tek başına eksiktir.

Neye ihtiyacın var

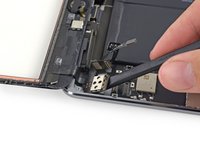
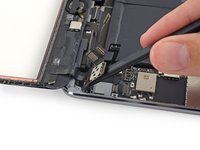
  1. iPad Mini 3 Wi-Fi Front Panel Assembly Replacement, Front Panel Assembly: adım 1, 2 resimden 1. iPad Mini 3 Wi-Fi Front Panel Assembly Replacement, Front Panel Assembly: adım 1, 2 resimden 2.
    • Use the tip of a spudger to lift the digitizer cable connector straight up off of its socket.

  2. iPad Mini 3 Wi-Fi Front Panel Assembly Replacement: adım 2, 2 resimden 1. iPad Mini 3 Wi-Fi Front Panel Assembly Replacement: adım 2, 2 resimden 2.
    • Slide the flat end of a spudger under the battery side of the digitizer board to begin separating it from the rear case.

  3. iPad Mini 3 Wi-Fi Front Panel Assembly Replacement: adım 3, 2 resimden 1. iPad Mini 3 Wi-Fi Front Panel Assembly Replacement: adım 3, 2 resimden 2.
    • Lift the digitizer board up to free the last of the adhesive.

  4. iPad Mini 3 Wi-Fi Front Panel Assembly Replacement: adım 4, 1 resimden 1.
    • Lift and remove the front panel assembly from the iPad.

Sonuç

To reassemble your device, follow these instructions in reverse order.

Evan Noronha

Üyelik tarihi: 02/05/15

223.412 İtibar

168 adet Kılavuz yazıldı

0 Yorum

Yorum Ekle

İstatistikleri Görüntüle:

Son 24 Saat: 0

Son 7 gün: 0

Son 30 gün: 0

Her zaman: 231