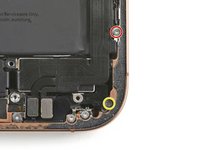
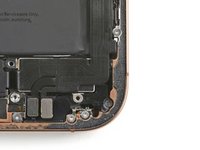
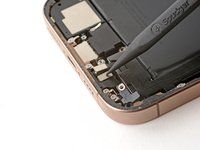
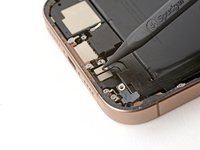
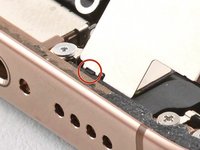
Ana içeriğe geç

iPhone 16 Pro Max Taptic Engine Installation

Salt Önkoşul
Bu kılavuz yalnızca diğer kılavuzlar için bir ön koşul olarak kullanılmak üzere tasarlanmıştır. Tek başına eksiktir.

Neye ihtiyacın var

  1. iPhone 16 Pro Max Taptic Engine Installation, Install the Taptic Engine: adım 1, 1 resimden 1.
    • Lay the Taptic Engine in its recess.

  2. iPhone 16 Pro Max Taptic Engine Installation: adım 2, 1 resimden 1.
    • Use your finger to pivot the corner bracket down into place.

  3. iPhone 16 Pro Max Taptic Engine Installation: adım 3, 1 resimden 1.
    • Use a Phillips screwdriver to install the 2.1 mm‑long screw securing the Taptic Engine.

  4. iPhone 16 Pro Max Taptic Engine Installation: adım 4, 1 resimden 1.
    • Use your finger to gently press the lower assembly cable onto the top of the Taptic Engine.

  5. iPhone 16 Pro Max Taptic Engine Installation: adım 5, 2 resimden 1. iPhone 16 Pro Max Taptic Engine Installation: adım 5, 2 resimden 2.
    • Install the two screws securing the lower assembly cable:

    • One 1.0 mm‑long tri-point Y000 screw

    • One 1.3 mm‑long Phillips screw

  6. iPhone 16 Pro Max Taptic Engine Installation: adım 6, 2 resimden 1. iPhone 16 Pro Max Taptic Engine Installation: adım 6, 2 resimden 2.
    • Use your finger or a spudger to press and connect the two lower assembly cable connectors.

  7. iPhone 16 Pro Max Taptic Engine Installation: adım 7, 2 resimden 1. iPhone 16 Pro Max Taptic Engine Installation: adım 7, 2 resimden 2.
    • Lay the Taptic Engine cover in place and align it by its screw holes.

    • Make sure the bottom edge of the cover latches properly to the frame.

  8. iPhone 16 Pro Max Taptic Engine Installation: adım 8, 2 resimden 1. iPhone 16 Pro Max Taptic Engine Installation: adım 8, 2 resimden 2.
    • Use a Phillips screwdriver to install the three screws securing the Taptic Engine cover:

    • One 2.9 mm‑long screw

    • One 1.3 mm‑long screw

    • One 2.4 mm‑long screw

  9. iPhone 16 Pro Max Taptic Engine Installation: adım 9, 1 resimden 1.
    • Use your finger or a spudger to press the assembly cable connector onto the logic board.

Bitiş Çizgisi

Arthur Shi

Üyelik tarihi: 01/03/18

281.900 İtibar

585 adet Kılavuz yazıldı

Ekip

iFixit iFixit üyesi

Staff

118 Üyeler

19.418 adet Kılavuz yazıldı

0 Yorum

Yorum Ekle

İstatistikleri Görüntüle:

Son 24 Saat: 2

Son 7 gün: 2

Son 30 gün: 6

Her zaman: 12