Bu çeviri bir makine tarafından oluşturulmuştur ve henüz bir kişi tarafından incelenmemiştir. Bu dili konuşuyor musunuz? İnceleme için.

iPhone 4 arka panel değişimi

Walter Galan ve 32 diğer katkıda bulunanlar
En son 9 Ağu 2026 tarihinde güncellendi
Görüntüleme: 1 Mn
İstatistikleri görüntüle:
- Son 24 Saat:
- 20
- Son 7 Gün:
- 81
- Son 30 Gün:
- 323
- Her zaman:
- 1.008.791
Yorumlar: 29
20 comments on steps, 9 guide comments.
Go to guide commentsTamamlandı: 812 813
812 kişi bu kılavuzu "tamamlandı" olarak işaretledi. Sıradaki sen olacak mısın?
813 kişi bu kılavuzu "tamamlandı" olarak işaretledi. Siz de dahil - harika iş!
Sık Kullanılanlar: 373 374
373 kişi bu kılavuzu favorilerine ekledi (ve abone oldu). Sıradaki sen olacak mısın?
Siz de dahil olmak üzere 374 kişi bu kılavuzu favorilerine ekledi (ve abone oldu)!
Öne Çıkan Kılavuzlar
Bu kılavuz, iFixit kadrosu tarafından acayip havalı bulundu.
Giriş
1. adıma git ↓iPhone 4'ünüzün içindeki bileşenlere erişmek için arka paneli çıkarın.
Neye ihtiyacın var
Parçalar

Aletler


Videoya Genel Bakış
-
-
-
Sökmeye başlamadan önce iPhone'unuzu kapatın.
-
iPhone 4 arka kapağınızda iki adet #000 yıldız vida veya Apple'ın 5 uçlu "Pentalobe" vidaları bulunabilir (ikinci görsel). Hangi vidalara sahip olduğunuzu kontrol edin ve bunları çıkarmak için doğru tornavidaya sahip olduğunuzdan emin olun.
-
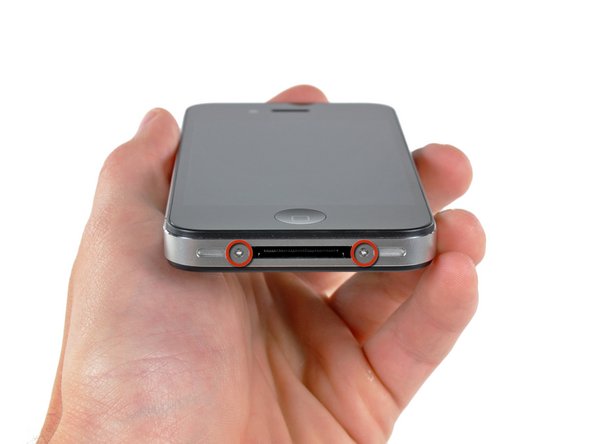
Dock konnektörün yanındaki iki adet 3,6 mm Pentalobe veya #000 yıldız vidayı çıkarın.
 FixBot'a Sor
-
-
-
-
Arka paneli parmaklarınızla kavrayın ve iPhone'dan uzağa doğru kaldırın. Alternatif olarak, bir Small Suction Cup (küçük vantuz) kullanabilirsiniz.
-
-


Cihazınızı tekrar toplamak için bu talimatları tersten uygulayın.
İptal et: Bu kılavuzu tamamlamadım.
812 farklı kişi bu kılavuzu tamamladı.
Ekli Belgeler

9Kılavuz Yorumları
The replacement part for the iPhone 4 rear panel has two thin, clear overlays on the inside surface--a larger one that runs the full length, and a small one that only covers the lens. These should be removed prior to installation. Also, the first rear panel replacement I got from iFixit was not an exact fit and would not easily "click" into place. They replaced it for free and the second one clicked right in.
On step 3 when replacing the back panel with a new one, they aren't kidding about removing ALL the protective slips. There's THREE of them.
1), the obvious back slip that protects the new back.
2). the one inside the back protecting the side with the camera lens
3). the little square one OVER the lens itself.
First time I tried to reinstall my back, that tiny little square over the lens prohibited my ability to actually get the back on completely. My husband jammed it for me, but the screws still wouldn't take. It's amazing that these things are so precise that the tiny little film on the lens would make it that much tighter.
Anyways, hope that helps somebody. :)
Easiest repair I've ever done. Thanks y'all!
