Bu sürüm, hatalı düzenlemeler içerebilir. En son doğrulanmış bellek kopyası dönün.
Neye ihtiyacın var
-
-
Eğer ekran camınız çatlamış ise, cama hafifçe vurarak, daha fazla kırılmayı kontrollü bir şekilde yapın ve tamir esnasında gövdenin de zarar görmesini engelleyin.
-
Temiz koli bandı şeritlerini üstüste gelecek şekilde yapıştırarak, iPhone'un ekranını tamamen kaplayın.
-
-
-
Hangi aleti kullandığınızdan bağımsız, bütün ekranı kaldırdığınızdan emin olmanız gerekiyor.
-
İlk fotoğrafta görüldüğü gibi cam, plastikten ayrılmaya başladığında; metal kelepçeleri kasadan ayırmak için plastik çerçeve ve metal telefon gövdesi arasına plastik bir açma aleti yerleştirin.
-
-
-
Vakumlu ağızları aralamak için iSclack'in sapını kapatın.
-
iPhone'unuzun altını, vakumlu ağızların arasından plastik derinlik ölçere gelecek şekilde yerleştirin.
-
Üstteki vakumlu ağız, ana sayfa düğmesinin hemen yukarsına gelecek şekilde yerleşmelidir.
-
iSclack'in ağzını kapatmak için sapı açın. Vakumlu ağızları ortalayarak yerleştirip, telefonun ön ve arkasına doğru sıkıca bastırın.
-
-
-
iPhone'unuzu sağlam bir şekilde tutun ve iSclack'in vakumlu ağızlarını ayırmak için sapı kapatın; bu işlem, ön paneli arka kasadan ayırır.
-
iSclack, iPhone'unuzun herhangi bir kablosuna zarar vermeden, parçaları güvenli bir şekilde ayıracak şekilde tasarlanmıştır.
-
Vakumlu ağızları iPhone'unuzdan sıyırın.
-
Takip eden üç adımı atlayarak, Adım 9'dan devam edin.
-
-
-
-
Ön panel düzeneğinin alt ve yanlardaki kelepçeleri serbest kaldıktan sonra düzeneği, alt kısmından kaldırarak arka kasadan ayırın.
-
Ön paneli, arka kasaya 90 derecelik bir açı çizecek şekilde yavaşça kaldırarak, üzerinde çalışırken durması için bir şeye yaslayın.
-
Çalışırken ekranın sağlam bir şekilde yerinde durması için, lastik bir bant kullanın. Bu bant aynı zamanda ekran kablolarına uygulanabilecek lüzumsuz gerginliği de önleyecektir.
-
-
Bu adım çevrilmemiş. Çevrilmesine yardım edin
-
Remove the two 1.3 mm Phillips screws securing the home button bracket to the display assembly.
-
-
Bu adım çevrilmemiş. Çevrilmesine yardım edin
-
Gently press up on the center of the home button from the display side of the display assembly, to loosen the adhesive securing it to the assembly.
-
-
Bu adım çevrilmemiş. Çevrilmesine yardım edin
-
Once the home button has started to separate from the display assembly, use the tip of a spudger to completely lift the button from the adhesive securing it.
-
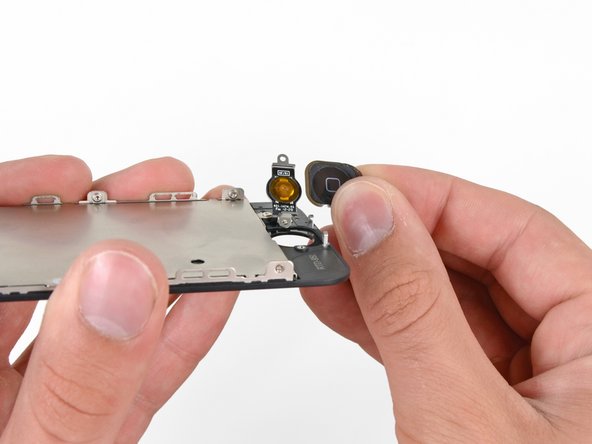
Remove the home button from the display assembly.
-


İptal et: Bu kılavuzu tamamlamadım.
255 farklı kişi bu kılavuzu tamamladı.

13 Yorum
I'm at the step where I need to remove the screws connecting the home button. The 2 screw's are stuck! I thought it was the screwdriver at first so I went in and bought another #000 screwdriver, but the screw is just melted shut. I cannot get it open no matter what. I fondled with it so much that the grooves of the screws are completely circular instead of a cross now. What do I do? Now my phone is just sitting here disassembled and I can't do anything.
mmmmm nows that's gonna be a really tough one. try using a heat gun, not very close else you'll fry the circuits, just close enough that it can dilate the area and you can try again with your screwdriver.
i have the same problem. were you able to fix it?
I have the same problem! Either the screwdriver isn't the right one (I bought all the recommended tools) or the screws are stuck
lana -
When I'm placing the home button in place its doesn't fall into place, as if the button is slightly too large to fit precisely in the slot. When I place the bracket back on it presses against the button and doesn't click. I've tried loosening the screws a bit to give some space but it usually leads to the screws popping off before I can put the screen back on. Idk if its my new home button or me but the process seems pretty straightforward and I haven't seen anything like the problem I'm having on any other forums.