Bu sürüm, hatalı düzenlemeler içerebilir. En son doğrulanmış bellek kopyası dönün.
Neye ihtiyacın var
-
-
Eğer ekran camınız çatlamış ise, cama hafifçe vurarak, daha fazla kırılmayı kontrollü bir şekilde yapın ve tamir esnasında gövdenin de zarar görmesini engelleyin.
-
Temiz koli bandı şeritlerini üstüste gelecek şekilde yapıştırarak, iPhone'un ekranını tamamen kaplayın.
-
-
-
Hangi aleti kullandığınızdan bağımsız, bütün ekranı kaldırdığınızdan emin olmanız gerekiyor.
-
İlk fotoğrafta görüldüğü gibi cam, plastikten ayrılmaya başladığında; metal kelepçeleri kasadan ayırmak için plastik çerçeve ve metal telefon gövdesi arasına plastik bir açma aleti yerleştirin.
-
-
-
Vakumlu ağızları aralamak için iSclack'in sapını kapatın.
-
iPhone'unuzun altını, vakumlu ağızların arasından plastik derinlik ölçere gelecek şekilde yerleştirin.
-
Üstteki vakumlu ağız, ana sayfa düğmesinin hemen yukarsına gelecek şekilde yerleşmelidir.
-
iSclack'in ağzını kapatmak için sapı açın. Vakumlu ağızları ortalayarak yerleştirip, telefonun ön ve arkasına doğru sıkıca bastırın.
-
-
-
iPhone'unuzu sağlam bir şekilde tutun ve iSclack'in vakumlu ağızlarını ayırmak için sapı kapatın; bu işlem, ön paneli arka kasadan ayırır.
-
iSclack, iPhone'unuzun herhangi bir kablosuna zarar vermeden, parçaları güvenli bir şekilde ayıracak şekilde tasarlanmıştır.
-
Vakumlu ağızları iPhone'unuzdan sıyırın.
-
Takip eden üç adımı atlayarak, Adım 9'dan devam edin.
-
-
-
Ön panel düzeneğinin alt ve yanlardaki kelepçeleri serbest kaldıktan sonra düzeneği, alt kısmından kaldırarak arka kasadan ayırın.
-
Ön paneli, arka kasaya 90 derecelik bir açı çizecek şekilde yavaşça kaldırarak, üzerinde çalışırken durması için bir şeye yaslayın.
-
Çalışırken ekranın sağlam bir şekilde yerinde durması için, lastik bir bant kullanın. Bu bant aynı zamanda ekran kablolarına uygulanabilecek lüzumsuz gerginliği de önleyecektir.
-
-
-
-
Pili iPhone'a tutturan yapışkandan söküp kurtarmak için, açıkta bulunan plastik açma halkasını kullanın.
-
Pili sökerek yerinden çıkarmakta zorluk yaşıyorsanız, iOpener veya arka kasayı ısıtarak yapışkanın tutuşunu azaltmak için saç kurutma makinesi kullanabilirsiniz.
-
Açma halkası hassastır ve kopabilir. Pilinizi çıkarmadan önce açma halkası zarar görürse, takip eden adımlara başvurabilirsiniz.
-
-
Bu adım çevrilmemiş. Çevrilmesine yardım edin
-
Use the tip of a spudger to pry the cellular data antenna cable connector up from its socket on the logic board, just above the speaker enclosure.
-
-
Bu adım çevrilmemiş. Çevrilmesine yardım edin
-
Remove the following two screws securing the top logic board bracket to the rear case:
-
One 1.5 mm Phillips screw
-
One 2.3 mm Phillips screw
-
-
Bu adım çevrilmemiş. Çevrilmesine yardım edin
-
Use the flat end of a spudger to disconnect the following three cables from the logic board:
-
Upper interconnect cable
-
Button assembly cable
-
Lower interconnect cable
-
-
Bu adım çevrilmemiş. Çevrilmesine yardım edin
-
Remove the two 1.3 mm Phillips screws from the inner top of the rear case.
-
-
Bu adım çevrilmemiş. Çevrilmesine yardım edin
-
Remove the single 1.2 mm Phillips screw remaining in the mid-section logic board bracket.
-
-
Bu adım çevrilmemiş. Çevrilmesine yardım edin
-
Use a spudger to pry the Lightning connector cable connector up from its socket on the logic board.
-
Gently peel the cable back and out of the way of the logic board.
-
-
Bu adım çevrilmemiş. Çevrilmesine yardım edin
-
Depress the SIM card release on the right side of the iPhone with a SIM card eject tool or a bent paperclip to eject the SIM card tray.
-
Remove the SIM card tray from the iPhone.
-
-
Bu adım çevrilmemiş. Çevrilmesine yardım edin
-
Remove the following screws securing the logic board to the rear case:
-
Two 2.3 mm Phillips screws
-
Two 2.7 mm standoff screws
-
One non-magnetic 2.7 mm standoff screw
-
-
Bu adım çevrilmemiş. Çevrilmesine yardım edin
-
Rotate the logic board assembly toward the battery side of the rear case.
-
The flash surround is adhered to the flash unit and the rear case. If it stays on the rear case remove with tweezers and mount it back on the flash unit.
-
Note: when reassembling your device, be sure that the lower interconnect cable is not tucked underneath the logic board.
-
-
Bu adım çevrilmemiş. Çevrilmesine yardım edin
-
Use the tip of a spudger to pry the Wi-Fi antenna cable connector up from its socket on the underside of the logic board.
-
-
Bu adım çevrilmemiş. Çevrilmesine yardım edin
-
Remove the logic board assembly from the rear case.
-
While your logic board is out of your phone, keep it on a grounded anti-static mat to prevent any damage to the circuitry.
-
-
Bu adım çevrilmemiş. Çevrilmesine yardım edin
-
Remove the following screws securing the Lightning connector and speaker enclosure assembly to the rear case:
-
One 2.5 mm Phillips screw
-
Two 3.3 mm Phillips screws
-
One 2.9 mm Phillips screw
-
Two 1.5 mm Phillips screws
-
One 2.8 mm Phillips screw
-
-
Bu adım çevrilmemiş. Çevrilmesine yardım edin
-
Use the flat end of a spudger to gently pry the Lightning connector and speaker enclosure assembly cables up from the rear case.
-
-
Bu adım çevrilmemiş. Çevrilmesine yardım edin
-
Remove the Lightning connector and speaker enclosure assembly from the rear case.
-
-
Bu adım çevrilmemiş. Çevrilmesine yardım edin
-
Remove the following screws securing the vibrator bracket and motor to the rear case:
-
One 2.3 mm Phillips screw
-
One 1.7 mm Phillips screw
-
One 1.6 mm Phillips screw in the top of the rear case
-
-
Bu adım çevrilmemiş. Çevrilmesine yardım edin
-
Remove the vibrator bracket and motor from the rear case.
-
-
Bu adım çevrilmemiş. Çevrilmesine yardım edin
-
Remove eight 1.3 mm Phillips screws securing the front panel clips to the interior sides of the rear case.
-
-
Bu adım çevrilmemiş. Çevrilmesine yardım edin
-
Remove the following screws from the metal power switch bracket between the rear facing flash and camera windows:
-
Single 2.9 mm standoff screw
-
Single 1.6 mm Phillips screw
-
Remove the metal power switch bracket.
-
-
Bu adım çevrilmemiş. Çevrilmesine yardım edin
-
Remove the single 1.9 mm Phillips screw securing the power button bracket to the inside top of the rear case.
-
Use the tip of a spudger to rotate the power button cover down on its hinge.
-
-
Bu adım çevrilmemiş. Çevrilmesine yardım edin
-
Remove the power button from behind its cover in the rear case.
-
-
Bu adım çevrilmemiş. Çevrilmesine yardım edin
-
Use the tip of a spudger to press the power button cover in and lift it off of its hinge in the rear case.
-
-
Bu adım çevrilmemiş. Çevrilmesine yardım edin
-
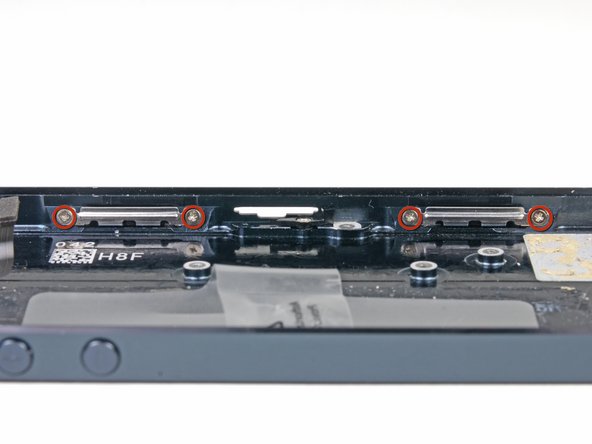
Remove the following screws securing the volume and silence buttons to the side of the rear case:
-
One 1.3 mm Phillips screw
-
Two 1.8 mm Phillips screws
-
-
Bu adım çevrilmemiş. Çevrilmesine yardım edin
-
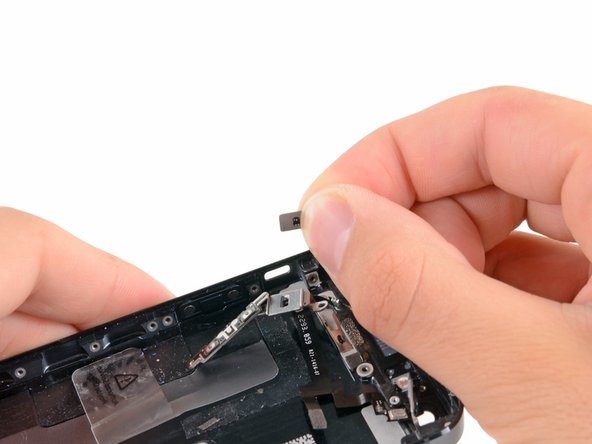
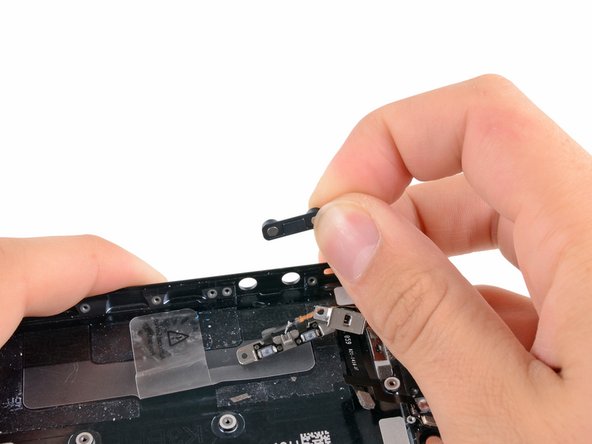
Pry the button cable away from the side of the rear case to expose the silence and volume buttons.
-
Remove the silence and volume buttons from the rear case.
-
-
Bu adım çevrilmemiş. Çevrilmesine yardım edin
-
Use the flat end of a spudger to pry the button cable up from the rear case.
-
Remove the button cable from the rear case.
-
-
Bu adım çevrilmemiş. Çevrilmesine yardım edin
-
Remove the single 2.0 mm Phillips screw securing the SIM card eject lever to the rear case.
-
Remove the SIM card eject lever.
-


İptal et: Bu kılavuzu tamamlamadım.
198 farklı kişi bu kılavuzu tamamladı.

8 Yorum
This guide does not describe removal of the wifi-antenna which seems to have taken place between step 32 and 34. For people new to electronics repair, such as myself, I feel this should be included in order to have a complete guide. I did a swap of the back casing yesterday myself, including the antenna and all went well (just a bit more nerve-wrecking removing parts not stated in the guide).
You're so right!
Replaced my rear case yesterday according to this guide, everything works :) just the power button pin was stuck on the old case and I had to make one from a paperclip, but still worked :)
All this is fine, but there is a padding to the mic, the lightning port, the audio jack and the speakers that is provided in the original casing but is not there in any of the replacement cases. Without it, there is a gap that is very much visible and susceptible to dust and water seepage. Is there any way to resolve this?