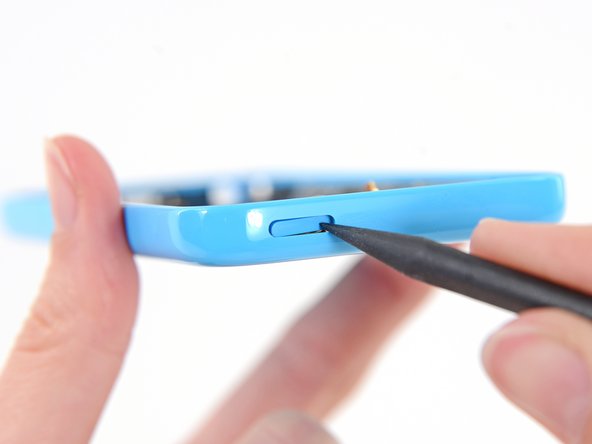
Ana içeriğe geç

iPhone 5c Power Button Replacement

Neye ihtiyacın var

  1. iPhone 5c Power Button Replacement, Taping the display glass: adım 1, 3 resimden 1. iPhone 5c Power Button Replacement, Taping the display glass: adım 1, 3 resimden 2. iPhone 5c Power Button Replacement, Taping the display glass: adım 1, 3 resimden 3.
    • If your display glass is cracked, keep further breakage contained and prevent bodily harm during your repair by taping the glass.

    • Lay overlapping strips of clear packing tape over the iPhone's display until the whole face is covered.

    • This will keep glass shards contained and provide structural integrity when prying and lifting the display.

    • Wear safety glasses to protect your eyes from any glass shaken free during the repair.

  2. iPhone 5c Power Button Replacement, Removing the Pentalobe screws: adım 2, 1 resimden 1.
    • Before you proceed, discharge your iPhone battery below 25%. A charged lithium-ion battery can catch fire and/or explode if accidentally punctured.

    • Power off your iPhone before beginning disassembly.

    • Remove the two 3.8 mm P2 Pentalobe screws on either side of the Lightning connector.

    to keep screws in order, buy some double sided tape and then affix the tape in small pieces to a sheet of paper. As you take the screws out, you can affix them to the tape (which is on the paper) and then write a description of what they are and where they go. quick, cheap and easy.

    V. Jones - Yanıt

    I found that these screws did not remove easily. After turning several times and feeling the threads drop back, indicating they were loose, the heads did not extend far enough to grip with my fingernails to pull out. I had to use the tweezers and then it took a bit more force than expected to remove them.

    Jim Thomas - Yanıt

    My iPhone 5c has P1 Pentalobe screws, not P2. This guide caused me to buy wrong tools so I thought I would share my experience. Perhaps they vary.

    Cody Craven - Yanıt

    @codycraven01 These guides are created using iFixit tools, and P2 is definitely the correct driver. If you’re using tools you bought somewhere else, then yes, results may vary.

    Jeff Suovanen -

  3. iPhone 5c Power Button Replacement, Starting the iSclack Opening Procedure: adım 3, 3 resimden 1. iPhone 5c Power Button Replacement, Starting the iSclack Opening Procedure: adım 3, 3 resimden 2. iPhone 5c Power Button Replacement, Starting the iSclack Opening Procedure: adım 3, 3 resimden 3.
    Bu adımda kullanılan alet:
    iSclack
    $24.99
    Satın Al
    • The next two steps demonstrate using the iSclack, a great tool for safely opening the iPhone 5c that we recommend for anyone doing more than one repair on an iPhone 5, 5s, or 5c. If you aren't using the iSclack, skip to Step 5.

    • Close the handle on the iSclack, opening the suction-cup jaws.

    • Place the bottom of your iPhone in between the suction cups, against the plastic depth gauge.

    • The top suction cup should rest just above the home button.

    • Open the handles to close the jaws of the iSclack. Center the suction cups and press them firmly onto the top and bottom of the iPhone.

    I just replaced my iPhone 5C battery today and only used the I fix it repair kit that came with the suction cup. Getting the glass screen out was not too difficult as I used a little bit of upward motion on the suction cup while at the same time prying gently with the flat end of the opening tool at the same time. If you have two people it makes it a little easier as someone can hold the phone. After getting the end open, I was able to go around the perimeter and gently pry up the edges with very little trouble.

    V. Jones - Yanıt

    Experienced immediate problem: there is s strap going from the home button to the screen, about 1-1/2 inch long. After removing 3-4 screws I saw no way to disconnect it from either end. My daughter came to help get the screws back (my 70 years have problems with very tiny screws). Slid a piece back and the strap came free of the home button ares. Screen could only open then 75-80 degrees. Tapr tore. Pried battery out. Replaced on original sticky tape. Restarted fine and about to recycle the charge. Thanks for the kit and all. But 6 demos and 3 inatructions never mentioned this strip! So careful opening it up, please!!

    Michael W Mason - Yanıt

    @mikamazn What you’re describing sounds like an iPhone 5s. This guide is for the 5c. Glad to hear things worked out for you.

    Jeff Suovanen -

  4. iPhone 5c Power Button Replacement, Finishing the iSclack Opening Procedure: adım 4, 2 resimden 1. iPhone 5c Power Button Replacement, Finishing the iSclack Opening Procedure: adım 4, 2 resimden 2.
    • Hold onto your iPhone securely and close the handle of the iSclack to separate the suction cups, pulling the front panel up from the rear case.

    • The iSclack is designed to safely open your iPhone just enough to separate the pieces, but not enough to damage any cables.

    • Peel the two suction cups off your iPhone.

    • Skip the next three steps and continue on to Step 8.

  5. iPhone 5c Power Button Replacement, Manual Opening Procedure: adım 5, 1 resimden 1.
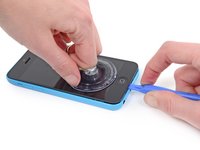
    • Press a suction cup onto the screen, just above the home button.

    • Be sure the cup is completely on the screen to get a tight seal.

    cool i diden't now

    Ben Lewis Murray Dyne - Yanıt

    very, very difficult to get a tight seal on tape. I removed the tape and still can't get a tight seal.

    bromanmoon - Yanıt

  6. iPhone 5c Power Button Replacement, Start lifting the front panel assembly: adım 6, 2 resimden 1. iPhone 5c Power Button Replacement, Start lifting the front panel assembly: adım 6, 2 resimden 2.
    • Make sure the suction cup is firmly attached to the front panel assembly.

    • While holding the iPhone down with one hand, pull up on the suction cup to slightly separate the front panel assembly from the rear case.

    • Take your time and apply firm, constant force. The display assembly is a much tighter fit than most devices.

    • With a plastic opening tool, begin to gently pry the rear case down, away from the display assembly, while you pull up with the suction cup.

    • There are several clips attaching the front panel assembly to the rear case, so you may need to use a combination of the suction cup and plastic opening tool to free the front panel assembly.

    Cover a badly cracked screen with a strip of packing tape first to get a better seal for your suction cup. If it's a super crappy suction cup, moistening it a bit will help as well.

    Dan - Yanıt

    Great Idea! I have been doing this for awhile and have never thought to share!

    duston -

    The pry point in this photo is spot on. Just be gentle and maybe come in at a little steeper angle.

    V. Jones - Yanıt

    This part ended up being really easy for me. I applied the suction cup just as the picture shows and pulled slowly almost straight up; the screen came off very easily and I didn’t even need to use a plastic prying tool. Not sure why it worked so well but I’m glad!

    Renee - Yanıt

    I did it with a guitar pick and no suction cup.

    andrew - Yanıt

    Be sure not to use metal pry tools as they may crack the plastic.

    guardian10 - Yanıt

  7. iPhone 5c Power Button Replacement: adım 7, 1 resimden 1.
    • Pull the plastic nub to release the vacuum seal on the suction cup.

    • Remove the suction cup from the display assembly.

  8. iPhone 5c Power Button Replacement, Opening up the phone: adım 8, 2 resimden 1. iPhone 5c Power Button Replacement, Opening up the phone: adım 8, 2 resimden 2.
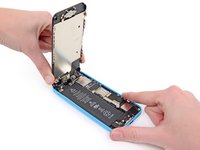
    • Lift the home button end of the front panel up to gain access to the connectors near the top of the phone.

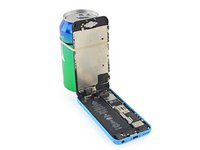
    • Open the display to about a 90º angle, and lean it against something to keep it propped up while you're working on the phone.

    • In a pinch, you can use an unopened canned beverage to hold the display.

    • Add a rubber band to keep the display securely in place while you work. This prevents undue strain on the display cables.

    Using a can works really well!

    Amy Dachs - Yanıt

    I use an old iPhone box to support the open phone. Set the box up on its end, and rubber band the screen side to the box. It works perfectly!

    Travis Henrick - Yanıt

    What do I do if it’s a little sticky and dirty inside?

    sunnydsunset2014 - Yanıt

  9. iPhone 5c Power Button Replacement: adım 9, 1 resimden 1.
    • Remove the two 1.6 mm Phillips #000 screws securing the metal battery connector bracket to the logic board.

    These screws are very tiny and hard to manipulate. The screwdriver is magnetic; which is great to take them out, but makes it hard to put the screws back in, as the screwdriver pulls them from the hole. I solved this problem by using the pointed end of the spudger to put a tiny drop of Elmer's glue in the hole and then insert the screw. You can do this before putting the bracket in place if you want. Then the screw wont pull out by the magnetic driver and make lining up and fastening the screws much easier; at least for me!

    Joe Shirghio - Yanıt

    I found that you don't need to disconnect the battery... why bother doing more fiddling with annoyingly tiny screws and obstinate cable connectors when you don't actually have to? Especially when you could only end up causing more damage. As a matter of fact, the original iFixit video didn't bother to disconnect the battery either, but they've since updated the video to include battery disconnection, I guess as a "belt and braces" approach in case the repair-hero forgets to power down the phone first?

    Michael Allen - Yanıt

    Disconnecting the battery is a safety precaution, and yes it's worth doing. Even with the phone powered off, there is some danger of blowing the backlight filter fuse if you disconnect the display while the battery is connected. At that point you're no longer looking at a simple DIY repair. Even though it's possible to skip this step and still come out okay, my advice is not to risk it.

    Jeff Suovanen -

    It’s a relatively junky phone, so if it breaks, what the heck. I’m not going to disconnect the battery.

    Zachariah Sampson - Yanıt

  10. iPhone 5c Power Button Replacement: adım 10, 1 resimden 1.
    • Remove the metal battery connector bracket from the iPhone.

  11. iPhone 5c Power Button Replacement, Disconnecting the battery connector: adım 11, 1 resimden 1.
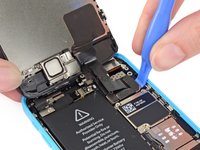
    • Use a spudger or a clean fingernail to gently pry the battery connector up from its socket on the logic board.

    • Be very careful to only pry up on the battery connector itself and not the socket on the logic board. If you pry up on the logic board socket or the board itself, you may destroy the socket or damage nearby components on the board.

    Instead of using a spudger, you can use your fingernails too. This is quicker and enables you to feel if you're not accidentally putting on too much pressure or lifting the connector instead of the cable.

    Jona Wolff - Yanıt

    Accidentally pulling out the logic board socket is no idle warning - exactly what I did without much effort. I think this shouldn’t be described as ‘prying’ up because it implies needing to use force - but these things actually pop off quite easily with a nudge, which you discover at later steps.

    Peter Hill - Yanıt

  12. iPhone 5c Power Button Replacement: adım 12, 1 resimden 1.
    • Remove the following Phillips #000 screws securing the front panel assembly cable bracket to the logic board:

    • Two 1.3 mm screws

    • One 1.7 mm screw

    • One 3.25 mm screw

    • It is especially important to keep track of your screws in this step for reassembly. Accidentally using the 3.25 mm screw or the 1.7 mm screw in the bottom right hole will result in significant damage to the logic board causing the phone to no longer boot properly.

    • Be careful not to over-tighten the screws. If they don't fit easily when you are securing them, they may be the wrong size—don't force them.

    I didn't need to remove the front panel to replace the lightning connector. Just prop it up like in Step 8, then skip steps 12-16.

    jacobstevens - Yanıt

    I always put my screws in a magnet tray and place the screws in the exact position they were taken out. The magnet tray holds the screws tight in the position I put them in. No chasing on the floor looking for small screws that you brushed off the table.

    Fredrick Apel - Yanıt

    I always take a picture of the phone, print it out, then use scotch tape to tape the screws onto the picture in the location where they go. You don't lose the screws and you always know where they go for re-assembly

    K Jansen - Yanıt

    good tip! but instead of taking & printing a picture of your own phone, you probably could just print the color coded pic from this step (assuming everything on your phone is exactly the same).

    travismlive -

    When reassembling, the screw holder that the screws screw into came off the board. Is there a way to superglue that back in?

    Chandler Perez - Yanıt

    no, do not use super-glue. Quite some of these ‘screw-holders’ are screws themselves with e hollow tread in the head (didn’t find the correct naming for it) - just like the things you screw into a PC case and fasten the mainboard on.

    akronymus -

    did NOT remove the front entirely. its not necessary to do this to remove the battery. these are only precautionary steps in case your clumsy or you feel you might not be able to manage it without. as always, be cautious.

    matt - Yanıt

    Agree. Step 12 is unnecessary if one is extremely careful.

    Christopher -

    *warning* … this connector assembly is very messy to re-build. Next time I change such a battery, I’ll try to get it out carefully *without* detaching the display unit. My resumée: *never* unscrew more things than necessary. These things are not M five (5 mm bolt diameter) like on a bike, these are M zero-point-five. Even for a smirf, this is tiny stuff.

    akronymus - Yanıt

    is it necessary to remove these screws in order to remove the battery?

    Ali Ahsan - Yanıt

    Hi Ali,

    You can choose to not remove those screws and still be able to take the battery out. Be very careful supporting the display, or you may tear the display cables and damage your screen.

    Arthur Shi -

  13. iPhone 5c Power Button Replacement: adım 13, 1 resimden 1.
    • Remove the front panel assembly cable bracket from the logic board.

  14. iPhone 5c Power Button Replacement, Disconnecting the front panel assembly cables: adım 14, 2 resimden 1. iPhone 5c Power Button Replacement, Disconnecting the front panel assembly cables: adım 14, 2 resimden 2.
    • Use a plastic opening tool or a fingernail to disconnect the front-facing camera and sensor cable connector.

    • Be sure to only pry up on the connector, and not on the socket on the logic board.

    You might get a more “modernised” part from eBay (for this very model, iPhone 5c) which has an ENTIRE CABLE missing… if you look closely, it’s been re-directed into the middle cable. And it all works perfectly, touch screen, and display. So it’s a optimisation.

    In summary - if you get this version of the screen, you only need to deal with 2 cables, not 3. The rightmost socket will remain empty.

    domarius - Yanıt

  15. iPhone 5c Power Button Replacement: adım 15, 3 resimden 1. iPhone 5c Power Button Replacement: adım 15, 3 resimden 2. iPhone 5c Power Button Replacement: adım 15, 3 resimden 3.
    • Make sure the battery is disconnected before you disconnect or reconnect the cables in this step.

    • Use a plastic opening tool or a fingernail to disconnect the LCD cable connector.

    • The LCD and Digitizer connectors are on the same cable assembly, so prying the LCD connector up should disconnect both connectors. Double check that the two cables are fully disconnected before removing the display.

    • When reassembling your phone, the LCD cable may pop off its connector. A blank screen, or white lines on the display could be caused by a loose connection. Should this happen, reconnect the cable and power cycle your phone. The best way to power cycle your phone is to disconnect and reconnect the battery.

    I replaced the broken front panel of the iPhone 5c and got the "famous white stripes" on the new screen. Reading about all kind of problems that the lcd/digitizer cable contacts may cause, I compared the cable connectors of the original Apple and the replacement part I bought online with a 35x magnifying glass. The quality difference was visible: The white description on the original part on the cable next to the connector is: 821-1784-A, while the inferior replacement part is: 821-1784-02. Check out the two numbers online and insist getting the "A" to avoid future troubles !!!

    Harold Wallner - Yanıt

    This person above is not knowledgeable. That number is a camera proxy part number, not the lcd or digitizer number. It changes with production date, both for original and aftermarket ones. A, B, D, 02, 04, 08 etc. Can all be either or.

    vince -

    Apple uses numerical revisions (-02) for pre-production parts, and alpha revisions (-A) for production revisions. It looks like you got a preproduction assembly, or a knock-off.

    terrymccallum -

    There are, in fact, three connectors in this step, not two. The front-facing camera and digitizer connector (Step 11) is really difficult to align when you put it back. Took me about 15 minutes before I succeeded.

    Now I have a different problem. Everything works just dandy, EXCEPT:

    Towards the bottom of the screen (in portrait) there is a horizontal line that is dead to the touch. For example, on the keyboard, I can use the spacebar, but not C V B N M, etcetera.

    Three possibilities in my mind: One, when I dropped it, something else besides the glass and digitizer, etc, was damaged.

    Two: I did not replace the cables correctly. This seems unlikely. They all "clicked" into place and stayed there.

    Three: The digitizer supplied is faulty.

    Comments? Which cable/connector could be causing this -- if it is that?

    piet - Yanıt

    Take apart, Clean Connections, Put back together.... If same problem sounds like a fault part...

    duston -

    When reassembling the iPhone 5c, I used the flat end of the spudger to press on the connectors and maintain them while replacing the front panel on the body of the iPhone.

    The third and "deepest" connector no longer slips out of its socket, which it did before holding the whole lot with the spudger.

    jimbbo - Yanıt

    If the ESD plate covering the connectors is properly re-attached to the phone, you should not have to do this. The cover holds all the connectors in place just fine.

    iBroke -

    I replaced the display assembly to resolve an issue with the phone not responding to any touch input. I assumed it was a bad digitizer. However, I have the same problem with the new display assembly—no touch response at all. The phone starts up fine and the screen works, I just can’t “slide to unlock”. This is also preventing me from downloading photos from the phone since I can’t enter the passcode. I have cleaned the connections and reseated the cables. Is it possible this is a problem on the logic board? If so, is there any way to get the photos off the phone since I can’t enter the passcode on the screen?

    ewistey - Yanıt

  16. iPhone 5c Power Button Replacement, Separating front panel assembly and rear case: adım 16, 1 resimden 1.
    • Remove the front panel assembly from the rear case.

    Very clear and percise.

    Jessica Fader - Yanıt

  17. iPhone 5c Power Button Replacement, Rear-Facing Camera: adım 17, 1 resimden 1.
    • Remove the two 1.5 mm Phillips #000 screws securing the rear-facing camera to the rear case.

  18. iPhone 5c Power Button Replacement: adım 18, 1 resimden 1.
    • Remove the rear-facing camera bracket from the iPhone.

  19. iPhone 5c Power Button Replacement: adım 19, 1 resimden 1.
    • Use the flat edge of a spudger to pry the rear-camera connector up off the logic board.

  20. iPhone 5c Power Button Replacement: adım 20, 1 resimden 1.
    • Remove the rear-facing camera from the iPhone.

  21. iPhone 5c Power Button Replacement, Power Button: adım 21, 1 resimden 1.
    Bu adımda kullanılan alet:
    Standoff Screwdriver for iPhones
    $5.49
    Satın Al
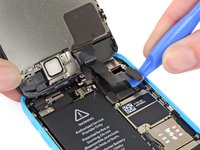
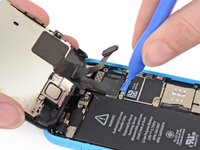
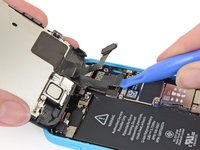
    • Remove the following screws securing the upper assembly contact bracket to the rear case:

    • 3.0 mm standoff screw

    • Standoff screws are best removed with a standoff screwdriver or standoff driver bit. A small flathead screwdriver can also do the job—but use extra caution to ensure it doesn't slip and damage surrounding components.

    • 1.5 mm Phillips #000 screw

  22. iPhone 5c Power Button Replacement: adım 22, 3 resimden 1. iPhone 5c Power Button Replacement: adım 22, 3 resimden 2. iPhone 5c Power Button Replacement: adım 22, 3 resimden 3.
    • Remove the upper assembly contact bracket from the rear case.

    • A small rubber bumper may fall off the top of the bracket—take care not to lose it.

  23. iPhone 5c Power Button Replacement: adım 23, 1 resimden 1.
    • Remove the small foam tape from inside the rear camera's cavity.

  24. iPhone 5c Power Button Replacement: adım 24, 1 resimden 1.
    • Remove the two 1.4 mm Phillips #000 screws securing the power/sleep button bracket.

  25. iPhone 5c Power Button Replacement: adım 25, 3 resimden 1. iPhone 5c Power Button Replacement: adım 25, 3 resimden 2. iPhone 5c Power Button Replacement: adım 25, 3 resimden 3.
    • Use the pointed end of a spudger to gently fold the power/sleep button bracket down from the top of the rear case.

    • Use tweezers to grab and remove the button.

    • For reassembly, note the orientation—the metal bar should be flush with the bottom of the button. Check if your home button has the metal hinge, if not you will need to transfer it from your current home button.

    • If you can't get a hold on the power button from inside the case, use a spudger to slightly push it in from the outside.

Sonuç

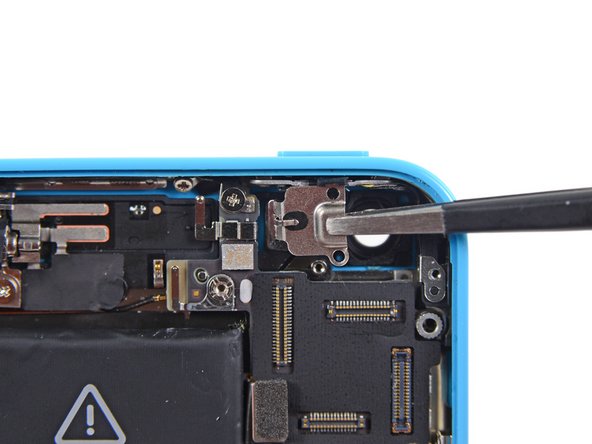
To reassemble your device, follow these instructions in reverse order.

44 farklı kişi bu kılavuzu tamamladı.

Andrew Optimus Goldheart

Üyelik tarihi: 10/17/09

502.275 İtibar

407 adet Kılavuz yazıldı

Ekip

iFixit iFixit üyesi

Staff

136 Üyeler

16.560 adet Kılavuz yazıldı

8 Yorum

So whats next,if you removed it and reintalled it and still dont work. What next??

ZULEYMA - Yanıt

This should not be rated "difficult" because it's extremely easy.

THIS is difficult.: iPhone 5c Audio Control and Power Button Cable Replacement

applerepairshop - Yanıt

Yes, this one is relatively easy.

Anything involving a heat gun is "Difficult ".

Anything involving mandatory spare parts and a heat gun is "Very Difficult ".

:-)

Boyd Waters -

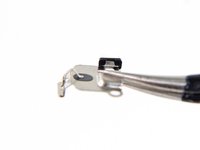
There is a cable connected to be power button on my iPhone c and all the videos don't show how to remove it HELP PLEASE

Perry Harrison - Yanıt

You can find the guide for removing/replacing the cable for the power button right here. That cable also contains the flash, microphone, and volume controls.

Jeff Suovanen -

I have watched all the videos on YouTube on how to take the iPhone 5c apart butt there is a cable connected to power button that the videos do not show me how do you remove so I can open the phone fully

Perry Harrison - Yanıt

My screen was flashing on and off, and then "slide to power off". If I turned the phone off, it powered itself back on. Apple store wanted $260 something. I found the little ribbon wire that runs along side the camera from (the right screw step 24 pic) the power button to, I assume ground. I found some oxidation on the contacts (both ends) and cleaned it with CaiLube MCL and put it back together. You could use alcohol too but I wouldn't waste it on that. Problem solved. Thanks iFixit!

mike - Yanıt

Hi fixit,

Your instructions on repairing and replacing parts on I phones,

Cannot be bettered and worth every penny supporting I give

You 5 stars,

Yours faithfully,

Martin jacques

Martin Jacques - Yanıt

Yorum Ekle

İstatistikleri Görüntüle:

Son 24 Saat: 1

Son 7 gün: 4

Son 30 gün: 22

Her zaman: 43,275